Feb 21, 2026

What if the problem is not your semaglutide dose, but how you are handling the syringe?
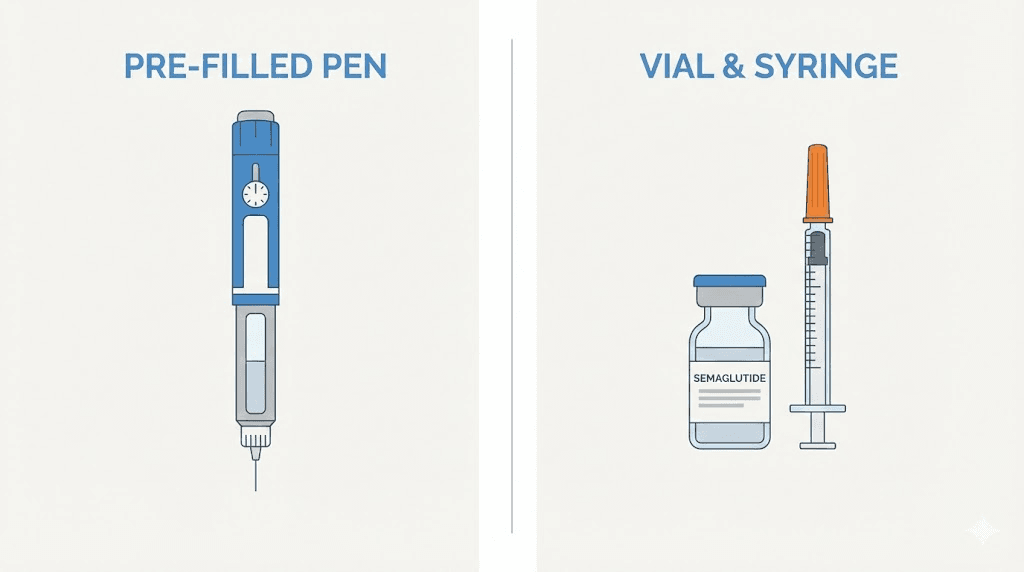
Thousands of people switch from pre-filled pens to compounded semaglutide every month. The medication arrives in a vial. The pharmacy sends an insulin syringe. And then comes the moment of truth, standing in the kitchen or bathroom, staring at a tiny vial and a syringe with markings that make no sense, wondering if you are about to do this completely wrong.
You are not alone in that feeling.
Drawing medication from a vial requires a completely different skill set than clicking a pen. The angle matters. The air bubble technique matters. The dose measurement in units matters more than most people realize, because a miscalculation at 5 mg/mL delivers a wildly different dose than the same unit count at 2.5 mg/mL. Getting this wrong does not just waste medication. It can mean weeks of inadequate dosing or, worse, an accidental overdose that leaves you nauseated and miserable for days. This guide walks you through every single step, from choosing the right syringe to disposing of the needle safely, with the kind of specific detail that generic instruction sheets leave out. Whether this is your first injection or your fiftieth, the techniques here will help you inject with confidence, minimize pain, and get the most out of every vial. SeekPeptides members often report that mastering proper syringe technique was the turning point in their protocols, transforming a stressful weekly chore into a quick, painless routine.
Why syringe injections are completely different from pen injections
If you have ever used an Ozempic or Wegovy pen, you know the process is almost foolproof. Dial the dose. Press the button. Done. The pen handles the measurement, the needle attachment, and the injection depth automatically. It is designed so that mistakes are nearly impossible.
Syringe injections from a vial are nothing like that.
With compounded semaglutide, you are responsible for every variable. You choose the needle. You calculate the dose. You draw the medication. You control the angle, the depth, and the speed of injection. This sounds intimidating, and for the first few times it genuinely is. But once you understand the mechanics, syringe injections become second nature. Many experienced users actually prefer them because of the precise control they offer over semaglutide dosage conversions and the ability to make micro-adjustments that pens do not allow.
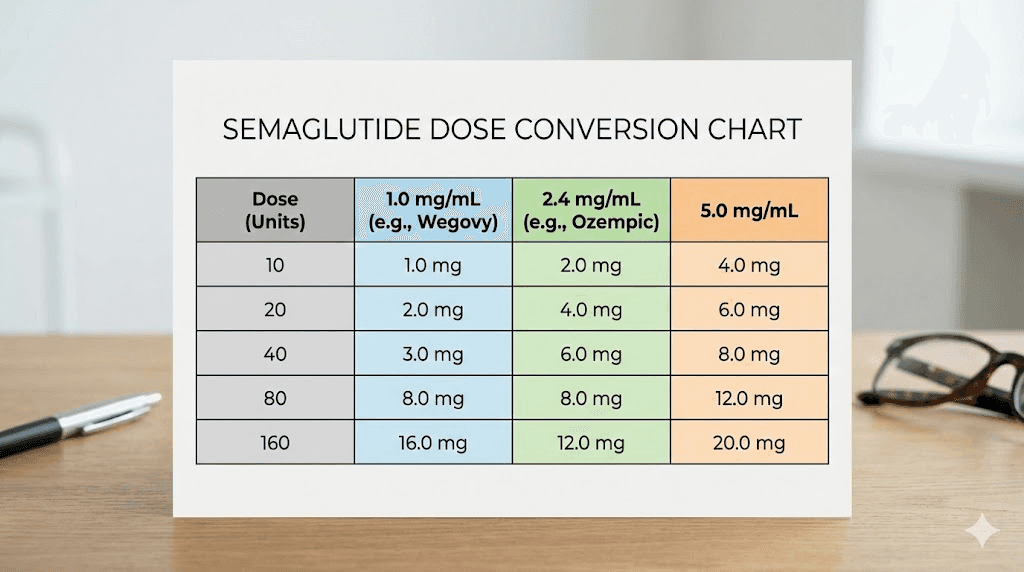
The biggest difference comes down to measurement. Pre-filled pens display doses in milligrams. Insulin syringes display volume in units. These are not the same thing. One unit on an insulin syringe equals 0.01 mL of liquid, not 1 mg of semaglutide. The actual milligram dose depends entirely on the concentration of your specific vial. A vial labeled 5 mg/mL contains five times more semaglutide per unit than a vial labeled 1 mg/mL. This distinction trips up more people than any other aspect of syringe injections, and getting it wrong can have real consequences.
There is also the matter of preparation. Pens come ready to use. Vials may require reconstitution if the semaglutide arrives as a lyophilized powder. Even pre-mixed compounded vials need proper handling, including the air injection technique that prevents vacuum resistance when drawing medication. None of this is difficult once you learn it. But nobody is born knowing how to handle a syringe, and the instruction sheets that come with compounded medications are often frustratingly vague.
Another key difference is needle selection. Pens use proprietary pen needles that attach with a twist. Syringes either come with fixed needles or accept standard detachable needles. The gauge, length, and syringe capacity all affect your injection experience. Choosing wrong means more pain, more bruising, or difficulty drawing the medication at all. We will cover exactly how to select the right equipment in the next section.
Everything you need before your first syringe injection
Preparation prevents problems. Before you touch that vial, gather everything you need so the process flows smoothly from start to finish. Scrambling for supplies mid-injection leads to contamination risks and dosing errors.
Choosing the right insulin syringe
Not all syringes work equally well for semaglutide. The standard choice is a U-100 insulin syringe, which measures 100 units per milliliter. These come in three common sizes.
The 0.3 mL syringe holds up to 30 units. This is ideal for low doses during the initial dose escalation phase, when you might be drawing just 5 or 10 units. The markings are spaced further apart, making it easier to measure small amounts precisely. If your weekly dose is 0.25 mg or 0.5 mg at a 5 mg/mL concentration, this is probably the best option.
The 0.5 mL syringe holds up to 50 units. This covers most maintenance doses and offers a good balance between precision and capacity. It works well for doses in the 2.4 mg range at higher concentrations, where 40 units translates to specific milligram amounts depending on your vial.
The 1.0 mL syringe holds up to 100 units. You will rarely need this for semaglutide unless your concentration is very low (1 mg/mL or 2 mg/mL) and your dose is high. At some concentrations, 100 units represents a very large dose, while at others it is perfectly reasonable. The markings are closer together on a full-size syringe, which makes precise measurement harder for small doses. Understanding how units translate to milliliters helps you choose the right syringe size for your specific protocol.
Choose the smallest syringe that can hold your dose. Smaller syringes have more space between unit markings, which means more accurate measurements and fewer dosing errors.
Needle gauge and length explained
Needle gauge refers to the thickness of the needle. Higher gauge numbers mean thinner needles. For subcutaneous semaglutide injections, you want a gauge between 29G and 31G. Here is how they compare.
A 29-gauge needle is the thickest option in this range. It draws medication from the vial quickly and handles slightly viscous formulations without difficulty. Some people find the insertion barely noticeable, while others prefer something thinner.
A 30-gauge needle splits the difference. It is the most commonly recommended gauge for subcutaneous semaglutide injections because it balances comfort with practical usability. Drawing medication takes slightly longer than with a 29G, but insertion is smoother.
A 31-gauge needle is the thinnest practical option. Insertion is virtually painless for most people. However, drawing medication takes noticeably longer, and you need to be more patient when removing air bubbles. This gauge works best for people who are needle-sensitive or who have mastered the drawing technique.
For needle length, 8 mm to 12.7 mm (1/2 inch) is standard for syringe-based subcutaneous injections. Shorter needles (4-6 mm) are designed for pen needles and may not reach subcutaneous tissue reliably when used with a syringe, especially in areas with thicker skin. A half-inch (12.7 mm) needle at a 45-degree angle delivers medication to the correct subcutaneous layer for most body types.
Additional supplies you will need
Beyond the syringe and needle, you need alcohol swabs for cleaning both the vial top and injection site. You need a sharps disposal container, which is a puncture-resistant container specifically designed for used needles. Regular trash cans are not acceptable and are actually illegal for needle disposal in many areas. You also need a clean, flat surface to work on and good lighting so you can read the syringe markings clearly.
If your semaglutide requires reconstitution, you will also need bacteriostatic water. The amount depends on your target concentration. Our peptide reconstitution calculator makes this calculation simple, and you can find specific guidance in our articles on mixing 5 mg vials and mixing 10 mg vials.
Understanding your semaglutide dose: units, milligrams, and milliliters
This is where most mistakes happen. And these mistakes are not trivial.
An insulin syringe measures volume in units. One hundred units equals one milliliter. But semaglutide is prescribed in milligrams. The bridge between these two measurements is your vial concentration, and if you get this wrong, everything else falls apart.
The conversion formula every syringe user needs
The formula is straightforward. Take your prescribed dose in milligrams. Divide it by the concentration printed on your vial label in milligrams per milliliter. Multiply the result by 100. That gives you the number of units to draw on your insulin syringe.
Units = (dose in mg / concentration in mg per mL) x 100
For example, if your prescribed dose is 0.5 mg and your vial concentration is 5 mg/mL, the calculation looks like this: 0.5 divided by 5 equals 0.1, multiplied by 100 equals 10 units. You draw 10 units on your syringe. Our semaglutide dosage calculator can verify these calculations instantly, which is especially helpful when you are first learning the conversion process. For those who prefer visual references, the compounded semaglutide dose chart and common dosing chart formats display these conversions in table form that you can print and keep next to your injection supplies.
Simple enough. But watch what happens when the concentration changes.
That same 0.5 mg dose at 2.5 mg/mL requires 20 units. At 1 mg/mL, it requires 50 units. At 10 mg/mL, it requires just 5 units. The difference between 5 units and 50 units of the same dose is enormous, and mixing up concentrations is one of the most common and dangerous mistakes in syringe-based dosing. You can explore this in depth in our semaglutide units to mg conversion guide. For those who prefer quick reference over formulas, the 10-unit conversion reference and 1.7 mg unit calculation provide instant answers for the most commonly searched dose conversions.
Dose charts by concentration
Here are the most common compounded semaglutide concentrations and their corresponding unit measurements for standard doses.
At 5 mg/mL concentration:
0.25 mg = 5 units
0.5 mg = 10 units
1.0 mg = 20 units
1.7 mg = 34 units
2.4 mg = 48 units
At 2.5 mg/mL concentration:
0.25 mg = 10 units
0.5 mg = 20 units
1.0 mg = 40 units
1.7 mg = 68 units
2.4 mg = 96 units
At 10 mg/mL concentration:
0.25 mg = 2.5 units
0.5 mg = 5 units
1.0 mg = 10 units
1.7 mg = 17 units
2.4 mg = 24 units
You can find comprehensive charts for every concentration in our 5 mg vial dosage chart, our dosing chart reference, and our detailed breakdown of what 20 units actually means in milligrams. For those on B12 combination formulas, the semaglutide B12 dosage chart accounts for the different concentrations these formulations typically use.
Why getting the concentration wrong is dangerous
Consider this scenario. A researcher switches pharmacies. The old pharmacy supplied semaglutide at 2.5 mg/mL. The new pharmacy supplies it at 5 mg/mL. The researcher draws the same number of units as before without checking the new label. They have just doubled their dose.
At low doses, this might mean some extra nausea. At higher maintenance doses, accidentally doubling from 2.4 mg to 4.8 mg could trigger severe gastrointestinal side effects, intense fatigue, and potentially dangerous drops in blood sugar. This is not hypothetical. It happens regularly with compounded formulations because there is no standardized concentration across pharmacies.
Every time you receive a new vial, read the concentration label. Every time. Even if you have been using the same pharmacy for months. Concentrations can change between batches, and a moment of verification prevents a week of misery. For a thorough understanding of this issue, check whether your current unit dose is appropriate for your specific concentration.
If you are unsure about your dose at any point, use the peptide calculator to verify before drawing medication. The few seconds it takes to double-check are always worth it.
Understanding the semaglutide dose escalation schedule
Knowing how to inject is only half the equation. Knowing how much to inject, and when to increase, determines whether you get results without unnecessary side effects.
Standard semaglutide dose escalation follows a gradual pattern designed to let your body adjust. Most protocols start at 0.25 mg per week for four weeks, then increase to 0.5 mg for another four weeks. From there, increases move to 1.0 mg, 1.7 mg, and eventually 2.4 mg, each step lasting at least four weeks. This slow ramp matters because jumping straight to a high dose almost always triggers severe nausea, vomiting, and gastrointestinal distress that makes people quit before the medication has a chance to work.
For syringe users, each dose increase means a different number of units. At a 5 mg/mL concentration, the escalation looks like this: 5 units for the first month, 10 units for the second month, 20 units for the third, 34 units for the fourth, and 48 units for maintenance. These unit numbers change completely at different concentrations. At 2.5 mg/mL, the same escalation requires 10 units, 20 units, 40 units, 68 units, and 96 units respectively. Keep a written reference card next to your injection supplies with your specific concentration and the corresponding unit measurements for each dose tier.
Some providers prescribe microdosing approaches that start even lower, at 0.125 mg or 0.1 mg, before following the standard escalation. This ultra-low starting strategy is particularly useful for people who are sensitive to medications or who have experienced significant side effects with GLP-1 drugs in the past. The precision of syringe injections actually makes microdosing easier than pen injections, because you can measure fractions of units that pens cannot deliver. Whether you are using a standard or microdosing approach, the compounded dosage calculators help verify that your unit measurements match your intended milligram dose at every escalation step.
When you increase your dose, pay close attention to side effects during the first week at the new level. Some increased fatigue and mild nausea are expected and usually resolve within a few days. If side effects are severe or persistent, you may need to stay at the current dose for an additional two to four weeks before attempting the increase again. Your provider can help you determine the right pace for your individual response. The total duration of semaglutide treatment varies widely, and reaching your maintenance dose is less important than finding the dose that balances effectiveness with tolerability. If side effects persist despite slow escalation, some researchers explore whether alternative weight loss medications might complement or replace their current protocol.
For those who have been on tirzepatide and are transitioning to semaglutide, the dose conversion is not straightforward because the medications have different potencies and mechanisms. Our switching guide and conversion chart provide the specific dosing crosswalk you need to avoid starting too high or too low. The reverse transition, from semaglutide to tirzepatide, follows a different conversion formula covered in the semaglutide to tirzepatide switching guide. Understanding tirzepatide dosing in units before making any switch helps prevent the concentration miscalculation errors that are common during transitions between medications.
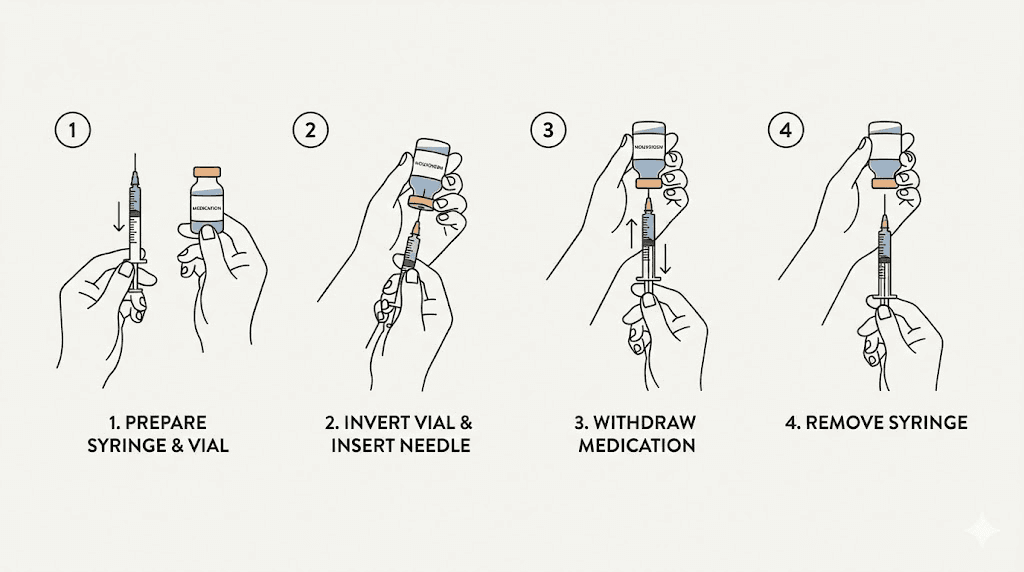
How to draw semaglutide from a vial: the complete process
This is the skill that separates confident injectors from anxious ones. Drawing medication from a vial has seven distinct steps, and each one matters. Skip a step and you risk inaccurate dosing, contamination, or wasted medication. Follow them all and the process takes less than two minutes.
Step 1: prepare your workspace and wash your hands
Start with clean hands. Wash with soap and warm water for at least 20 seconds, getting between the fingers and under the nails. Dry with a clean towel or let them air dry. Do not use hand sanitizer as a substitute because certain formulations can leave residue that interferes with the injection.
Clear a flat surface with good lighting. You need to be able to see the syringe markings clearly, especially if your dose falls between printed lines. Overhead lighting works best because it eliminates shadows on the syringe barrel.
Step 2: clean the vial top
Remove the plastic flip cap from your semaglutide vial if it is a new vial. If you have used the vial before, the rubber stopper should already be exposed. Take an alcohol swab and wipe the rubber stopper in one direction. Do not scrub back and forth. Let it air dry for about 10 seconds. This step prevents bacteria from entering the vial on the needle tip.
Proper vial handling is essential for maintaining medication potency. Learn more about how long semaglutide remains effective and the refrigeration requirements that keep your medication stable between uses. If you are working with a lyophilized (freeze-dried) vial that requires mixing, the 10 mg mixing chart provides exact water-to-powder ratios for achieving your target concentration.
Step 3: draw air into the syringe
This step confuses beginners, but it serves an important purpose. Pull back the plunger to draw air into the syringe equal to the volume of medication you plan to withdraw. If you need 10 units of semaglutide, pull the plunger back to the 10-unit mark.
Why air? Because the vial is sealed. When you remove liquid, you create a vacuum inside the vial that makes it progressively harder to draw medication. Injecting an equal volume of air first equalizes the pressure, allowing medication to flow smoothly into the syringe. Without this step, you will fight the plunger the entire time, and the resistance makes precise measurement nearly impossible.
Step 4: inject air into the vial
Hold the vial upright on a flat surface. Insert the needle through the center of the rubber stopper. Push the plunger down completely to inject all the air into the vial. Keep the needle in the vial.
Important: push the needle through the rubber stopper at the center, not near the edge. Repeated punctures near the edge can cause the rubber to core, meaning tiny pieces of rubber break off and fall into the medication. Centering your punctures prevents this.
Step 5: invert the vial and draw the medication
With the needle still in the vial, flip the vial upside down so the stopper faces the ground. The needle tip should be submerged in the liquid. Now slowly pull the plunger back to your target dose. Pull slightly past your dose mark, then push back to the exact line. This back-and-forth helps establish accurate measurement.
Keep the needle tip below the liquid level at all times. If the tip rises above the liquid, you will draw air instead of medication. In a small vial with limited volume remaining, you may need to tilt the vial slightly to keep the needle submerged as the liquid level drops.
Step 6: remove air bubbles
With the vial still inverted and the needle still inside, look at the syringe barrel. Small air bubbles often appear. Tap the barrel firmly with your fingernail or flick it with your finger. The bubbles will float up toward the needle. Push the plunger gently to push the air back into the vial. Then pull the plunger back to your dose line again.
Repeat this tap-and-push process until no visible air bubbles remain. Small bubbles are not dangerous for subcutaneous injections since the air gets absorbed harmlessly by surrounding tissue. But they do affect dose accuracy. An air bubble occupying 2 units of space means you are getting 2 fewer units of medication than you intended.
Step 7: remove the needle and verify your dose
Pull the needle straight out of the vial. Hold the syringe at eye level with the needle pointing up. Verify that the plunger edge sits exactly at your target dose line. The bottom of the plunger seal (the flat rubber edge closest to the needle) is your measurement reference point.
If you have too much medication, push the plunger gently until you reach the correct line. If you have too little, you can reinsert the needle into the vial and draw more. Once verified, cap the needle or proceed immediately to injection. Do not set down an uncapped needle.
For detailed mixing ratios and volume calculations, the semaglutide mixing chart provides concentration-specific reference tables that pair perfectly with this drawing technique. If you are working with the common 5 mg vial format, our 5 mg reconstitution guide walks through the entire preparation process that precedes these drawing steps. The reconstitution calculator handles the math for any vial size and target concentration combination.
Choosing and preparing your injection site
Where you inject matters less than most people think. How you prepare the site and rotate locations matters more than most people realize.
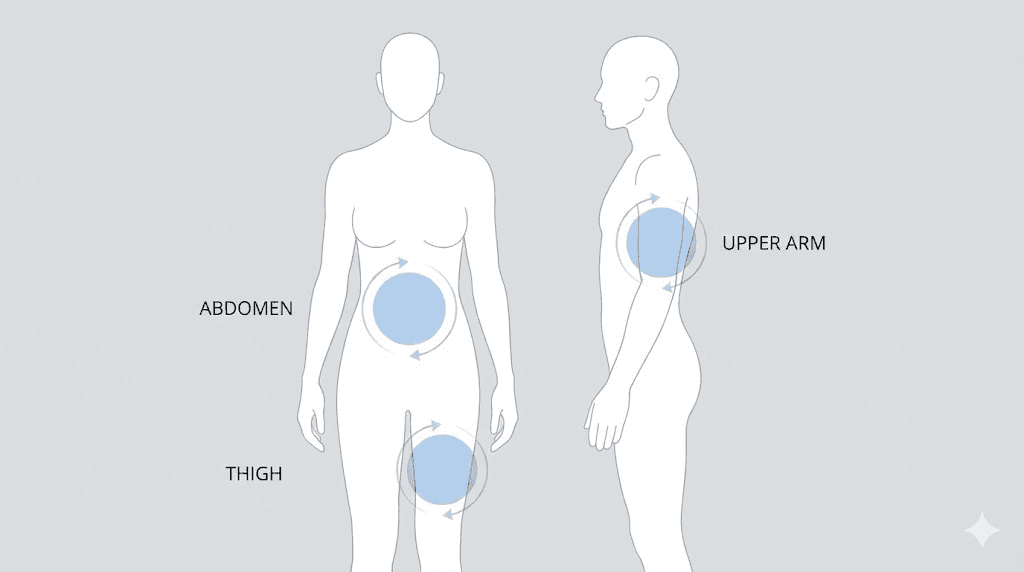
The three approved injection sites
Semaglutide can be injected into three areas of the body. Each has advantages and considerations, and our comprehensive guide to the best injection site for semaglutide covers each option in detail.
The abdomen is the most popular choice. Inject at least two inches away from the belly button, anywhere on the lower abdomen where you can pinch a fold of skin. The abdomen typically has the most subcutaneous fat, which means easier injections and consistent absorption. Most research on subcutaneous medication absorption shows slightly faster uptake from abdominal tissue compared to other sites, which may contribute to faster appetite suppression onset. Many users find the abdomen to be the least painful area because of the generous fat layer, though this varies by individual body composition.
The front of the thigh is the second most common option. Inject into the upper outer area, roughly halfway between the hip and the knee. Avoid the inner thigh, which tends to be more sensitive and has more blood vessels near the surface. The thigh is convenient because you can see what you are doing without a mirror, and it offers a large rotation area. If you also use other injectable peptides, the same thigh injection principles apply, as discussed in our retatrutide injection site guide.
The back of the upper arm is the third option. This site works well but typically requires help from another person unless you have exceptional flexibility. The tissue here tends to be thinner in many people, which makes proper technique (especially the pinch) more important. For a broader look at injection mechanics across all GLP-1 medications, see our guide on where to inject GLP-1 medications.
Site rotation made simple
Injecting in the same exact spot repeatedly causes a condition called lipohypertrophy, where the fat tissue becomes lumpy and hardened. This changes how the medication absorbs and can reduce its effectiveness. The fix is simple: rotate your injection sites systematically.
One effective approach is the clock method. Imagine a clock face on your abdomen centered around your belly button. Week one, inject at the 12 o'clock position (above the navel, two inches out). Week two, inject at the 3 o'clock position (right side). Week three, 6 o'clock (below). Week four, 9 o'clock (left side). Then start the cycle again but shift each position slightly, about an inch from the previous spot.
Alternatively, you can rotate between body regions entirely. Abdomen one week, right thigh the next, left thigh after that, then back to abdomen. This approach gives each area maximum recovery time between injections.
Whatever system you choose, space each injection at least one inch from the previous location. Keep a simple log (even just a note on your phone) of where you injected each week. This prevents the accidental clustering that leads to lipohypertrophy. Understanding the best time of day and optimal timing for your GLP-1 shot can further improve consistency and reduce side effects.
Preparing the injection site
Clean the chosen area with a fresh alcohol swab using firm, circular motions moving outward from the center. This matters. Then, and this is the part most instruction sheets skip, let the alcohol dry completely before injecting. This usually takes 15 to 30 seconds.
Why does drying matter? Wet alcohol on the skin surface gets carried under the skin by the needle. This causes a burning or stinging sensation during injection that many people mistakenly attribute to the medication itself. Let the alcohol evaporate, and that burning disappears entirely. Such a small detail, but it makes a significant difference in comfort.
How to perform the semaglutide injection step by step
You have your dose drawn. Your site is prepped. Now comes the part that makes most beginners nervous. Here is exactly how to do it.
Step 1: pinch the skin
Using your non-dominant hand, gently pinch a fold of skin at your injection site between your thumb and index finger. Lift the skin about one to two inches away from the underlying muscle. This pinch creates a pocket of subcutaneous tissue for the medication and ensures the needle reaches the correct depth without penetrating into muscle.
Keep the pinch gentle but firm. Squeezing too hard compresses the tissue and can increase pain. Too loose and the fold will slip away during injection. Think of it as holding a piece of fabric between your fingers, firm enough to keep it in place but not so tight that you are crushing it. If you are injecting into the abdomen, our detailed guide on stomach injection technique applies the same principles to both semaglutide and tirzepatide and includes visual references for proper pinch placement.
Step 2: insert the needle
Hold the syringe like a dart in your dominant hand, between your thumb and index finger, with the needle facing the skin. For half-inch (12.7 mm) needles, insert at a 45-degree angle. For shorter needles (8 mm), you can insert at 90 degrees, straight in. The angle ensures the needle tip reaches subcutaneous fat without going deeper into muscle tissue.
Insert the needle with a swift, steady motion. Do not push slowly. A quick, confident insertion actually hurts less than a tentative, gradual push because it passes through the nerve-rich skin layer faster. Think of it like removing a bandage: quick and decisive beats slow and cautious every time.
Step 3: release the pinch and inject the medication
Once the needle is fully inserted, release the skin pinch. Keeping the pinch during injection can compress the tissue and affect absorption. With the skin released, slowly push the plunger down to inject the medication. Slow and steady is the goal here. Rushing the plunger pushes medication into the tissue too fast, which creates pressure that registers as pain and increases the risk of medication pooling or leaking back out.
A good injection pace takes about 5 to 10 seconds for a typical dose. You should feel minimal resistance on the plunger. If you feel significant resistance, the needle may be positioned incorrectly, possibly against fibrous tissue or muscle. Do not force it. Remove the needle, adjust your site slightly, and try again with a new needle.
Step 4: pause before removing the needle
After the plunger is fully depressed, keep the needle in place for 5 to 10 seconds. This allows the medication to disperse into the tissue and prevents it from tracking back up the needle path and leaking out of the injection site. Removing the needle too quickly is one of the most common reasons for medication appearing on the skin surface after injection.
Step 5: remove the needle and apply gentle pressure
Pull the needle straight out at the same angle you inserted it. Do not twist or angle the needle during removal, as this can cause tearing and bruising. Immediately place a dry cotton ball or clean gauze over the site and press gently for 10 to 30 seconds.
Do not rub or massage the injection site. Rubbing disperses the medication too quickly from the depot site and increases bruising by disturbing any small blood vessels the needle may have nicked. Gentle pressure is all you need.
What to do immediately after your injection
The injection itself is done, but a few post-injection steps ensure safety and help you track your progress.
First, dispose of the needle immediately. Place the entire syringe (needle attached) into your sharps container. Never recap a used needle. Recapping is the number one cause of accidental needlestick injuries. If your sharps container is not within reach, set the syringe down on a hard surface with the needle pointing away from you until you can dispose of it. Never put used needles in regular trash, recycling bins, or any container that someone else might reach into.
Second, note the date, dose, injection site, and any observations in whatever tracking system you use. Even a simple note app works. Record things like "2/21, 10 units (0.5 mg at 5 mg/mL), left abdomen, no issues" or "2/21, 10 units, right thigh, slight bruise." This record becomes invaluable for tracking how fast semaglutide is working for you, identifying site reactions, and communicating with your healthcare provider.
Third, watch the injection site for a few minutes. A small drop of blood is normal. A tiny bump that resolves within an hour is normal. Significant swelling, spreading redness, or increasing pain over the following hours is not normal and warrants a call to your provider. Our guide on managing common semaglutide side effects covers the full range of what to expect as your body adjusts to the medication.
You can return the vial to the refrigerator now. Ensure it is stored upright with the stopper facing up. The storage timeline for compounded semaglutide varies by formulation, but most compounded vials are good for 28 to 56 days under proper refrigeration. If you are also managing other injectable peptides, the same post-injection protocol applies. The general GLP-1 injection guide covers these shared principles across all subcutaneous medications.
12 common syringe injection mistakes and how to fix them
After analyzing hundreds of community reports and clinical guidance documents, these are the twelve mistakes that cause the most problems for syringe users. Some waste medication. Some cause pain. A few can genuinely affect your results.
Mistake 1: ignoring the vial concentration. This is the most dangerous mistake on this list. Drawing 20 units from a 5 mg/mL vial delivers 1.0 mg. Drawing 20 units from a 10 mg/mL vial delivers 2.0 mg. Same number of units, double the dose. Always verify concentration before calculating your dose. Always. Refer to the units to milligrams conversion for your specific concentration before every injection.
Mistake 2: skipping the air injection step. Without injecting air first, the vacuum inside the vial makes drawing medication difficult and imprecise. You end up pulling hard on the plunger, which often results in drawing too much, then pushing back, then adjusting, introducing air bubbles with each attempt. Inject air first and the medication flows smoothly.
Mistake 3: injecting cold medication. Semaglutide straight from the refrigerator is around 36 to 46 degrees Fahrenheit. Injecting cold liquid into warm tissue causes a stinging sensation that many people describe as burning. The fix is simple. Remove the vial from the fridge 15 to 30 minutes before injection. Let it reach room temperature naturally. Do not microwave it, run it under hot water, or use any artificial warming method, as heat degrades the peptide. To understand how temperature affects your medication, see our article on what happens when semaglutide gets warm.
Mistake 4: not rotating injection sites. Using the same spot every week feels comfortable because you know it works. But repeated trauma to the same tissue causes lipohypertrophy, those lumpy hardened areas that change medication absorption and can contribute to frustrating weight loss stalls. Rotate systematically using the clock method or body region method described earlier.
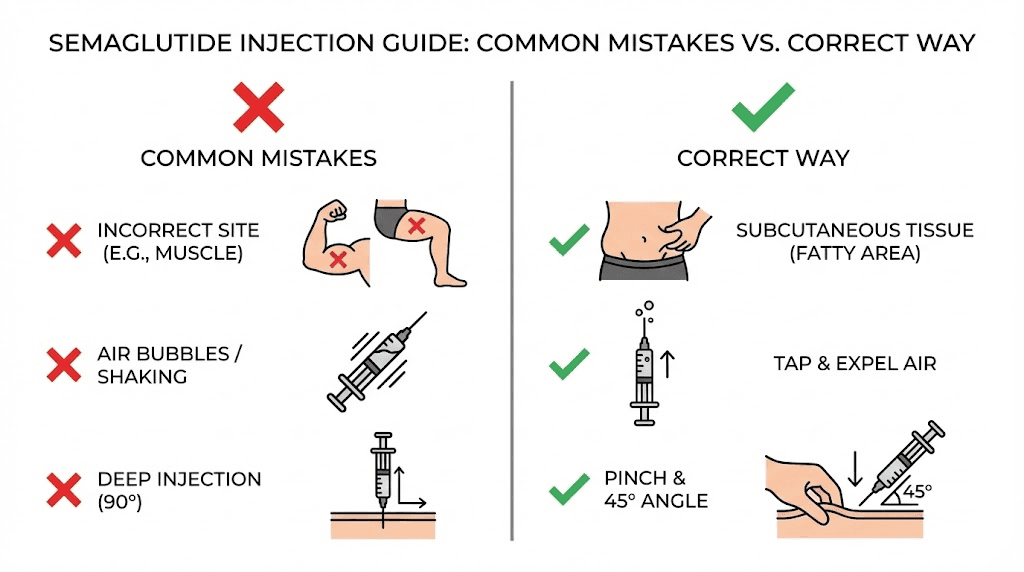
Mistake 5: injecting into muscle instead of fat. If the needle goes too deep, medication ends up in muscle tissue instead of subcutaneous fat. Muscle tissue has more blood flow, which changes the absorption rate and can intensify side effects. Use the pinch technique, inject at the correct angle for your needle length, and choose sites with adequate fat coverage.
Mistake 6: reusing needles. A needle that has been used once is no longer sterile. The tip also becomes slightly bent at the microscopic level after a single puncture, making subsequent insertions more painful and more likely to cause tissue damage. Use a new needle for every injection. The cost of individual needles is negligible compared to the cost of the medication itself. Use our peptide cost calculator to factor in supply costs alongside medication expenses for a complete picture of your monthly investment.
Mistake 7: ignoring air bubbles. Small air bubbles in subcutaneous injections are not dangerous. They are absorbed harmlessly by surrounding tissue. But they do displace medication volume. A 3-unit air bubble in a 10-unit dose means you are only getting 7 units of semaglutide, which is a 30% reduction. Take the time to tap and clear bubbles, especially at lower doses where even small volume differences represent significant percentage changes in your dose. Related dosing precision is covered in our guide on precise unit measurements.
Mistake 8: injecting too quickly. Pushing the plunger fast forces a bolus of liquid into tissue at high pressure. This hurts. It can also cause the medication to pool instead of dispersing evenly, leading to lumps and slower absorption. Take 5 to 10 seconds for the injection. Slow, steady pressure.
Mistake 9: pulling the needle out immediately after injection. The medication needs a moment to settle into the tissue. Removing the needle instantly allows medication to leak back through the needle track. Wait 5 to 10 seconds with the plunger fully depressed before withdrawing.
Mistake 10: rubbing the injection site afterward. Rubbing feels instinctive, but it disperses medication too quickly, increases bruising, and can cause irritation. Gentle pressure only. No rubbing, no massaging.
Mistake 11: not letting alcohol dry before injecting. Wet alcohol carried under the skin by the needle burns. It is not the medication causing the sting. Let the alcohol swab dry for 15 to 30 seconds before inserting the needle.
Mistake 12: injecting at the wrong angle for your needle length. A half-inch needle at 90 degrees may reach muscle in thin individuals. A short needle at 45 degrees may not reach subcutaneous tissue at all. Match your angle to your needle length: 45 degrees for 12.7 mm needles, 90 degrees for 8 mm needles. If you experience consistent issues with injection depth, the GLP-1 injection site guide includes body-composition-specific recommendations that help you choose the optimal angle for your physique.
Many of these mistakes compound each other. Injecting cold medication at the wrong angle into a site that was not properly rotated, without removing air bubbles, is a recipe for a painful and ineffective injection. But fix even two or three of these issues and the improvement in your injection experience is dramatic. The most successful syringe users report that their technique stabilized after about four to six injections, at which point the entire process takes under three minutes from vial to disposal.
How to make semaglutide injections less painful
The needle is small. The volume is tiny. But pain is subjective, and there is no shame in wanting to minimize discomfort. Here are evidence-based techniques that genuinely reduce injection pain.
Temperature management. Let the vial sit at room temperature for 15 to 30 minutes before drawing your dose. Cold medication stings. Room temperature medication does not. This single change eliminates the most common cause of injection discomfort.
Ice the injection site. Press an ice pack (wrapped in a thin cloth, never directly on skin) to your injection site for 30 to 60 seconds before injecting. The cold numbs the skin surface, reducing pain sensation during needle insertion. Remove the ice, clean the site with alcohol, wait for the alcohol to dry, then inject. The numbness lasts long enough for the entire process.
Distraction breathing. Take a slow, deep breath in. Begin inserting the needle as you start to exhale. Exhalation naturally relaxes muscles, and the breathing rhythm gives your brain something to focus on besides the needle. This is not just folk wisdom. Studies on injection pain consistently show that controlled breathing reduces perceived pain intensity.
Choose the right gauge. If you are using 29G needles and finding injections uncomfortable, try 30G or 31G. The thinner needle means less tissue displacement during insertion. Yes, drawing medication takes slightly longer with thinner needles, but the comfort improvement is significant for many people.
Inject at the right speed. Fast insertion, slow injection. Push the needle in quickly (like throwing a dart, not like threading a needle) to pass through the nerve-dense skin layer fast. Then inject the medication slowly over 5 to 10 seconds to avoid pressure-related pain in the tissue.
Avoid bruised or irritated areas. Injecting into skin that is already bruised, sunburned, scarred, or inflamed amplifies pain and increases the risk of complications. Check your chosen site visually before injection. If it looks anything other than normal, choose a different spot. Those experiencing persistent side effects can find comprehensive guidance in our semaglutide side effects management guide and our article on how semaglutide affects different body systems.
Relax the muscle underneath. Tense muscles in the injection area push subcutaneous tissue thinner, making it harder for the needle to stay in the fat layer and increasing pain. Before injecting into the abdomen, try lying down or leaning back slightly. Before injecting into the thigh, sit down and let the leg relax completely. A relaxed muscle creates a thicker, softer target. If injection anxiety is a persistent issue for you, know that it tends to decrease dramatically after the third or fourth injection as the process becomes routine.
Some users find that combining semaglutide with compounds like glycine reduces the stinging sensation at the injection site, though this may vary by formulation. If your current compound causes consistent discomfort, discussing alternative formulations with your pharmacy, perhaps one that includes B12 or uses a different concentration, can sometimes improve the injection experience. The compounded semaglutide guide breaks down how different formulation choices affect everything from injection comfort to how quickly the medication takes effect.
Building your weekly injection routine
Semaglutide is a once-weekly medication. Consistency matters more than perfection, but establishing a reliable routine makes compliance automatic rather than something you have to remember.
Choose a consistent day. Pick a day of the week that works for your schedule and stick with it. Many people choose a day when they have a lighter schedule in case of initial side effects like nausea or fatigue. Sunday evening is a popular choice because it leaves the adjustment period during the early week, and the effects stabilize by the time the weekend arrives. For detailed timing guidance, our article on the best time of day to take semaglutide explores how timing interacts with meal patterns, sleep quality, and side effect management.
Set a reminder. Use your phone calendar with an alert. Missing a dose by a day or two is not catastrophic, but consistency in timing helps maintain steady blood levels. If you miss your scheduled day, take the injection as soon as you remember as long as your next scheduled dose is at least two days away. If you are within two days of your next dose, skip the missed one entirely and return to your normal schedule. Never double up.
Create a pre-injection ritual. Routines reduce anxiety. Maybe you always inject after your morning shower on injection day. Maybe you watch a specific show while waiting for the vial to warm up. The specific routine does not matter. What matters is that the consistency removes the decision fatigue and the "should I do this now?" procrastination that leads to missed doses.
Understanding how long semaglutide takes to work can help set realistic expectations during the first weeks of your routine. Most people begin to notice appetite suppression effects within the first few doses, though significant weight changes typically take at least a month to become apparent.
Track your results. Note your weight, how you feel, side effects, and injection details each week. Patterns emerge over time that help you and your provider optimize your protocol. If you notice no weight loss after four weeks, these records help identify whether the issue is dosing, timing, diet, or something else entirely. For those hitting a plateau later in treatment, our guide on breaking through semaglutide plateaus offers specific strategies based on real user experiences.
Monitor for less obvious effects. Beyond weight changes, semaglutide influences energy levels, sleep quality, and even mood. Some users report that semaglutide affects their energy positively once past the initial adjustment phase, while others experience temporary GLP-1 related fatigue that resolves with dose stabilization. Women should be aware that semaglutide can affect menstrual cycles, and tracking these changes helps your provider make informed decisions about your protocol. If you drink alcohol, understanding how alcohol interacts with semaglutide helps you plan your injection timing around social events. Those who also take phentermine should review the combination safety profile and comparative analysis to understand how the medications interact.
The GLP-1 plotter tool can help visualize your dose escalation schedule and project when you will reach various milestones based on your current protocol. Combined with the peptide cost calculator, you can plan both the clinical and financial aspects of your treatment timeline.
Storing your semaglutide between injections
Proper storage protects your investment. Compounded semaglutide is not cheap, and improper storage degrades the active peptide, reducing its effectiveness without any visible change in the liquid appearance.
Refrigeration is essential. Store your vial in the refrigerator at 36 to 46 degrees Fahrenheit (2 to 8 degrees Celsius). Do not store it in the freezer. Do not store it in the refrigerator door, which experiences the most temperature fluctuations. The middle of a shelf, toward the back, provides the most stable temperature. Our detailed guide on semaglutide refrigeration requirements explains why temperature stability matters as much as the temperature itself.
Know your expiration timeline. Once a compounded semaglutide vial is first punctured, most pharmacies recommend using it within 28 days, though some formulations are stable for up to 56 days under proper refrigeration. The key timeline to track is the 28-day post-puncture window, not the printed expiration date on the vial. Write the date of first use on the vial label with a permanent marker so you always know where you stand. If you are ever uncertain about whether your semaglutide is still potent, check our guide on using expired semaglutide for specific guidance on potency loss timelines.
Protect from light. Many compounded semaglutide formulations are light-sensitive. Keep the vial in its original box when refrigerated, or store it in a spot where it will not be exposed to direct light every time the refrigerator door opens. Tirzepatide vials follow similar storage requirements, so if you manage multiple medications, the same refrigerator organization principles apply. Our articles on tirzepatide refrigeration and tirzepatide fridge storage timelines cover the specifics for those managing both medications.
Travel considerations. When traveling, transport your vial in an insulated bag with a cold pack. Do not check it in luggage where it might freeze in the cargo hold. Carry it in your carry-on with your prescription documentation. For comprehensive travel guidance, including TSA rules and international considerations, see our complete guide to traveling with semaglutide.
What if it gets warm? Brief temperature excursions (an hour at room temperature while you prepare your injection) are fine. Extended exposure to temperatures above 77 degrees Fahrenheit degrades the peptide. If your vial has been left out for more than a few hours, especially in a warm environment, it may have lost potency. Learn more about temperature stability in our article on what happens when semaglutide gets too warm.
When something goes wrong: signs to watch for
Most syringe injections are uneventful. But knowing what requires attention versus what is normal prevents both unnecessary panic and dangerous complacency.
Normal and expected: A tiny drop of blood at the injection site. A small bruise that appears within hours and resolves within a week or two. A temporary bump at the injection site that flattens within an hour. Mild redness at the site that fades within a day. These are all normal consequences of inserting a needle through skin and do not indicate any problem with your technique or medication.
Worth monitoring but not alarming: Bruising that covers a larger area than a quarter. A small firm lump under the skin that persists for a few days. Mild itching at the injection site. These usually resolve on their own but may indicate that you are injecting too deep, not rotating sites adequately, or reacting mildly to a component of the formulation. If you are also experiencing body aches or muscle pain, these are more likely medication effects than injection technique problems. Adjust your technique and monitor.
Contact your healthcare provider: Redness that spreads outward from the injection site over hours (sign of potential infection). Increasing pain at the injection site rather than decreasing pain. Any sign of infection including warmth, pus, or fever. Severe nausea, vomiting, or abdominal pain after injection, which could indicate a dosing error. Allergic reactions including hives, difficulty breathing, or swelling of the face or throat, though these are extremely rare with semaglutide. Other unusual symptoms like persistent headaches or hair changes should also be discussed with your provider, as these may be medication-related rather than injection-related.
Understanding common side effects like fatigue, constipation, and excessive burping helps you distinguish between expected medication effects and injection-related complications. Most side effects are related to the medication itself, not the injection technique, and they typically improve as your body adjusts during the initial adjustment period. Women should be particularly aware that GLP-1 medications can affect breastfeeding considerations and menstrual cycle regularity, both of which are medication effects rather than injection technique issues. If you are taking a combination product that includes B12, some side effects may be reduced by the supplemental ingredients.
Maximizing your results beyond injection technique
Proper injection technique ensures you get every milligram you are paying for. But the injection itself is just one piece of the puzzle. What you do between injections significantly impacts your outcomes.
Diet matters. Semaglutide reduces appetite, but the foods you choose during that reduced eating window determine whether you lose fat, muscle, or both. Prioritize protein at every meal to preserve lean mass. Our guides on semaglutide diet planning, the best foods to eat on semaglutide, and foods to avoid provide specific meal frameworks designed around the appetite changes semaglutide creates. Tirzepatide users face similar nutritional challenges, and the tirzepatide diet plan, optimal food choices, and food avoidance list address the slight differences in appetite suppression patterns between the two medications.
Supplementation supports the process. Many compounded formulations now include additions like B12 or glycine specifically to address common semaglutide side effects. If your formulation does not include these, supplementing separately may be worth discussing with your provider. Learn about the benefits of semaglutide combined with B12, semaglutide with glycine, and methylcobalamin formulations to understand which combinations might benefit your specific situation. For those on tirzepatide, similar combination products are available, and our tirzepatide supplementation guide covers which additions have the strongest evidence base.
Exercise enhances outcomes. You can lose weight on semaglutide without exercise, but adding resistance training helps preserve muscle mass, improves body composition, and often accelerates results. Even walking 30 minutes daily makes a measurable difference in outcomes. People who combine semaglutide with structured exercise programs tend to see the most impressive before and after results, and many report that the appetite reduction from semaglutide actually makes it easier to fuel workouts with high-quality nutrition rather than relying on willpower alone. The peptides for fat loss resource page provides broader context on how different compounds support body composition goals.
Understand the timeline. Semaglutide is not an overnight solution. How fast it works depends on your starting dose, how quickly you escalate, and individual metabolic factors. Our detailed breakdown of how long semaglutide takes to work covers the typical timeline from first injection through maintenance. Most people start noticing appetite changes within the first two weeks and visible weight changes within four to eight weeks. If you are not losing weight on semaglutide, the issue is often dose-related rather than technique-related, and our troubleshooting guides can help identify the specific bottleneck. Some people also wonder about energy level changes and whether the medication affects metabolism directly, both of which influence the overall timeline of results.
Know your options. If semaglutide is not providing the results you expect, or if side effects are limiting your dose escalation, other GLP-1 options exist. Tirzepatide offers a dual-action mechanism that some people respond to better. Understanding the differences between semaglutide and tirzepatide, including their side effect profiles and dosage equivalencies, helps you have informed conversations with your provider about your protocol. For those considering a switch, our semaglutide to tirzepatide conversion chart provides the dosing crosswalk. If cost is a factor in your decision, our guides on affordable tirzepatide options and cost-effective compounded alternatives help you evaluate the financial picture alongside the clinical one. SeekPeptides provides detailed comparison tools that let you evaluate these options side by side based on your specific goals and budget.
SeekPeptides members access comprehensive protocol guides, interactive dosing tools, and a community of experienced researchers who have navigated these exact questions. Whether you are optimizing your current semaglutide protocol or exploring alternatives, the platform provides the evidence-based guidance that generic instruction sheets leave out.
Compounded versus branded semaglutide: what syringe users need to know
If you are using a syringe, you are almost certainly using compounded semaglutide. Understanding the differences between compounded and branded formulations helps you use your medication more effectively and set appropriate expectations.
Branded semaglutide (Ozempic, Wegovy) comes in pre-filled pens with standardized concentrations. You do not use a syringe with these products. Compounded semaglutide comes from compounding pharmacies in multi-dose vials at varying concentrations, and it requires everything we have covered in this guide: syringe selection, dose calculation, drawing technique, and proper injection. Our complete guide to compounded semaglutide covers the regulatory landscape, quality considerations, and what to look for in a compounding pharmacy.
The active molecule in compounded semaglutide is the same as in branded versions. The difference lies in the manufacturing environment, the excipients (inactive ingredients), and the regulatory oversight. Some compounded formulations include additional ingredients like vitamin B12 or glycine that are not present in branded versions. Others use combined B12 dosage charts that account for the dual-ingredient formulation. Understanding which formulation you have affects both your dosing calculations and your expected first month results.
For syringe users, the most important practical difference is concentration variability. Branded semaglutide has fixed concentrations that do not change. Compounded semaglutide can come in any concentration the pharmacy chooses to prepare. This is why the concentration verification step is so critical with every vial. If you are currently researching different compounding pharmacy options, understanding their standard concentrations and included ingredients helps you compare effectively. Other pharmacy reviews include our guides on Direct Meds, Olympia Pharmacy, and BPI Labs.
Alternative delivery methods are also worth knowing about. Some users prefer oral semaglutide drops or sublingual formulations to avoid injections entirely. Tirzepatide users face the same oral versus injection decision, and the tablet comparison data applies similar principles. These alternatives trade the precision of syringe injections for convenience, and each has its own absorption considerations. The comparison between injectable and oral peptide delivery methods can help you determine which approach aligns with your priorities.
Syringe injection for tirzepatide and other GLP-1 medications
The injection technique you learn for semaglutide applies to virtually every subcutaneous peptide injection. If you ever switch medications or add a second compound, the skills transfer directly. Only the dose calculations change.
Tirzepatide follows the same syringe process: calculate dose based on concentration, draw from vial, inject subcutaneously. The main difference is the dose escalation schedule, which starts at 2.5 mg and increases in 2.5 mg increments rather than the smaller semaglutide steps. If you are considering tirzepatide, our guides on tirzepatide dosing in units, reconstitution, and injection technique specifics cover the differences in detail. The starting dose recommendations and compound dosage charts are particularly helpful for those transitioning from semaglutide. Unit conversion works identically for tirzepatide, and our references for 2.5 mg in units, 5 mg in units, 7.5 mg in units, and 10 mg in units cover every standard tirzepatide dose tier.
For those curious about next-generation GLP-1 compounds, retatrutide uses the same subcutaneous injection approach but targets three receptors instead of one or two. The retatrutide dosage charts and comparisons with semaglutide offer perspective on where the field is heading. Other emerging compounds include survodutide and mazdutide, both of which use the same subcutaneous injection method you are learning here. Even non-injectable delivery methods like GLP-1 patches and oral GLP-1 liquids are entering the market, though injectable forms remain the gold standard for bioavailability and dosing precision. Understanding the relationship between GLP-1 and branded medications helps you navigate the rapidly expanding landscape of weight management options. Regardless of which medication you use, the fundamental syringe skills you develop now will serve you throughout your protocol.
The injection technique applies identically to combination formulations as well. If your pharmacy provides semaglutide combined with B12, glycine, or methylcobalamin, the drawing and injection process remains exactly the same. Tirzepatide users working with combination compounds like tirzepatide glycine B12 formulations follow the same principles. The only difference is the dose chart, which will be specific to that particular combination formulation. Always use the chart provided by your pharmacy for combination products rather than standalone semaglutide dosing references.
Frequently asked questions
Can I reuse my syringe if I only used it once?
No. Even after a single use, the needle tip is no longer sterile and has microscopic damage that makes subsequent insertions more painful. Reusing needles also increases infection risk. Use a fresh syringe for every injection. The cost of a new syringe is minimal compared to the cost of your medication and the risk of complications.
What happens if I accidentally inject an air bubble?
Small air bubbles in subcutaneous injections are harmless. The air gets absorbed by surrounding tissue within minutes. This is fundamentally different from air in an intravenous injection, which can be dangerous. However, air bubbles do reduce the amount of medication you receive, so removing them before injection ensures you get your full dose. A 2-unit air bubble in a 10-unit dose means losing 20% of your medication.
How do I know if I injected into muscle instead of fat?
Muscle injections tend to be more painful than subcutaneous injections, and you may notice increased bruising or a deeper ache at the injection site. If you felt the needle hit a firm, resistant layer (muscle) rather than soft tissue (fat), you likely went too deep. Use the skin pinch technique and inject at the correct angle for your needle length to avoid this. If it happens occasionally, it is not dangerous, but consistent muscle injections can alter your medication absorption rate.
Is it normal for medication to leak out after removing the needle?
A small droplet of medication on the skin surface after injection is common and not cause for concern. It usually means the needle was removed too quickly. Wait 5 to 10 seconds with the plunger fully depressed before removing the needle. This allows the medication to disperse into tissue and prevents tracking back up the needle path. If you consistently see significant leakage, discuss your technique with your provider or consider a slightly longer needle.
Can I inject semaglutide at any time of day?
Yes. Semaglutide can be injected at any time, with or without food. However, many users prefer injecting in the evening or before bed because the initial nausea side effects, if they occur, happen while sleeping. Others prefer morning injections so they benefit from the appetite suppression throughout the day. Consistency matters more than specific timing, so choose whatever time you will remember most reliably. See our detailed analysis of optimal injection timing for specific strategies.
How do I dispose of used syringes properly?
Place used syringes directly into an FDA-cleared sharps disposal container. Never clip, bend, or recap needles. When the container is about three-quarters full, seal it and follow local disposal guidelines, which usually involve dropping it off at a hospital, pharmacy, or designated collection site. If you do not have a sharps container, a heavy-duty plastic container with a secure lid (like a laundry detergent bottle) works as a temporary alternative.
What if my prescribed dose falls between unit markings on the syringe?
Some doses, like 2.5 units for 0.25 mg at 10 mg/mL, fall between printed lines on the syringe. In this case, aim for the closest whole unit and accept a minor variance, or choose a syringe with finer markings. A 0.3 mL syringe has markings at every half-unit, making these between-line doses much easier to measure accurately. Our semaglutide dosage calculator can help determine whether your specific dose and concentration combination requires a smaller syringe for adequate precision.
Should I use the same syringe to draw and inject, or change needles?
Using the same needle for both drawing and injecting is standard practice for most compounded semaglutide users. Some people prefer to use a separate drawing needle (a larger gauge like 25G for faster drawing) and then switch to a thinner injection needle (31G for comfort). This two-needle technique provides faster drawing with more comfortable injection but adds cost and complexity. For most users, a single 30G needle works perfectly well for both drawing and injecting.
Can I mix semaglutide with other medications in the same syringe?
No. Never mix semaglutide with insulin, B12, or any other medication in the same syringe unless your compounding pharmacy has specifically formulated them together. Mixing medications can cause chemical interactions that degrade one or both compounds. If you take multiple injectable medications, use a separate syringe for each and inject at different sites at least two inches apart. Pre-combined formulations like semaglutide with methylcobalamin are prepared under controlled conditions to ensure compatibility.
What if I see particles or cloudiness in my semaglutide vial?
Clear, colorless liquid is the standard for semaglutide solutions. If you notice cloudiness, floating particles, discoloration, or any other visual change, do not use that vial. These changes can indicate contamination, degradation, or improper storage. Contact your pharmacy for a replacement. This is one reason proper storage and shelf life awareness matters so much.
Is it safe to fly with my semaglutide and syringes?
Yes, but you need documentation. TSA allows prescription injectable medications and associated supplies (syringes, needles) in carry-on luggage. Keep your medication in its original pharmacy packaging with the prescription label visible. A letter from your provider can help if questions arise. Never pack semaglutide in checked luggage where temperatures cannot be controlled. Our comprehensive travel with semaglutide guide covers international travel rules, cold chain management, and TSA procedures in detail.
How do I handle the transition if my pharmacy changes my vial concentration?
This is more common than most people expect, and it is one of the biggest sources of dosing errors. If your pharmacy switches your concentration, you must recalculate your dose in units using the new concentration. Do not assume the same number of units delivers the same dose. The formula remains the same: units equals your dose in mg divided by the new concentration in mg/mL, multiplied by 100. Double-check using the dosage calculator before your first injection with the new vial. If your previous vial was 2.5 mg/mL and the new one is 5 mg/mL, your unit count for the same milligram dose drops by exactly half. Our unit conversion references can help verify your calculations.
Can I take my semaglutide injection a day early or late?
Minor timing variations are generally acceptable. If you need to adjust by a day in either direction, that is fine. The key is maintaining consistent weekly intervals as much as possible. If you realize you are more than two days late, take your dose immediately and resume your regular schedule the following week. Never double up on doses to compensate for a missed injection. For related guidance on timing flexibility with other GLP-1 medications, see our article on adjusting injection timing.
External resources
For researchers serious about optimizing their peptide protocols, SeekPeptides offers the most comprehensive resource available, with evidence-based guides, proven protocols, and a community of thousands who have navigated these exact questions. Members access detailed injection technique videos, personalized dosing support, and expert guidance that transforms the learning curve from weeks of uncertainty into confidence from day one.
In case I do not see you, good afternoon, good evening, and good night. May your needles stay sharp, your doses stay accurate, and your injections stay painless.