Feb 12, 2026
Some people inject their GLP-1 and feel nothing. No bruising, no pain, no redness. Others dread every weekly dose because the same spot keeps swelling, the medication stings going in, and they are starting to wonder if something is wrong with them. The difference between these two experiences almost never comes down to the medication itself. It comes down to where, exactly, the needle goes.
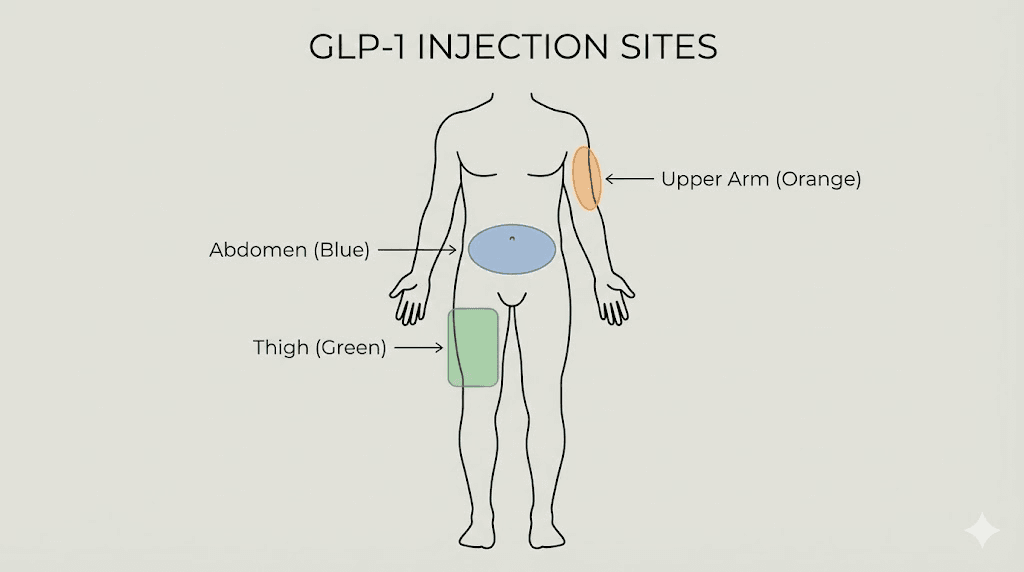
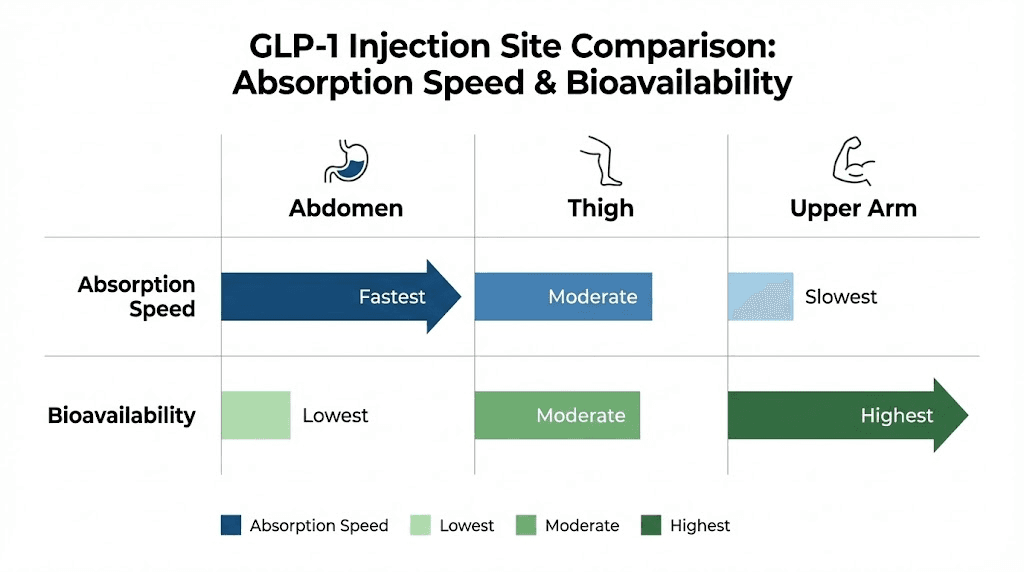
That matters more than most people realize. Injection site affects how quickly the medication enters the bloodstream, how much discomfort you feel during and after, and whether you develop those frustrating lumps that make future injections even harder. Research on subcutaneous GLP-1 delivery shows meaningful differences in absorption rates between the abdomen, thigh, and upper arm, with the abdomen generally offering the fastest uptake and the thigh providing a slower, more gradual release. A crossover study on the GLP-1 agonist taspoglutide found that upper arm injections produced 41% higher systemic exposure compared to abdominal injections, while the thigh fell somewhere in between at 13% higher. These are not trivial differences. They can influence how you feel in the hours after your dose, how your body responds to the medication, and how consistent your results become over weeks and months.
And yet most injection guides skip right past these details. They tell you to inject in the belly, rotate your sites, and move on. That is not enough. Not when you are committing to a weekly protocol that might last months or years. Not when the wrong technique can mean bruising, pain, inconsistent medication absorption, or tissue damage that compounds with every dose. This guide covers everything the quick tutorials leave out, from the exact anatomical boundaries of each injection zone to the rotation schedules that prevent lipodystrophy, from needle selection to pain reduction techniques backed by actual clinical practice. Whether you are using semaglutide, tirzepatide, or any other GLP-1 receptor agonist, the principles are the same. SeekPeptides has compiled the most comprehensive injection site resource available, pulling from clinical research, FDA guidelines, and the practical experience of thousands of researchers who have refined their technique over time.
Understanding subcutaneous injection basics
Before choosing a specific location on your body, you need to understand what subcutaneous injection actually means and why it matters for GLP-1 medications. Subcutaneous means beneath the skin. Specifically, it means delivering medication into the fatty tissue layer that sits between the outer skin and the underlying muscle. This layer acts as a slow-release depot, allowing the medication to absorb gradually into the bloodstream over hours rather than minutes.
That gradual release is exactly what GLP-1 receptor agonists need. These peptides are designed to work over days, not hours. Weekly formulations like semaglutide and tirzepatide rely on slow, steady absorption from the subcutaneous depot to maintain consistent blood levels throughout the week.
Inject too deep and you hit muscle. Intramuscular injection changes everything. The medication absorbs faster than intended, which can spike blood levels, increase side effects like nausea, and reduce the duration of action. Some people who report feeling terrible after their injection, intense nausea, dizziness, fatigue that lasts for days, are unknowingly injecting into muscle rather than fat.
Inject too shallow and you stay in the dermal layer. This causes pain, redness, and poor absorption. The medication might pool under the skin surface, creating visible welts or nodules that take days to resolve.
The sweet spot is that middle layer. The subcutaneous fat. And the thickness of that layer varies dramatically depending on where you inject, your body composition, and even your hydration status. That is why site selection matters so much, not just for comfort, but for how well the medication actually works.
How needle gauge and length affect your experience
The needle you use changes everything about the injection experience. For subcutaneous GLP-1 injections, the standard recommendation is a 29 to 32 gauge needle with a length between 4mm and 12mm. Most prefilled pens come with 31 or 32 gauge needles, which are thin enough that many people barely feel the injection at all.
Here is what those numbers mean in practice. Gauge measures thickness. A higher number means a thinner needle. A 32 gauge needle is thinner than a 29 gauge needle. Thinner needles cause less tissue displacement, which means less pain and less bruising. For most GLP-1 injections, 31 gauge is the sweet spot between comfort and reliability.
Length matters for a different reason. A 4mm needle is suitable for most adults injecting into areas with adequate subcutaneous fat, like the abdomen. The American Diabetes Association supports the use of 4mm pen needles across all BMI categories when proper technique is used. Longer needles, 8mm to 12mm, increase the risk of accidentally hitting muscle, especially in leaner individuals or when injecting into the thigh.
If you are using a syringe rather than a prefilled pen, a 30 gauge, 0.5 inch (12.7mm) needle works well for most people. Combined with proper reconstitution technique and a skin pinch, this length reaches the subcutaneous layer without going too deep in most body areas.
The 90-degree versus 45-degree angle question
This confuses nearly everyone who starts self-injecting. Some guides say 90 degrees. Others say 45. Both are correct, depending on the situation.
If you can comfortably pinch at least one inch of skin at your injection site, use a 90-degree angle. Straight in. This works for most people injecting into the abdomen or the back of the upper arm, where subcutaneous fat tends to be thickest. The pinch lifts the fat layer away from the muscle, and a perpendicular insertion drops the needle right into the target zone.
If you are leaner, injecting into a thinner area like the outer thigh, or using a longer needle, switch to a 45-degree angle. This ensures the needle tracks through the fat layer rather than punching straight through it into muscle. Think of it as taking a diagonal path through the subcutaneous tissue instead of a direct vertical drop.
For prefilled pen devices, the manufacturer instructions typically recommend 90 degrees because the needles are short enough (4-5mm) that muscular injection is unlikely even without a skin pinch. Follow the device-specific instructions, but know that the 45-degree adjustment exists for situations where you need it.
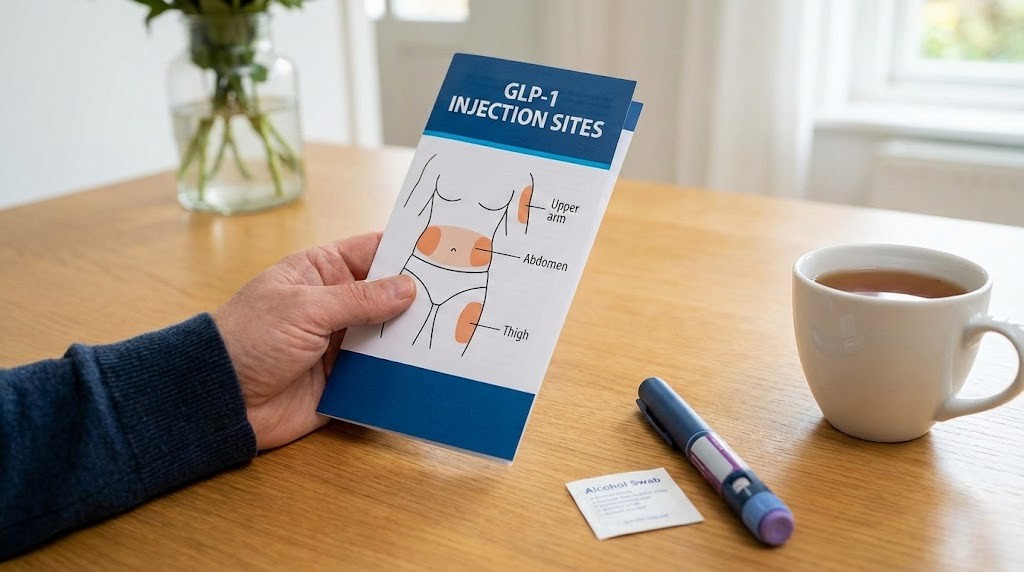
The abdomen: most popular GLP-1 injection site
The abdomen is where most people inject their GLP-1 medication, and for good reason. It offers the largest usable surface area, the most consistent subcutaneous fat layer, and research suggests it provides the fastest absorption rate of any injection site. For people who want convenience and predictability, the belly is hard to beat.
Exact boundaries for abdominal injection
Not all of the abdomen is suitable for injection. There are specific boundaries you need to respect.
Upper boundary: Two finger-widths below the lowest rib. You can feel this by running your fingers along the bottom edge of your ribcage and then dropping down about an inch.
Lower boundary: The top of the pelvic bones. Press into your hip area and find the bony ridge. Stay above it.
Lateral boundaries: You can inject across the full width of the abdomen, but the best tissue is on either side of the navel, roughly where your hands would rest if you placed them on your waist and slid them forward.
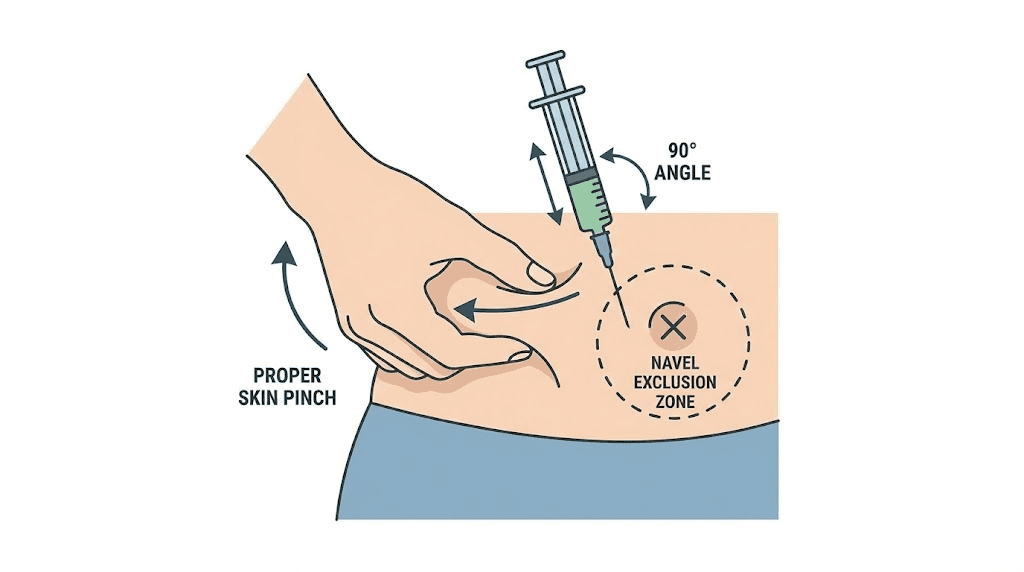
Critical exclusion zone: Stay at least two inches (about two finger-widths) away from the belly button in all directions. The tissue around the navel is different, thinner, more vascular, and injecting here increases the risk of pain, bruising, and inconsistent absorption. This is the most common boundary mistake beginners make.
Within these boundaries, you have a substantial area to work with. Imagine a rectangle on each side of the navel, roughly the size of a paperback book. That is your injection zone on each side, giving you two large areas to alternate between.
Why the abdomen absorbs fastest
Clinical observations and pharmacokinetic studies consistently show that abdominal subcutaneous injections produce faster absorption compared to other sites. The abdomen has a relatively rich blood supply in the subcutaneous layer, combined with consistent fat thickness in most people. This combination means the medication depot forms reliably and enters the circulation efficiently.
For GLP-1 medications that work on a weekly cycle, faster absorption is generally not a problem. The medication is designed to release slowly regardless of injection site. But the initial uptake can influence how quickly you feel the first effects of a dose, including appetite suppression and the nausea that some people experience in the hours after injection.
Interestingly, the taspoglutide bioavailability study found that abdominal injection actually produced the lowest overall systemic exposure (AUC of 44.2 ng/h/mL) compared to the upper arm (61.2 ng/h/mL) and thigh (50.0 ng/h/mL). However, the researchers still recommended the abdomen because it also had the lowest incidence of nausea and vomiting. Lower peak levels with smoother absorption meant fewer side effects, even though total exposure was technically lower. For most people, this tradeoff favors the abdomen, especially during dose escalation phases when side effects are at their worst.
Step-by-step abdominal injection technique
Here is the complete process for an abdominal GLP-1 injection.
Preparation:
Wash your hands thoroughly with soap and water
If using refrigerated medication, allow it to reach room temperature for 15-30 minutes (cold medication stings more and may cause tissue irritation)
Clean the injection site with an alcohol swab using gentle outward circles covering an area about the size of a silver dollar
Wait at least 10 seconds for the alcohol to air-dry completely, do not blow on it or fan it, as this reintroduces bacteria
Injection:
Pinch a fold of skin between your thumb and index finger (about 1-2 inches of tissue)
Hold the pen or syringe like a dart at a 90-degree angle to the pinched skin
Insert the needle with a smooth, quick motion, do not hesitate or push slowly
If using a pen, press the injection button and hold for the full count recommended by the manufacturer (usually 5-10 seconds)
If using a syringe, push the plunger slowly and steadily over 5-10 seconds
Wait 5 seconds after the plunger is fully depressed before removing the needle
Release the skin pinch after removing the needle
Apply gentle pressure with a clean cotton ball or gauze, do not rub
That last point matters more than people think. Rubbing the injection site after removing the needle can spread the medication depot, potentially increasing bruising and reducing the effectiveness of the slow-release mechanism. Gentle pressure for 10-15 seconds is all you need to close the needle track and prevent bleeding.
The thigh: second most common injection site
The front of the thigh is the second most popular injection site for GLP-1 medications. It offers easy self-access, a large surface area, and works particularly well for people who want to keep their abdominal area available for rotation or who find belly injections uncomfortable.
Exact boundaries for thigh injection
The usable injection zone on the thigh is more specific than many guides suggest.
Upper boundary: One hand-width below the crease where your leg meets your hip (the inguinal crease). This keeps you away from the femoral artery and nerve bundle that run through the groin area.
Lower boundary: One hand-width above the kneecap. The tissue here becomes thinner and there is less subcutaneous fat to work with.
Medial boundary (inner thigh): Avoid the inner thigh entirely. The skin is thinner, more sensitive, and closer to major blood vessels. Injecting here increases pain and bruising risk significantly.
Lateral boundary (outer thigh): The outer front and side of the thigh are your target zones. Imagine dividing your thigh into thirds lengthwise. The front third and the outer third are appropriate. The inner third is off limits.
The ideal injection area is the middle third of the thigh (between hip and knee), focused on the front and outer surfaces. This is where you will find the most consistent subcutaneous fat layer and the least sensitivity.
Absorption differences in the thigh
Thigh injections produce slower absorption compared to the abdomen. This is consistent across multiple studies of subcutaneous medications, not just GLP-1 agonists. The thigh has less blood flow to the subcutaneous layer compared to the abdomen, which means the medication depot releases more gradually.
For weekly GLP-1 medications, this slower absorption rarely matters clinically. The drugs are formulated for extended release regardless. But some people report that thigh injections produce a more gradual onset of both therapeutic effects and side effects. If you experience significant nausea in the hours after an abdominal injection, switching to the thigh might smooth out the initial absorption spike and reduce that peak-dose nausea.
One important consideration: physical activity involving the legs can increase blood flow to the thigh and accelerate absorption. If you inject in the thigh and then immediately go for a run or do a leg-focused workout, you may absorb the medication faster than intended. The same principle applies to hot showers or baths, heat dilates blood vessels and increases circulation to the skin. If you inject in the thigh, wait at least 30 minutes before vigorous leg exercise or hot water immersion.
Thigh injection technique adjustments
The technique for thigh injection differs slightly from abdominal injection.
Sitting versus standing: You can inject while seated or standing. Seated is often easier because the thigh relaxes and the tissue becomes softer. If standing, shift your weight to the non-injection leg so the target thigh is relaxed.
Needle angle: Because thigh subcutaneous fat tends to be thinner than abdominal fat, especially in active or lean individuals, a 45-degree angle is more appropriate than 90 degrees for many people. If you can pinch a full inch of tissue, use 90 degrees. If you can only pinch about half an inch, go with 45 degrees. With a 4mm pen needle, 90 degrees is typically fine for all body types.
Skin pinch: More important here than in the abdomen, especially for lean individuals. Pinching lifts the subcutaneous layer away from the underlying quadriceps muscle, reducing the chance of intramuscular injection.
Post-injection: Avoid crossing your legs immediately after injection, as this compresses the tissue and can squeeze the medication depot. Sit comfortably with legs relaxed for a few minutes after injection.
The upper arm: third injection site option
The back of the upper arm is the third approved injection site for most GLP-1 medications. It is less commonly used for self-injection because it is harder to reach and see, but it has some unique advantages worth understanding.
Exact boundaries for upper arm injection
The injection zone is on the posterior (back) and lateral (outer) surface of the upper arm, roughly in the area between the shoulder and the elbow.
Upper boundary: Three finger-widths below the acromion process (the bony point of the shoulder). This keeps you away from the deltoid muscle insertion and the shoulder joint.
Lower boundary: Halfway between the shoulder and the elbow. Going lower puts you too close to the elbow where subcutaneous fat is minimal.
Target zone: The fleshy, slightly soft area on the back and outer surface of the arm. If you let your arm hang naturally and feel the back of the upper arm, the tissue that gives slightly under gentle pressure is your target.
Avoid: The front of the arm and the inner arm. The front is primarily muscle (bicep), and the inner arm has thinner skin and more superficial veins.
The bioavailability question with arm injections
The taspoglutide crossover study revealed something interesting about upper arm injections. The arm produced the highest systemic exposure of any site, 41% higher than the abdomen in terms of AUC and significantly higher peak concentrations (Cmax of 0.382 ng/mL versus 0.268 ng/mL for the abdomen). This suggests that medication injected into the upper arm enters the bloodstream more completely and reaches higher peak levels.
For some medications, higher bioavailability would be considered an advantage. For GLP-1 agonists, it is more nuanced. Higher systemic exposure correlates with more pronounced side effects, particularly nausea and gastrointestinal symptoms that are already the most common complaints with these medications. This is why researchers recommended the abdomen despite its lower bioavailability: the tradeoff between efficacy and tolerability favors smoother, lower-peak absorption.
That said, if you tolerate your GLP-1 medication well and rarely experience side effects, the arm could provide marginally better pharmacological response. This is speculative based on limited data, but worth considering if you are someone who responds well to the medication but wants to optimize absorption.
The self-injection challenge
The biggest practical limitation of upper arm injection is accessibility. It is genuinely difficult to inject yourself in the back of your own arm while maintaining proper technique. You need to hold the skin pinch with one hand and operate the pen or syringe with the other, all while keeping the needle at the correct angle in a location you cannot directly see.
Options for upper arm self-injection include using a mirror to see the injection site, having a partner or family member administer the injection, or using the reflection in a large bathroom mirror positioned to give you a clear view. Some people become comfortable with arm self-injection over time, but most find the abdomen and thigh more practical for unsupervised weekly injections.
If someone is available to help you, the upper arm becomes an excellent rotation option. The tissue tolerates injection well, the area is less sensitive than many people expect, and having three viable rotation zones instead of two significantly extends the time between repeat injections at any single location.
Injection site rotation: why it matters and how to do it right
Every GLP-1 prescribing guide mentions site rotation. Few explain why it matters so much or give you a practical system to actually follow.
What happens when you do not rotate
Repeated injection into the same spot causes a condition called lipohypertrophy. This is a thickened, hardened combination of fatty and fibrous tissue that forms when the same area is traumatized by needles over and over. It starts as a barely noticeable firmness under the skin and progresses to visible lumps that can grow to the size of a marble or larger.
Lipohypertrophy is not just cosmetic. It has real pharmacological consequences. When you inject into a lipohypertrophic area, absorption becomes unpredictable. The medication may absorb faster, slower, or not at all depending on the severity of the tissue change. Studies in insulin-dependent diabetes patients have shown that injecting into lipohypertrophic tissue can increase blood glucose variability by 30% or more. The same principle applies to GLP-1 medications: inconsistent absorption means inconsistent effects.
Beyond lipohypertrophy, repeated injection in the same location increases the risk of nodule formation. A case report published in the Journal of the Endocrine Society documented injection-site nodules with once-weekly semaglutide, described as quarter-sized, hard, red, and itchy. These resolved within 2-4 days at the 1mg dose but are uncomfortable and concerning when they appear. Proper rotation is the primary prevention strategy.
The minimum rotation distance
How far apart do consecutive injections need to be? The general recommendation is at least one inch (approximately 2.5 centimeters) between injection sites. This gives the tissue time to recover from the micro-trauma of needle insertion and allows the medication depot to fully absorb before the area is used again.
For weekly injections, moving just one inch is the minimum. Moving to an entirely different zone (abdomen to thigh, for example) is better. The more distance and time between injections in the same area, the lower your risk of tissue damage.
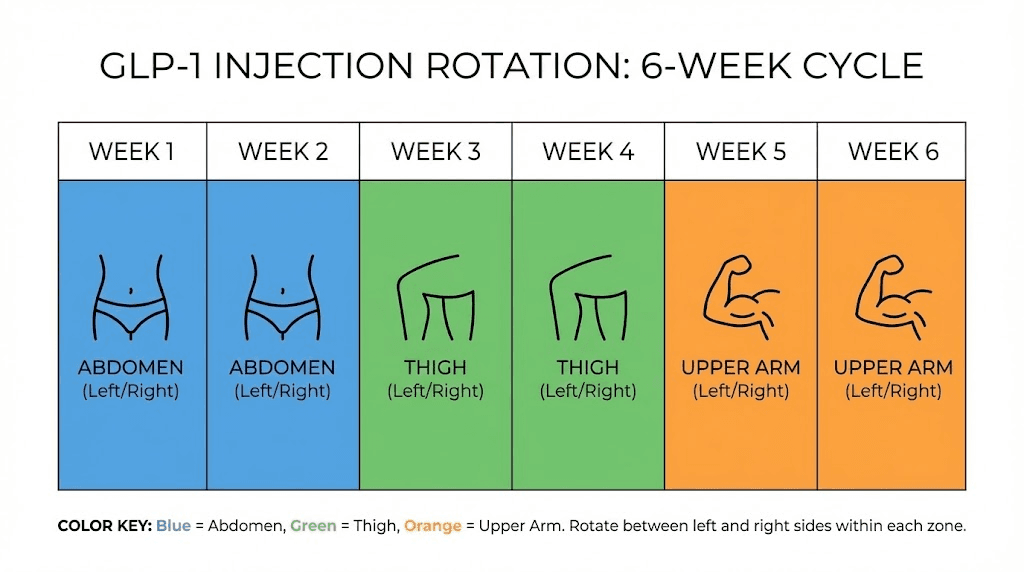
Practical rotation schedules for weekly GLP-1 injections
Here are three rotation systems you can use, ranging from simple to comprehensive.
Two-zone rotation (simplest):
Week 1: Right side of abdomen
Week 2: Left side of abdomen
Week 3: Right side of abdomen (shift position within zone)
Week 4: Left side of abdomen (shift position within zone)
This is the minimum viable rotation. You alternate between two abdominal zones, moving at least an inch from your previous spot within each zone. It works, but it limits your tissue recovery time.
Three-zone rotation (recommended):
Week 1: Right abdomen
Week 2: Right thigh
Week 3: Left abdomen
Week 4: Left thigh
Week 5: Right abdomen (different spot than Week 1)
This four-week cycle gives each zone a full three weeks of recovery between injections. It is the best balance of simplicity and tissue protection for most people.
Six-zone rotation (most thorough):
Week 1: Right upper abdomen
Week 2: Right thigh
Week 3: Left upper abdomen
Week 4: Left thigh
Week 5: Right lower abdomen
Week 6: Left lower abdomen
Add upper arms as Week 7 and 8 if you have help with injection, and you create an eight-week cycle where no single zone is used more than once every two months. This is the gold standard for long-term injectable therapy and mirrors what endocrinologists recommend for patients on chronic GLP-1 protocols.
How to track your rotation
The biggest reason people fail at rotation is that they forget where they injected last week. A few simple tracking methods solve this.
Phone calendar: Set a weekly reminder for injection day and add a note with the site used. Next week, check last week's note before injecting.
Body diagram: Print or draw a simple outline of your torso and legs. Mark each injection with the date. After a few months, you will have a clear visual map of your rotation pattern.
Numbered system: Assign a number to each zone (1 through 6 or 8) and simply move to the next number each week. Write the current number on your medication or pen case so you always know where you are in the cycle.
App-based tracking: Several injection tracking apps exist specifically for GLP-1 users. These let you log each injection by location and date, and some even remind you which zone to use next.
The method does not matter nearly as much as consistency. Pick a system and stick with it. SeekPeptides recommends the three-zone rotation as the starting point for most people, upgrading to six zones once you are comfortable with the injection routine.
Common injection mistakes and how to avoid them
Even experienced self-injectors develop habits that undermine their technique. Here are the most common mistakes and their solutions.
Injecting cold medication
This is the number one cause of injection-site stinging and burning. GLP-1 medications stored in the refrigerator are typically between 2 and 8 degrees Celsius (36-46 degrees Fahrenheit). Injecting this cold solution directly into warm body tissue causes immediate discomfort. The temperature difference irritates nerve endings and can cause the tissue to contract around the depot, potentially affecting absorption.
The fix is simple. Remove your medication from the refrigerator 15-30 minutes before your scheduled injection. Let it reach room temperature naturally. Do not use hot water, microwaves, or any active heating method, as these can damage the peptide structure of the medication. Room temperature injection is noticeably more comfortable for most people.
Reusing needles
Needles are designed for single use. After one insertion, the tip begins to dull and the surface can develop microscopic burrs that tear tissue rather than cleanly penetrating it. Reused needles cause more pain, more bruising, more tissue damage, and significantly higher infection risk. The FDA and American Diabetes Association both recommend using a new needle for every injection without exception.
If cost is a concern, pen needles are available in bulk and typically cost less than $0.15 each. That is a trivial expense compared to the cost of the medication itself or the medical bills from an injection-site infection.
Not waiting for alcohol to dry
Cleaning the injection site with an alcohol swab is standard practice. But injecting before the alcohol has fully evaporated introduces alcohol into the subcutaneous tissue, causing a sharp stinging sensation that people blame on the medication rather than their technique. Wait 10-15 seconds after swabbing. The skin should feel dry to the touch before you insert the needle.
Injecting through clothing
Some people try to inject through thin fabric to save time or avoid lifting their shirt. This is a significant infection risk. Fabric fibers can be pushed into the subcutaneous tissue by the needle, introducing bacteria and foreign material. Always inject into clean, bare skin.
Rushing the injection process
Speed is the enemy of good technique. Pushing the plunger too fast can create excessive pressure in the tissue, causing pain and potentially pushing the medication along fascial planes rather than forming a clean depot. For pen devices, not holding the button long enough means the full dose may not be delivered. For syringes, pushing over 5-10 seconds is ideal.
The same applies to needle removal. Pulling the needle out too quickly can cause the medication to leak back through the needle track, a phenomenon called medication reflux. Hold for a full 5 seconds after the plunger is fully depressed, then remove smoothly.
Injecting into scar tissue, moles, or bruised areas
Scar tissue has altered blood supply and nerve distribution. Injecting into or near scars produces unpredictable absorption and often more pain. Moles should be avoided because needle trauma to a mole can cause bleeding and inflammation. Previously bruised areas may have residual blood pooling or inflammation that affects absorption. The rule is simple: inject into healthy, unmarked skin only.
Forgetting the air bubble check with syringes
When using a syringe rather than a pen, air bubbles in the medication can reduce your effective dose. Hold the syringe with the needle pointing up, tap gently to move bubbles to the top, and push the plunger slightly to expel the air before injection. This is not necessary with pen devices, as they are designed to prevent air entry.
Reducing injection pain and discomfort
Even with perfect technique, some people find GLP-1 injections uncomfortable. Here are evidence-based strategies to minimize pain.
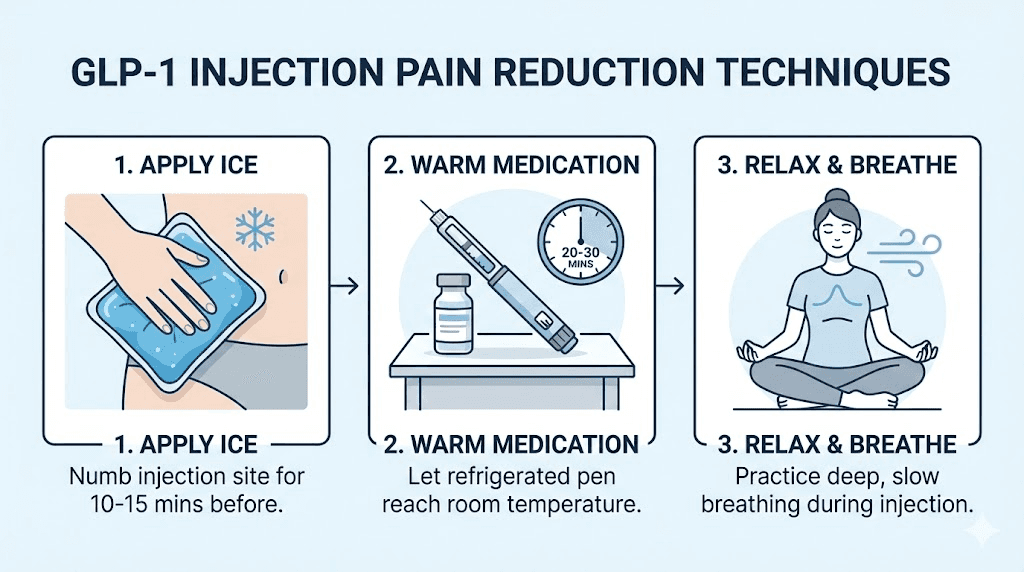
Temperature management
We already covered letting the medication reach room temperature. But temperature can be used on the injection site itself too. Applying an ice pack or cold compress to the injection area for 3-5 minutes before injection numbs the superficial nerve endings and reduces pain perception. Some people find that the cold actually makes them less anxious about the injection, which reduces tension in the tissue and makes insertion easier.
Caution: excessive cooling can cause vasoconstriction (narrowing of blood vessels), which theoretically might slow initial absorption. Five minutes of ice is enough to numb without significantly affecting blood flow. Do not use ice for longer than 10 minutes or apply it so aggressively that the skin turns white.
Topical numbing agents
Over-the-counter lidocaine creams (typically 4-5% concentration) can be applied to the injection site 30-60 minutes before injection. These temporarily block nerve signal transmission in the treated area, making the needle insertion barely perceptible. Popular options include brands like LMX and various generic lidocaine creams available at most pharmacies.
Check with your healthcare provider before using numbing creams to ensure they will not interfere with your specific medication's absorption. In most cases, topical lidocaine is applied and absorbed into the superficial skin layers well before the subcutaneous injection, so interaction is unlikely. But individual circumstances vary.
Distraction and relaxation techniques
Muscle tension increases injection pain. When you tense up in anticipation of the needle, the tissue becomes harder and more resistant to penetration. Take a deep breath, exhale slowly, and inject during the exhale when your body is most relaxed. Some people find it helpful to wiggle their toes during injection, as this simple distraction engages sensory processing in a way that reduces pain perception.
Looking away from the injection site also helps. Studies on injection pain in both adults and children consistently show that watching the needle increases reported pain scores. Set everything up, locate your site, pinch your skin, then look away as you insert the needle.
Choosing the right time of day
Most GLP-1 medications can be injected at any time of day. But some people find that injecting in the evening, before bed, allows them to sleep through any initial side effects like nausea or fatigue. Others prefer morning injections so they are awake and can monitor for any unusual reactions. There is no pharmacologically correct time, pick whatever works best for your routine and comfort level.
The most important factor is consistency. Injecting on the same day each week maintains steady blood levels and minimizes the peaks and troughs that can cause fluctuating side effects. If your injection day is Tuesday, try to keep it on Tuesday every week, within a few hours of the same time if possible.
Site-specific considerations for different GLP-1 medications
While the injection site principles are universal across GLP-1 receptor agonists, some medication-specific considerations are worth noting.
Semaglutide (Ozempic, Wegovy)
Semaglutide is administered once weekly and comes in prefilled pen devices with built-in 30 or 32 gauge needles. The pen design makes the injection process straightforward, with minimal technique variation needed between sites. The standard dose escalation starts at 0.25mg and increases monthly to the maintenance dose.
For semaglutide specifically, the abdomen tends to produce the most consistent results because the prefilled pen needle length is optimized for abdominal subcutaneous fat. The 4mm needle on most pens can be used at 90 degrees into the abdomen without a skin pinch in most patients. For the thigh, a skin pinch is recommended even with the short pen needle, especially in lean individuals.
Semaglutide injection-site reactions occur in approximately 1.4% of Ozempic patients and 2.4% of Wegovy patients, according to FDA clinical trial data. These are generally mild, consisting of redness, swelling, or itching that resolves within 24-48 hours. If injection-site reactions persist or worsen, switching to a different anatomical zone often resolves the issue.
Tirzepatide (Mounjaro, Zepbound)
Tirzepatide is a dual GIP/GLP-1 receptor agonist administered once weekly. Like semaglutide, it comes in prefilled pens with small gauge needles. The injection technique is essentially identical, but tirzepatide has a slightly different dose escalation schedule starting at 2.5mg.
Some tirzepatide users report more injection-site reactions than semaglutide users, particularly during the first few weeks. This may be related to the medication formulation rather than injection technique. If you experience persistent redness or swelling with tirzepatide, proper storage and temperature management become especially important. Room temperature injection significantly reduces the inflammatory response at the injection site.
For compounded tirzepatide that requires reconstitution, the injection process is slightly different. You will use a separate syringe and needle, typically a 30 gauge, 0.5 inch insulin syringe. The same site selection and rotation principles apply, but you have more control over needle choice and injection speed. Many researchers using compounded tirzepatide prefer 31 gauge, 5/16 inch (8mm) needles as a good balance between comfort and reliable subcutaneous delivery.
Retatrutide and newer triple agonists
Retatrutide is a triple receptor agonist (GLP-1/GIP/glucagon) currently in clinical trials. While not yet commercially available in prefilled pen form, researchers using the peptide follow the same subcutaneous injection principles. Because retatrutide requires reconstitution, syringe selection and injection technique become more important.
For reconstituted GLP-1 peptides in general, the same three injection sites apply. The key additional consideration is sterile technique during the reconstitution process itself, which introduces contamination risk that does not exist with sealed prefilled pens. Use bacteriostatic water, alcohol-swab every vial top before drawing, and never reuse syringes.
Injection sites for specific body types
Body composition significantly affects which injection sites work best and what technique adjustments you need to make. A one-size-fits-all approach does not work when body fat distribution varies so dramatically between individuals.
For individuals with higher body fat
If your BMI is above 30 or you carry significant subcutaneous fat, you have the advantage of thick tissue layers at all three injection sites. The abdomen is almost always comfortable and effective, with generous tissue to work with. The thighs and arms also tend to have adequate subcutaneous fat.
The main consideration for larger individuals is needle length. The standard 4mm pen needle works well for the abdomen but may not be long enough to penetrate through thicker skin and reach the subcutaneous layer in all areas. If you notice that medication seems to leak from the injection site or if you are not getting expected results despite consistent dosing, talk to your provider about whether a slightly longer needle (5mm or 6mm) might improve delivery.
Another consideration is skin fold technique. With more tissue, you may need to use a wider pinch and be more deliberate about lifting the subcutaneous layer away from the underlying muscle. The goal remains the same: deposit the medication in the fat layer, not the muscle and not the dermis.
For lean individuals
If you have low body fat, injection site selection becomes more critical. The abdomen usually still has adequate subcutaneous fat, even in very lean individuals, because the body preferentially maintains some visceral and subcutaneous fat around the midsection. However, the thighs and arms may have minimal subcutaneous tissue, making intramuscular injection more likely with standard technique.
For lean individuals:
Prioritize the abdomen as your primary injection site
Use a 45-degree angle for thigh injections, even with short pen needles
Always pinch the skin firmly to lift the subcutaneous layer
Consider avoiding the upper arm entirely if you have very little tissue there
4mm pen needles are ideal, as they minimize the risk of muscular injection
Some athletes and bodybuilders using GLP-1 peptides for research purposes find that the only viable injection site is the lower abdomen, where even very lean individuals maintain some subcutaneous fat. This is a legitimate limitation and one reason why rotation between multiple zones can be challenging for this population.
For individuals with loose or sagging skin
Weight loss itself, whether from GLP-1 medications or other means, can change the characteristics of your injection sites over time. As you lose subcutaneous fat, the skin may become looser, particularly around the abdomen. This does not make injection unsafe, but it may require technique adjustments.
With loose skin, the pinch technique becomes more important because you need to ensure you are pinching actual subcutaneous tissue and not just the skin itself. Press gently before pinching to assess the tissue depth. You should feel a layer of soft tissue between the skin and the firm muscle underneath. That soft layer is your target.
If significant weight loss has left you with very little subcutaneous fat at your usual injection sites, consult your healthcare provider about adjusting your technique or switching to injection sites where you still have adequate tissue.
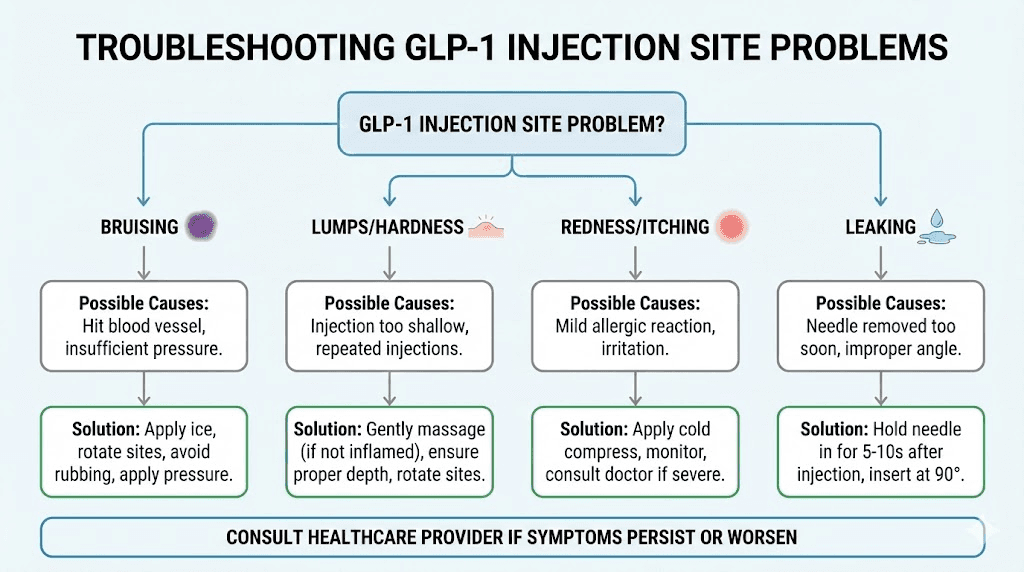
When something goes wrong: troubleshooting injection site problems
Even with perfect technique, problems occasionally occur. Here is how to identify and address the most common issues.
Bruising after injection
Bruising occurs when the needle nicks a small capillary beneath the skin, causing blood to leak into surrounding tissue. It is cosmetic, not dangerous, and typically resolves within 7-14 days. Bruising does not mean you did anything wrong. It simply means a tiny blood vessel was in the needle's path.
To minimize bruising: apply firm, steady pressure (not rubbing) for 15-30 seconds after removing the needle. Avoid alcohol or blood-thinning medications (aspirin, ibuprofen, fish oil) on injection day if possible and medically appropriate. Use the thinnest needle available. And do not inject into areas where you can see superficial veins.
If you bruise consistently at one particular site, it may have a more vascular subcutaneous layer. Simply avoid that specific spot and move to an adjacent area. Every person's vascular anatomy is slightly different, and some areas bruise more easily than others.
Lumps or nodules at the injection site
Hard lumps that appear within minutes to hours after injection can be medication-related nodules or early lipohypertrophy. Medication nodules are typically the result of the depot forming close to the skin surface, and they usually resolve within 24 hours to a few days. They are uncomfortable but not harmful.
Lumps that persist for weeks or grow over time are more concerning and may indicate lipohypertrophy from inadequate rotation. These require medical evaluation. Do not inject into a lump, as absorption will be unpredictable. Mark the area and avoid it until it fully resolves, then resume using that zone only as part of a proper rotation schedule.
Redness, swelling, or itching
Mild injection-site reactions (redness in a 1-2 inch circle around the injection site, mild swelling, slight itching) are within normal limits and typically resolve within 24-48 hours. These are more common during the first few weeks of therapy and often diminish as your body adjusts.
Severe or expanding redness, significant swelling, warmth, or the appearance of spreading red streaks could indicate infection and requires immediate medical attention. These reactions are rare but serious. If you see red streaks extending away from the injection site, contact your healthcare provider immediately.
Medication leaking from the injection site
A small droplet of medication at the injection site after needle removal is relatively common, especially with pen devices. This is sometimes called "wet injection" and typically represents a minimal amount of medication. It occurs more frequently when the needle is removed too quickly or when the pen button is not held down long enough after dose delivery.
To prevent leakage: hold the pen button for the full recommended count (usually 10 seconds with pens), wait an additional 5 seconds after the count, and remove the needle slowly. Apply immediate gentle pressure to the site. If you consistently experience significant leakage, you may not be achieving adequate subcutaneous depth, and a technique review with your healthcare provider is warranted.
Persistent pain at injection sites
Pain that lasts more than a few hours after injection suggests one of several issues: the needle may have hit a nerve ending (sharp, shooting pain), the injection may have been intramuscular rather than subcutaneous (deep, aching pain), or the medication may be causing a local inflammatory response (burning pain with redness).
Nerve hits are random and unavoidable. If you feel a sharp, electrical pain when the needle enters, you have likely hit a nerve. You can either redirect the needle slightly or remove it and inject in a nearby spot. The pain from a nerve hit resolves within seconds to minutes and does not indicate tissue damage.
Deep aching pain that lasts hours suggests intramuscular injection. Review your technique, particularly needle angle and length, and consider switching to a shorter needle or using a 45-degree angle. Consistent deep pain means you are routinely missing the subcutaneous layer.
Injection site comparison table
Factor | Abdomen | Thigh | Upper arm |
|---|---|---|---|
Absorption speed | Fastest | Moderate | Moderate-fast |
Systemic bioavailability | Lowest | Moderate (+13%) | Highest (+41%) |
Ease of self-injection | Easiest | Easy | Difficult alone |
Pain level (average) | Low | Low-moderate | Low |
Bruising risk | Low | Moderate | Low-moderate |
Subcutaneous fat (typical) | Most consistent | Variable | Variable |
Recommended needle angle | 90 degrees | 45-90 degrees | 90 degrees (with pinch) |
Nausea correlation | Lowest | Moderate | Highest |
Best for | Primary site, dose escalation | Rotation, nausea-sensitive | Rotation with helper |
This comparison reflects general trends across studies and clinical observations. Individual experience may vary based on body composition, medication type, and technique.
Injection timing relative to meals, exercise, and other medications
Before or after meals
GLP-1 medications do not need to be taken with food, and injection timing relative to meals does not significantly affect absorption. However, many people find that injecting on a relatively empty stomach, or at least not immediately after a large meal, reduces the nausea that can occur in the hours following injection. This is practical advice rather than pharmacological necessity.
If your GLP-1 medication causes significant gastrointestinal side effects, some clinicians recommend injecting before bed so that the peak absorption occurs overnight while you are asleep. This can help you sleep through the worst of the nausea and wake up feeling more normal.
Exercise and injection timing
Exercise increases blood flow to the muscles and skin, which can accelerate medication absorption from a subcutaneous depot. If you inject in your thigh and then immediately do squats, you are going to absorb that medication faster than intended. The same applies to abdominal exercises after a belly injection or arm exercises after an arm injection.
The general recommendation is to wait at least 1-2 hours after injection before exercising the body part where you injected. If you are on a consistent exercise schedule, consider injecting at the end of the day on a rest day rather than before a workout. This gives the medication depot time to stabilize before increased blood flow could disrupt it.
Other injectable medications
If you use other injectable medications, whether other peptides, insulin, or different therapies, never inject two different medications into the same site at the same time. Use completely different zones. For example, if you inject insulin into the abdomen, use the thigh for your GLP-1 medication. The injection sites should be at least several inches apart to prevent interaction between the two medication depots.
The timing between different injections matters less than the location. You can inject two different medications within minutes of each other as long as they are in different anatomical zones. But avoid injecting two medications on the same day if it is avoidable, simply because doubling up on injection-site trauma increases your overall discomfort and complicates rotation tracking.
Special situations and frequently asked questions
Can you inject GLP-1 in the buttocks?
The buttocks are not typically listed as an approved injection site for GLP-1 medications, but subcutaneous injection into the upper outer quadrant of the buttock is a well-established technique for other medications. The buttock has the slowest absorption rate of any subcutaneous injection site, which could theoretically extend the medication's release profile. However, most GLP-1 clinical trials did not include the buttocks as a study site, so it is not in the official prescribing information. Stick to the three approved sites (abdomen, thigh, upper arm) unless your healthcare provider specifically recommends otherwise.
What if you accidentally inject into muscle?
If you suspect an intramuscular injection (you felt a deeper pain, the needle went in much further than usual, or you did not pinch the skin and used a longer needle), do not panic. The medication will still work. It will simply absorb faster than intended, which may increase side effects like nausea for that particular dose. There is no need to re-inject or take any corrective action. Just note what happened and adjust your technique for next time.
Can you inject through body hair?
Light body hair at the injection site does not need to be removed. The needle will pass through without issue. However, very thick, coarse body hair can increase the resistance the needle encounters during insertion, potentially making the injection more uncomfortable. If hair at your preferred injection site is thick enough to impede the needle, you can trim (not shave) the area. Shaving can cause micro-cuts and irritation that make the site less suitable for injection for several days.
What about tattoos at injection sites?
You can inject into tattooed skin. The ink sits in the dermal layer, and the needle passes through this layer into the subcutaneous fat beneath. However, tattooed skin makes it harder to assess for injection-site reactions (redness, swelling) because the coloring can mask these signs. If possible, choose an untouched area of skin for easier monitoring, but tattooed skin is not a contraindication for injection.
Is injection site different for oral GLP-1 formulations?
Oral GLP-1 medications (such as oral semaglutide, brand name Rybelsus) do not require injection at all. They are taken as tablets, typically first thing in the morning on an empty stomach with a small amount of water. The injection site guidance in this article applies exclusively to injectable GLP-1 formulations. If you are considering switching between oral and injectable GLP-1 options, discuss the differences with your healthcare provider.
How long after reconstitution can you inject?
For reconstituted GLP-1 peptides, the standard practice is to use the reconstituted solution within 28 days when stored properly in the refrigerator. Always reconstitute with bacteriostatic water rather than sterile water, as bacteriostatic water contains 0.9% benzyl alcohol that prevents bacterial growth during multi-use storage. The injection technique itself does not change based on how recently the peptide was reconstituted, but always inspect the solution for cloudiness, particles, or discoloration before injection. Clear solution only.
Do injection sites matter for appetite suppression timing?
Because the abdomen provides faster initial absorption, some people notice appetite suppression slightly sooner after an abdominal injection compared to a thigh injection. However, GLP-1 medications are designed for sustained action over a full week, so the difference in onset timing is typically measured in hours, not days. Over the course of the week, appetite suppression should be comparable regardless of injection site. If you notice dramatic differences in appetite suppression between sites, it is worth evaluating whether your technique is consistent across locations, as inconsistent subcutaneous delivery could be the real issue.
Building your personal injection routine
The best injection routine is one you can follow consistently, week after week, without it becoming a source of stress or avoidance. Here is a framework for building a sustainable practice.
Choose your primary and secondary sites
Start with the abdomen as your primary site. It is the easiest to access, the most forgiving of minor technique variations, and produces the most tolerable side effect profile. Designate the thigh as your secondary site for rotation. If you have someone willing to help with arm injections, add the upper arm as a third rotation zone.
Set up your injection station
Having a designated spot and setup routine eliminates decision fatigue and reduces the chance of forgetting a step. Your station should include: your medication (at room temperature), a new needle or syringe, alcohol swabs, a cotton ball or small gauze pad, a sharps container for needle disposal, and your tracking method (phone, paper, or app).
Keep everything in one place. A small basket or pouch works well. The goal is to make injection day feel routine rather than like a medical procedure.
Develop your pre-injection checklist
Consistency in preparation leads to consistency in technique. A simple mental checklist:
Medication at room temperature? Check.
Hands washed? Check.
New needle attached (if using pen)? Check.
Site selected and cleaned? Check.
Alcohol dried? Check.
Previous injection site noted? Check.
Within a few weeks, this becomes automatic. The routine itself provides confidence that reduces injection anxiety, which in turn reduces muscle tension and pain perception. It is a positive cycle.
Tracking results by injection site
If you want to optimize your injection practice, track not just where you injected but how it went. Note any pain, bruising, nausea, or other observations. After several months, you may discover patterns. Maybe your right thigh consistently bruises more than your left. Maybe abdominal injections on the lower portion produce less nausea than upper abdominal injections. These personal observations help you refine your rotation to favor the sites and positions that work best for your body.
SeekPeptides members access detailed protocol tracking tools that make this kind of personalization straightforward. But even a simple notebook serves the purpose if you record consistently.
Frequently asked questions
Where is the best place to inject GLP-1 for beginners?
The abdomen is the best starting point for beginners. It has the most subcutaneous fat in most people, provides the easiest self-access, and produces the most comfortable injection experience. Start with the area to the right or left of the navel, at least two inches away from the belly button. Use a 90-degree angle with a gentle skin pinch.
Does it matter where you inject semaglutide on your stomach?
Within the approved abdominal zone, specific location does not matter significantly. Stay at least two inches from the belly button, remain within the boundaries between the ribs and pelvic bones, and rotate your position each week. Some people find the lower abdomen slightly more comfortable than the upper abdomen, but this varies individually.
Can you inject GLP-1 in the same spot every week?
No. Repeated injection in the same spot causes lipohypertrophy, a thickening of tissue that leads to unpredictable medication absorption. Always rotate at least one inch from your previous injection site, and ideally rotate between different anatomical zones each week.
Why does my GLP-1 injection burn?
The most common cause is injecting cold medication. Allow 15-30 minutes at room temperature before injecting. Other causes include injecting before the alcohol swab has dried, injecting too quickly, or injecting too superficially into the dermal layer. Deeper subcutaneous injection with slow, steady plunger pressure typically eliminates burning.
How deep should the needle go for GLP-1 injections?
The needle should reach the subcutaneous fat layer, which sits between the skin and the muscle. With a 4mm pen needle at 90 degrees into a pinched skin fold, the depth is appropriate for most people. With a longer syringe needle, a 45-degree angle ensures the needle travels through the fat layer rather than penetrating into muscle.
Should I pinch the skin when injecting GLP-1?
Pinching is recommended for syringe injections and for pen injections in leaner individuals or at the thigh. The pinch lifts the subcutaneous layer away from the muscle, ensuring proper depth. For pen injections with 4mm needles into the abdomen, pinching is optional but still good practice, especially while you are learning.
Can you exercise after a GLP-1 injection?
Wait at least 1-2 hours before vigorous exercise involving the injected body area. Exercise increases blood flow, which can accelerate absorption. Light activity like walking is fine immediately. Intense workouts targeting the injection site should be delayed.
What size needle is best for semaglutide or tirzepatide?
For prefilled pens, use the manufacturer-provided needles (typically 31-32 gauge, 4mm). For syringe injections of compounded formulations, 30-31 gauge, 0.5 inch (12.7mm) or 5/16 inch (8mm) needles work well. Choose the thinnest, shortest needle that reliably reaches the subcutaneous layer.
External resources
For researchers serious about optimizing their GLP-1 protocols, SeekPeptides offers the most comprehensive resource available, with evidence-based guides, dosing calculators, proven protocols, and a community of thousands who have navigated these exact questions.
In case I do not see you, good afternoon, good evening, and good night. May your injection sites stay comfortable, your rotation stay consistent, and your results stay exactly where you want them.