Feb 14, 2026
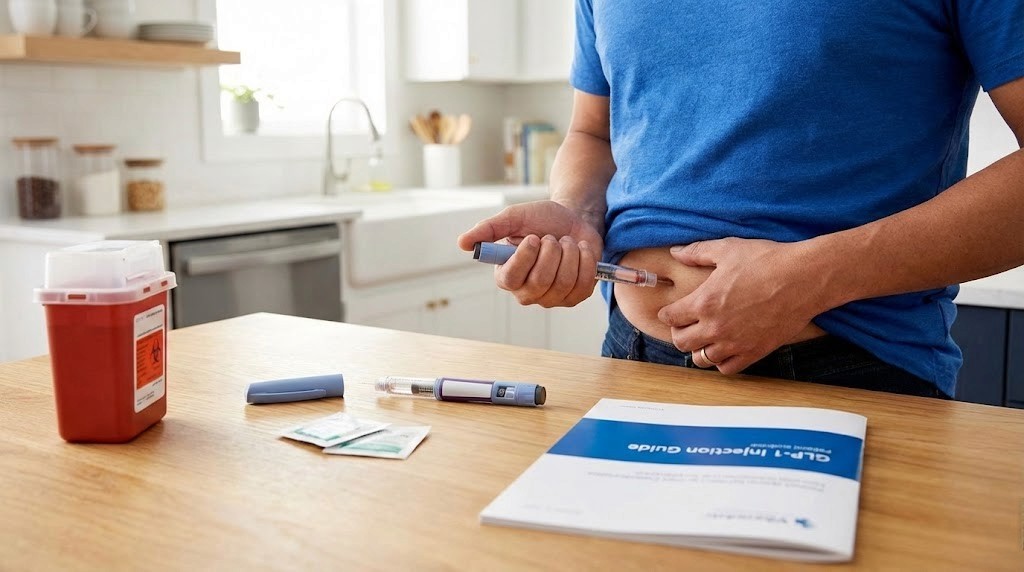
Your first GLP-1 injection does not have to feel like defusing a bomb. But if you have ever stared at a vial, a syringe, and an alcohol swab wondering where to even begin, you are not alone. Thousands of researchers go through this exact moment, needle in hand, heart rate climbing, confidence dropping. The good news? The actual injection takes about 10 seconds. The technique is simple once you understand it. And the discomfort, for most people, amounts to less than a mosquito bite.
The confusion comes from somewhere specific. GLP-1 medications arrive in different formats. Pre-filled pens. Multi-dose vials. Lyophilized powder that needs reconstitution. Each format has its own preparation steps, its own needle requirements, its own quirks. Mix up the steps for one format and you waste medication, get an inaccurate dose, or create unnecessary pain at the injection site. That is why a clear, format-specific guide matters more than generic advice.
This guide covers everything. From gathering your supplies to administering your first injection to handling the aftercare that prevents bruising and infection. Whether you are using a brand-name pen like Ozempic or Wegovy, a compounded semaglutide vial, or a tirzepatide formulation, the fundamentals of safe subcutaneous injection remain the same. The differences live in the preparation details, and we will walk through every single one of them. SeekPeptides has helped thousands of researchers navigate these exact steps, and the protocol below reflects what actually works in practice, not just what looks good on paper.
What you need before your first injection
Preparation separates a smooth injection from a stressful one. Before you uncap anything, gather every supply you will need within arm reach. Scrambling mid-injection for an alcohol swab you forgot to grab creates exactly the kind of stress that makes your hands shake and your technique suffer.
Essential supply checklist
Your supply list depends on whether you are using a pre-filled pen or drawing from a vial. For pen users, the requirements are minimal. Your medication pen, a compatible pen needle (typically 4mm to 6mm, 31 or 32 gauge), alcohol swabs, and a sharps disposal container. That is it.
Vial users need more. The vial of GLP-1 medication, an insulin syringe (29 to 31 gauge, 0.5mL or 1mL depending on your dose volume), alcohol swabs, a clean cotton ball or gauze pad, and a sharps container. If you are working with compounded semaglutide in lyophilized form, you also need bacteriostatic water for reconstitution.
One thing many guides skip: have a flat, clean, well-lit surface ready. A kitchen counter works. A bathroom counter works. What does not work is balancing a vial on your knee while sitting on the couch. Stability matters when you are drawing precise doses.
Understanding your needle options
Needle selection confuses more beginners than almost anything else. Here is the simple breakdown. Gauge refers to thickness, and the numbers run counterintuitively. Higher gauge means thinner needle. A 31-gauge needle is thinner than a 29-gauge needle. Thinner needles cause less discomfort but draw medication more slowly.
For subcutaneous GLP-1 injections, the sweet spot sits between 29 and 32 gauge. Most researchers find 30 or 31 gauge ideal. It is thin enough to minimize pain but thick enough to draw medication without excessive effort. Needle length matters too. For subcutaneous delivery into the fat layer beneath the skin, 4mm to 8mm works for most body types. People with less subcutaneous fat may prefer 4mm. Those with more adipose tissue may need 6mm or 8mm to ensure the medication reaches the subcutaneous layer properly.
Never reuse needles. A fresh needle every single time. Used needles develop microscopic barbs on the tip that increase pain, increase bruising risk, and increase infection risk. The cost of a new needle is negligible compared to the problems a dulled one creates.
Storage check before injection
Before you inject, verify your medication has been stored correctly. GLP-1 medications require refrigeration at 36 to 46 degrees Fahrenheit (2 to 8 degrees Celsius). If your compounded semaglutide or tirzepatide has been out of the fridge for extended periods, do not use it without checking the manufacturer stability guidelines.
Check the solution visually. It should be clear and colorless. No particles. No cloudiness. No discoloration. If something looks off, do not inject it. Period.
One practical tip that makes a real difference: remove your medication from the refrigerator 15 to 30 minutes before injection. Room-temperature medication causes significantly less stinging than cold medication. This single step reduces injection discomfort more than almost any other technique adjustment.
Choosing your injection site
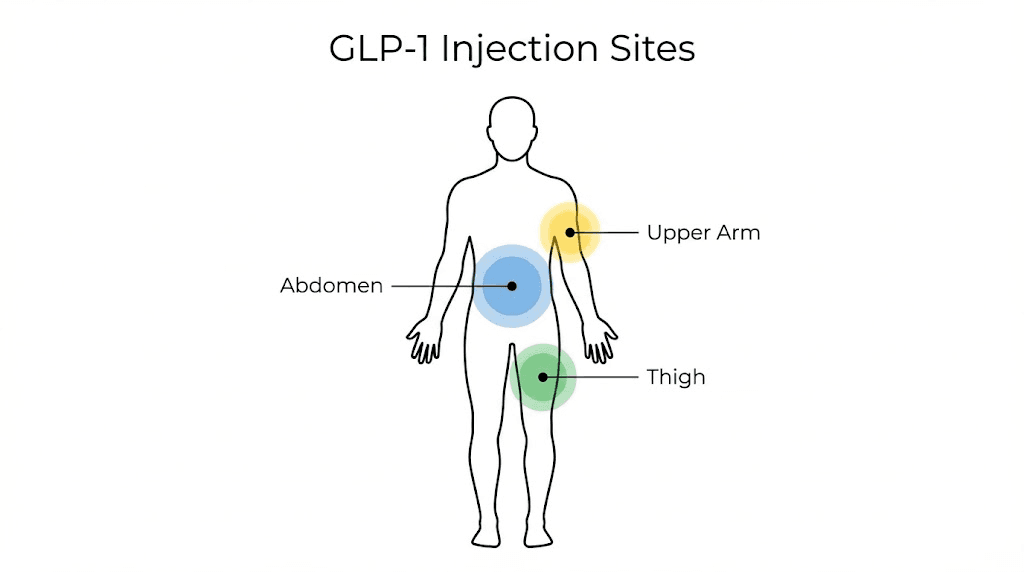
Where you inject matters. Not all body locations absorb GLP-1 medications equally, and some sites are simply more comfortable than others. The three FDA-approved injection sites for subcutaneous GLP-1 administration are the abdomen, the front or outer thigh, and the back of the upper arm. Each has advantages and trade-offs.
The abdomen
Most researchers and healthcare providers consider the abdomen the preferred injection site. It offers the largest surface area for rotation, consistent subcutaneous fat depth, and reliable absorption rates. The key zone sits at least two inches away from the belly button in any direction. Avoid the area directly around the navel, any surgical scars, stretch marks, or areas where the skin is bruised or irritated.
The abdomen typically has enough subcutaneous fat for comfortable injection across most body types. Absorption from the abdominal area tends to be the most consistent, which matters for medications like semaglutide and tirzepatide where steady-state levels drive clinical outcomes. For a more detailed breakdown of optimal locations, check our guide on where to inject GLP-1.
The thigh
The front or outer thigh provides the second most popular injection site. Target the middle third of the thigh, staying at least four inches above the knee and four inches below the hip. This zone offers good subcutaneous fat depth in most individuals and easy visual access for self-injection.
Thigh injections can be slightly more uncomfortable than abdominal injections for some people because the thigh has more nerve endings near the surface. If you find thigh injections consistently more painful, you are not imagining it. Try the abdomen instead. The medication works the same regardless of which approved site you choose.
The upper arm
The back of the upper arm works well but presents a practical challenge: most people cannot comfortably self-inject in that location. If someone else administers your injection, the upper arm is a perfectly valid option. The subcutaneous fat layer on the back of the arm absorbs GLP-1 medications effectively. But if you are doing this solo, stick with the abdomen or thigh.
Why site rotation is non-negotiable
Injecting into the same spot repeatedly causes lipohypertrophy, a condition where hardened lumps of fatty and fibrous tissue develop under the skin. These lumps are more than cosmetic. They actively interfere with medication absorption. A dose injected into lipohypertrophic tissue may absorb unpredictably, leading to inconsistent blood levels and reduced effectiveness. Research on injection safety consistently shows that proper rotation prevents this entirely.
The rotation strategy is straightforward. Move at least one inch (2.5 centimeters) from your last injection site every time. Many researchers use a clock pattern around the abdomen, moving to the next hour position each week. Others alternate sides, left abdomen one week, right abdomen the next, left thigh the third week, right thigh the fourth. The specific system matters less than the consistency of never hitting the same spot twice in a row.
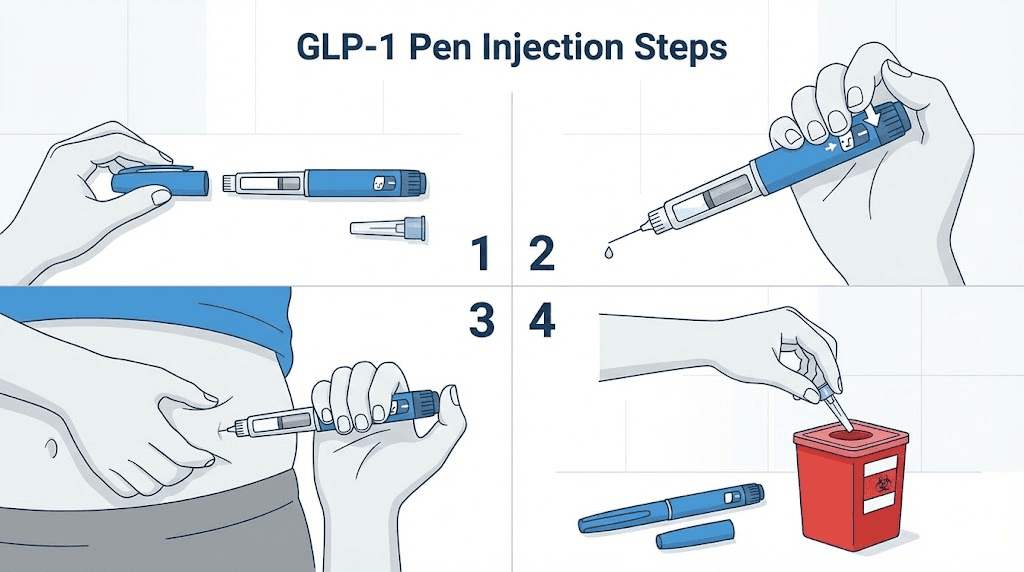
Step-by-step injection guide for pre-filled pens
Pre-filled pens are the simplest format. The medication is already in liquid form, the dose mechanism is built in, and the process requires minimal preparation. If you are using Ozempic, Wegovy, Mounjaro, or Zepbound, this section applies to you.
Step 1: Wash your hands
Soap and water. Twenty seconds minimum. This is not optional hygiene theater. Your hands will touch the pen, the needle, and potentially the injection site. Clean hands are the first line of defense against introducing bacteria into a subcutaneous injection.
Step 2: Inspect the medication
Look through the pen window. The solution should be clear and colorless. For semaglutide pens, the liquid should have no particles floating in it. For tirzepatide pens, the same standard applies. If you see cloudiness, discoloration, or particulate matter, do not use that pen. Contact your pharmacy for a replacement.
Step 3: Attach a new needle
Remove the outer cap from the pen. Peel the protective tab from a new pen needle. Screw or push the needle onto the pen tip depending on your specific model. Do not remove the outer or inner needle caps yet.
Step 4: Perform a flow check (new pens only)
If this is the first injection from a new pen, you need to prime it. This step is also called a flow check or safety test. Set the dose to the smallest unit (usually 2 units on the dial). Remove both needle caps. Hold the pen with the needle pointing upward. Press the injection button. You should see a small drop of medication appear at the needle tip. If no drop appears, repeat until you see one. This confirms the pen mechanism is working and clears any air from the needle assembly.
You do not need to prime before every injection. Only before the first use of each new pen. Some researchers prime each time out of habit, which wastes medication unnecessarily.
Step 5: Set your dose
Dial the pen to your prescribed dose. You will hear clicks as the dose selector turns. Verify the number in the dose window matches your target. If you accidentally dial past your dose, you can dial back without wasting medication on most pen models. Reference our semaglutide dosing chart or tirzepatide dosing chart to confirm your target units.
Step 6: Prepare the injection site
Choose your site using the rotation strategy discussed above. Clean the area with an alcohol swab using a circular motion from the center outward. Let the alcohol dry completely before injecting. This takes about 15 to 30 seconds. Injecting through wet alcohol stings. Waiting for it to dry eliminates that entirely.
Step 7: Inject
Remove both needle caps. Pinch a fold of skin at your chosen site with your non-dominant hand. Hold the pen like a dart in your dominant hand. Insert the needle at a 90-degree angle straight into the pinched skin. Press the injection button all the way down. Hold the button pressed and keep the needle in place for a slow count of 10 seconds. This ensures the full dose delivers into the subcutaneous tissue.
Do not rush the hold time. Removing the needle too quickly causes medication to leak back out through the injection site. Ten seconds feels long when you are holding a needle in your body, but it is essential for complete dose delivery.
Step 8: Withdraw and dispose
Release the skin fold. Pull the needle straight out at the same angle it went in. If you see a small drop of blood or medication at the site, press gently with a clean cotton ball or gauze. Do not rub. Rubbing spreads blood under the skin and increases bruising.
Immediately place the used pen needle into your sharps container. Recap the pen without the needle attached and return it to the refrigerator.
Step-by-step injection guide for vials and syringes
Drawing from a vial requires more steps than using a pre-filled pen. The trade-off is greater dose flexibility and often lower cost, especially with compounded formulations. This process applies to compounded semaglutide, compounded tirzepatide, and any GLP-1 medication supplied in a multi-dose vial.
Step 1: Wash your hands
Same standard as pen injections. Soap, water, 20 seconds. Non-negotiable.
Step 2: Gather and inspect supplies
Set out your vial, a new insulin syringe, an alcohol swab, gauze or cotton ball, and your sharps container. Inspect the vial contents. The solution should be clear. If you are working with a reconstituted vial, check that the powder dissolved completely during reconstitution. Undissolved particles mean incomplete reconstitution, which means inaccurate dosing.
Step 3: Clean the vial top
Swab the rubber stopper on top of the vial with a fresh alcohol swab. Let it dry. This step prevents bacteria from transferring into the vial via the needle. Every time you draw from the vial, clean the stopper first. Every single time. No exceptions.
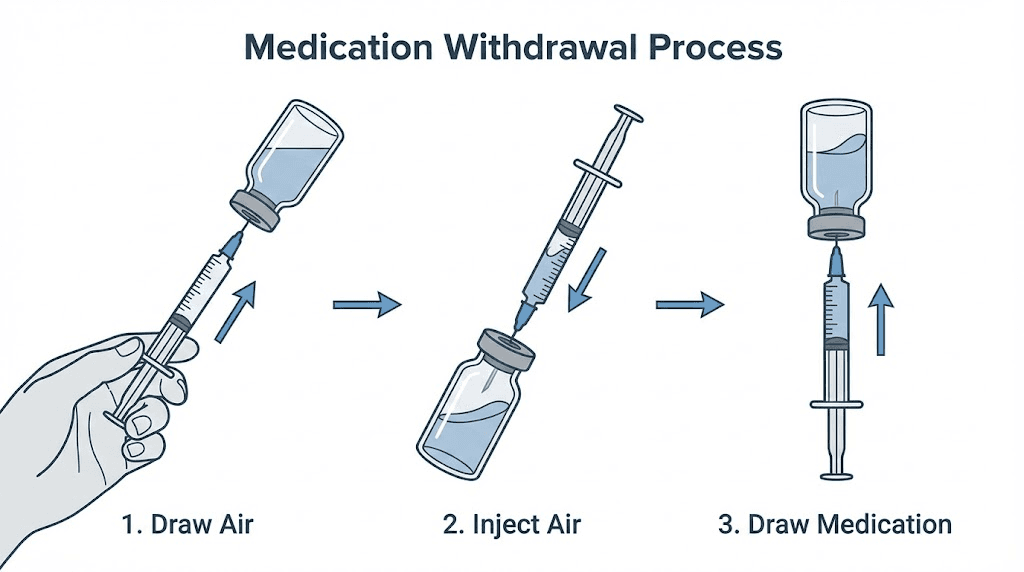
Step 4: Draw air into the syringe
Pull the plunger back to draw air into the syringe equal to the volume of medication you plan to withdraw. If you need 0.1mL of medication, draw 0.1mL of air. This air injection into the vial equalizes pressure and makes drawing medication significantly easier. Skip this step and you will fight vacuum pressure the entire time you are trying to draw your dose.
Step 5: Inject air into the vial
Insert the needle through the rubber stopper. Push the plunger to inject the air into the vial. Keep the needle in the vial for the next step.
Step 6: Draw your dose
Turn the vial upside down with the syringe still inserted. The needle tip should be submerged in the liquid. Pull the plunger back slowly to your target dose marking. Drawing slowly reduces the chances of creating bubbles. If you are using our semaglutide dosage calculator or tirzepatide dosage calculator, you already know exactly how many units or milliliters you need.
Step 7: Remove air bubbles
With the vial still inverted and the needle still inside, check for air bubbles in the syringe. If you see bubbles, tap the syringe barrel gently with your fingernail. The bubbles will float to the top near the needle. Push the plunger slightly to expel them back into the vial. Then pull back again to your correct dose.
A small note on air bubble anxiety: subcutaneous air bubbles are not dangerous. They do not enter the bloodstream. The air gets absorbed by surrounding tissue. The reason to remove them is accuracy, not safety. An air bubble in your syringe means you are injecting less medication than your dose marking indicates.
Step 8: Remove the syringe from the vial
Pull the needle straight out of the vial. Set the vial down on your clean surface. Do not recap the syringe needle. Recapping increases the risk of accidental needle sticks.
Step 9: Prepare and inject
The injection technique from here is identical to the pen method. Clean the site with alcohol. Let it dry. Pinch the skin. Insert the needle at 90 degrees. Push the plunger slowly and steadily until the syringe is empty. Hold for 5 to 10 seconds. Withdraw. Apply gentle pressure with gauze if needed. Dispose of the syringe in your sharps container immediately.
Reconstitution: when your vial contains powder
Some compounded GLP-1 medications arrive as lyophilized (freeze-dried) powder. Before you can inject, you must reconstitute the powder into an injectable solution using bacteriostatic water. The concentration of your final solution depends entirely on how much water you add.
For example, adding 2mL of bacteriostatic water to a 5mg vial creates a concentration of 2.5mg per mL. Adding 1mL to the same vial creates 5mg per mL. This concentration determines how many units on your syringe equal your target dose. Our reconstitution calculator handles this math automatically. For specific instructions, read our detailed guides on reconstituting 5mg semaglutide or reconstituting tirzepatide.
When reconstituting, inject the bacteriostatic water along the inside wall of the vial, not directly onto the powder. Swirl gently. Never shake. Shaking denatures the peptide and destroys its effectiveness. The powder should dissolve completely within 30 to 60 seconds of gentle swirling. If particles remain after two minutes of gentle mixing, something may be wrong with the vial.
Injection technique that minimizes pain
Nobody enjoys needles. But GLP-1 subcutaneous injections should cause minimal discomfort when done correctly. Most users describe the sensation as a brief pinch followed by a faint warmth that fades within a minute. If your injections consistently hurt, your technique needs adjustment, not your pain tolerance.
Temperature matters more than you think
Cold medication stings. This is the single most common cause of injection pain that people overlook. Let your medication sit at room temperature for 15 to 30 minutes before injecting. The difference is dramatic. Cold liquid entering subcutaneous tissue triggers a sharp, burning sensation that room-temperature liquid does not.
Do not microwave your medication. Do not run it under hot water. Simply set it on the counter. Natural warming to room temperature is all you need. And never leave medication out for more than the manufacturer recommended time, typically 14 to 28 days depending on the formulation.
The 90-degree rule
Insert the needle straight in at a 90-degree angle. Not at a 45. Not at a slant. Perpendicular to the skin surface. Angling the needle increases the chance of hitting muscle tissue instead of the subcutaneous fat layer, which hurts significantly more and may affect absorption. The one exception is if you are very lean with minimal subcutaneous fat, where your healthcare provider may recommend a 45-degree angle with a shorter needle.
Speed of insertion matters
Quick and confident. Do not slowly push the needle in. A fast, dart-like motion passes through nerve-rich skin layers quickly, minimizing the time those nerves are stimulated. Think of it like removing a bandage. Fast is better.
The plunger, however, gets the opposite treatment. Push the plunger slowly. Rapid injection forces medication into tissue faster than it can disperse, creating pressure that feels like a burning sting. Slow, steady pressure over 5 to 10 seconds distributes the medication evenly and comfortably.
The pinch technique
Pinching a fold of skin lifts the subcutaneous fat away from the underlying muscle. This creates a clear target zone for the needle and reduces the chance of intramuscular injection. Pinch firmly enough to lift the tissue but not so hard that you cause pain from the pinch itself. Maintain the pinch throughout the injection and release only after withdrawing the needle.
Not everyone needs to pinch. If you are using a 4mm needle and have adequate subcutaneous fat at the injection site, you can inject without pinching. But when in doubt, pinch. It consistently improves comfort and accuracy.
Relaxation is not a platitude
Tense muscles make injections hurt more. This is physiological, not psychological. When the muscle beneath your injection site is contracted, the tissue is firmer, the needle meets more resistance, and nerve endings are more compressed. Before injecting, take a breath. Let the muscle at your injection site go slack. If injecting in the thigh, sit down and let the quadricep relax completely. If injecting in the abdomen, avoid flexing your core.
Ice as a last resort
If you consistently find injections painful despite proper technique, try applying an ice cube or cold pack to the injection site for 30 to 60 seconds before injecting. The cold temporarily numbs the surface nerve endings. This is particularly helpful for needle-anxious beginners who need to build confidence. Most people stop needing ice after the first few injections as they realize the actual discomfort is minimal.
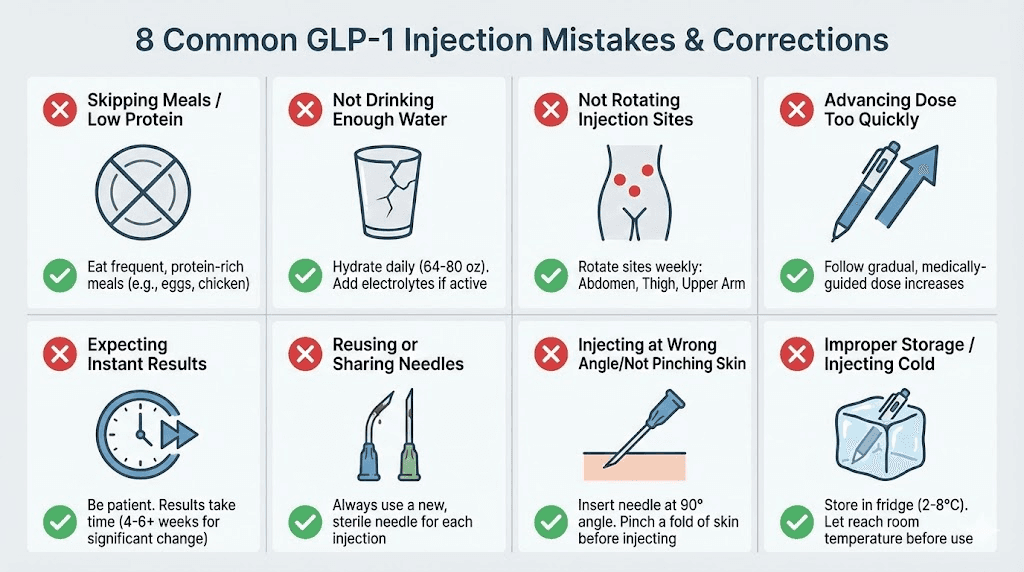
Common injection mistakes and how to avoid them
Even experienced researchers make mistakes. The difference between beginners and veterans is that veterans have already made these mistakes and corrected them. Here are the most common errors from our analysis of common peptide mistakes, along with specific fixes.
Mistake 1: Injecting cold medication
We covered this above, but it bears repeating because it is the most common cause of injection pain. Cold medication equals unnecessary discomfort. Fifteen minutes at room temperature solves it completely. Set a timer on your phone when you take the medication out of the fridge. By the time the timer goes off, you are ready.
Mistake 2: Not rotating injection sites
Using the same spot repeatedly feels comfortable because you know what to expect there. But comfort today creates lipohypertrophy tomorrow. Those hardened lumps are not just unsightly. They absorb medication unpredictably, which means your carefully calibrated dose may not deliver the blood levels you expect. Rotate every single time. No exceptions. Keep a simple log if you need to track which site you used last.
Mistake 3: Rushing the hold time
Pulling the needle out immediately after pressing the plunger is the most common cause of medication leaking from the injection site. That small drop of liquid you see on the skin after a rushed injection? That is medication you are supposed to absorb. Ten seconds of holding the needle in place after injection completion. Count it out. The dose depends on it.
Mistake 4: Rubbing the injection site
The instinct to rub the spot after an injection is natural but counterproductive. Rubbing spreads blood under the skin, increasing bruise size and duration. It can also push medication away from the injection site. Gentle pressure with a cotton ball is the correct approach. Press, do not rub.
Mistake 5: Reusing needles
Needles are designed for single use. A needle that has been through skin once develops microscopic burrs on the tip that increase pain, tissue damage, and infection risk with each subsequent use. Insulin syringes cost pennies each. There is zero justification for reusing them. Use a fresh needle every time.
Mistake 6: Injecting into the wrong tissue layer
GLP-1 medications are designed for subcutaneous injection, meaning into the fat layer between the skin and the muscle. Injecting too shallow (intradermal) causes a painful raised welt and poor absorption. Injecting too deep (intramuscular) causes more pain, faster absorption than intended, and potentially different pharmacokinetics. The 90-degree angle with proper pinch technique targets the subcutaneous layer accurately. Review our peptide injection fundamentals if you need a refresher on tissue layers.
Mistake 7: Skipping the alcohol swab
It takes five seconds. Skipping it introduces bacteria directly into a subcutaneous wound. Injection site infections are rare but entirely preventable. The alcohol swab is not medical theater. It is a basic sterility measure that eliminates the most common contamination vector: the bacteria on your skin.
Mistake 8: Incorrect air bubble removal from vials
Air bubbles in a syringe are not dangerous for subcutaneous injections. Subcutaneous air gets absorbed harmlessly by surrounding tissue. But air bubbles are a dosing accuracy issue. A bubble displaces medication volume, meaning you inject less than your syringe markings indicate. Tap the barrel, push the air out, redraw to your target line. Precision matters for accurate peptide dosing.
Injection timing and scheduling
When you inject matters less than most people think, but consistency matters more than most people realize. GLP-1 receptor agonists have long half-lives, which gives you flexibility in timing. But that flexibility does not mean randomness is acceptable.
Weekly injections: pick a day and stick with it
Most GLP-1 medications like semaglutide and tirzepatide use once-weekly dosing. The specific day does not matter. What matters is consistency. Pick a day that works with your schedule. Many researchers choose a day when they are home and relaxed. Some prefer injection day to be Sunday morning. Others pick Wednesday evening. The choice is personal.
If you miss your scheduled day, inject as soon as you remember, as long as it is at least two days before your next scheduled dose. If you are within two days of your next dose, skip the missed one and continue your regular schedule. Never double up. Our timing guide for semaglutide covers this in more detail.
Time of day: morning vs. evening
Clinical trials show no significant difference in effectiveness between morning and evening injections for weekly GLP-1 medications. However, individual experience varies. Some data suggests that injecting before 8am may produce slightly lower post-prandial glucose levels compared to evening injections, with one analysis showing a 15% improvement in post-meal blood sugar management.
The nausea factor plays a bigger role in timing decisions. Some researchers prefer evening injections because they can sleep through the initial hours when nausea peaks. Others prefer morning injections because any nausea resolves by bedtime. Experiment during your first few weeks to find what works for your body.
Food and injection timing
GLP-1 injections can be administered with or without food. The medication works independently of meal timing. However, many users report less nausea when injecting 2 to 3 hours after eating or on an empty stomach first thing in the morning. Injecting immediately after a large meal seems to amplify nausea in some individuals.
Some researchers find that eating a small protein-rich snack about 30 minutes before their injection reduces nausea. This is not universal, but it is worth trying if nausea is an issue for you. Understanding which foods to avoid and what to eat while on GLP-1 therapy can also help manage side effects.
Pen vs. vial: which format is right for you
The format of your GLP-1 medication affects your injection experience significantly. Both deliver the same active compound. Both achieve the same clinical outcomes. But the user experience differs in ways that matter for daily compliance.
Pre-filled pens
Brand-name GLP-1 medications like Ozempic, Wegovy, Mounjaro, and Zepbound come as pre-filled injection pens. The advantages are substantial. No reconstitution. No dose calculation beyond dialing a number. Built-in dose accuracy. Minimal preparation steps. The pen does most of the work.
The trade-offs: higher cost, less dose flexibility, and dependence on manufacturer supply. When shortages hit, pen users feel the impact first. The dose increments are fixed to what the manufacturer programmed into the pen mechanism.
Multi-dose vials
Compounded GLP-1 medications typically come in multi-dose vials. The advantages: lower cost, more precise dose flexibility (you control exactly how much you draw), and generally better availability. Compounded semaglutide and compounded tirzepatide have become increasingly popular precisely because of these benefits.
The trade-offs: more preparation steps, requires reconstitution knowledge for lyophilized formulations, and slightly more room for user error in dose measurement. The additional steps are not difficult, but they require attention to detail. Our semaglutide mixing chart and tirzepatide reconstitution chart simplify the math significantly.
Oral alternatives
Oral GLP-1 formulations are emerging as alternatives to injection. Oral tirzepatide and oral semaglutide drops offer needle-free administration for those who prefer it. However, oral formulations have different bioavailability profiles and may require different dosing schedules. Our comparison of tirzepatide oral vs. injection breaks down the differences.
Dose titration and your injection schedule
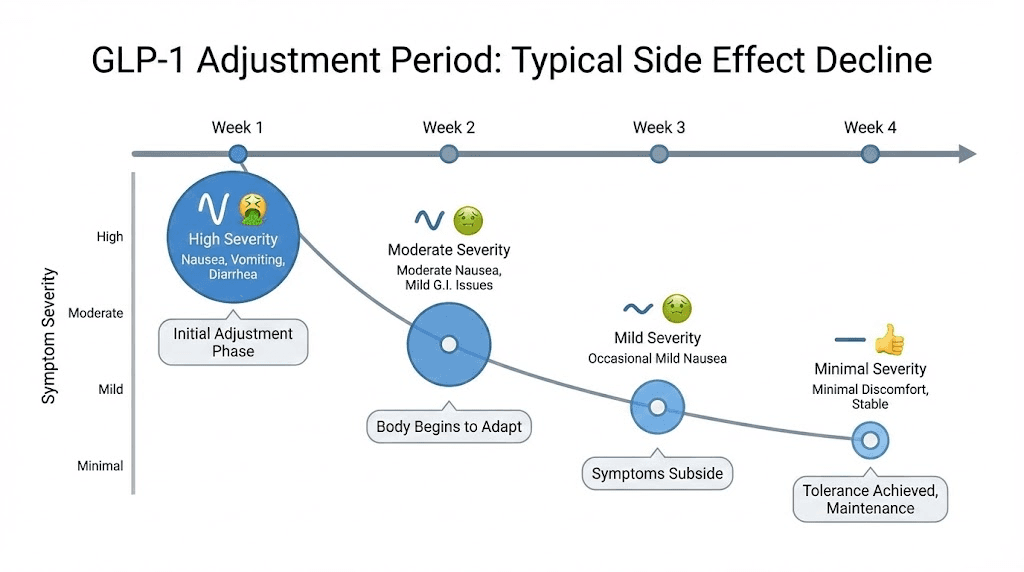
GLP-1 therapy never starts at the full dose. Every protocol begins with a lower dose and increases gradually over weeks to months. This titration process gives your body time to adjust to the medication and minimizes gastrointestinal side effects that drive many people to quit too early.
Standard semaglutide titration
The typical semaglutide protocol starts at 0.25mg weekly for the first four weeks. Then increases to 0.5mg weekly for the next four weeks. Further increases to 1.0mg, 1.7mg, and potentially 2.4mg happen at four-week intervals based on tolerance and response. Rushing this schedule is the single most common reason people experience severe nausea, vomiting, and other GI side effects that make them abandon the medication entirely.
Some researchers follow even more conservative titration using microdosing approaches. Starting at lower doses and increasing more slowly often produces better long-term compliance with fewer side effects. The goal is not the highest dose, but the effective dose you can maintain comfortably.
Standard tirzepatide titration
Tirzepatide starts at 2.5mg weekly for the first four weeks, then increases to 5mg weekly. Further increases to 7.5mg, 10mg, 12.5mg, and 15mg occur at four-week intervals. The same principle applies. Slow and steady titration produces better outcomes than aggressive dose escalation. Check our tirzepatide dosing guide in units for the exact syringe markings at each dose level.
What to do when you titrate up
Each dose increase may temporarily bring back mild side effects that subsided at the previous dose. This is normal. Your body needs 2 to 4 weeks to adjust to each new dose level. If side effects are intolerable at a new dose, the standard approach is to drop back to the previous dose for 2 more weeks before attempting the increase again. There is no shame in holding at a dose that works. Many researchers achieve their goals at moderate doses without ever reaching the maximum.
If you are switching between GLP-1 medications, dose conversion requires careful attention. Our conversion chart maps equivalent doses between the two most common options.
Managing injection side effects
Side effects from GLP-1 injections fall into two categories: injection-site reactions and systemic medication effects. Understanding which is which helps you respond appropriately.
Injection-site reactions
Redness, mild swelling, itching, or bruising at the injection site are common and typically resolve within 24 to 48 hours. These are local tissue responses to the physical act of injection, not allergic reactions to the medication. Proper technique reduces their frequency significantly.
Bruising is the most common complaint. Most injection bruises heal within 7 to 14 days. To minimize bruising, apply firm but gentle pressure (not rubbing) for 10 to 20 seconds after withdrawing the needle. Avoid blood-thinning medications like NSAIDs for several hours before injection if medically appropriate to do so. A cold compress applied for 10 to 15 minutes within the first hour can limit bruise size.
If you notice a hard lump at an injection site that does not resolve within two weeks, you may be developing lipohypertrophy from inadequate rotation. Avoid that site entirely until the lump resolves and evaluate your rotation pattern.
Systemic side effects
Nausea is the most commonly reported side effect of GLP-1 therapy, and it is a medication effect, not an injection technique issue. Nausea occurs because GLP-1 receptor agonists slow gastric emptying, which can cause a feeling of fullness or queasiness, especially after eating. Understanding this mechanism helps manage it effectively.
Eating smaller, more frequent meals helps. Avoiding high-fat and fried foods reduces the burden on slowed digestion. Staying hydrated is critical. If nausea is significant, your dose may need to increase more slowly. Our guides on managing semaglutide side effects and tirzepatide fatigue cover these systemic effects in detail.
Other common systemic side effects include constipation, diarrhea, headache, and fatigue. Most diminish after 2 to 4 weeks at each dose level as your body adjusts. If side effects persist beyond this adjustment window, consult your healthcare provider about dose modification. The side effect profiles differ between semaglutide and tirzepatide, so switching medications is sometimes the solution.
Safe needle disposal
Every used needle, syringe, and pen needle goes into a sharps container. Immediately. Not into the regular trash. Not onto the counter to deal with later. Into the sharps container the moment it leaves your body.
What qualifies as a sharps container
An FDA-cleared sharps container is the gold standard. These are available at most pharmacies for a few dollars. They are puncture-resistant, leak-proof, and have a one-way opening that prevents needles from falling out. If you do not have a purpose-built sharps container, a heavy-duty plastic bottle (like a laundry detergent container) with a screw-top lid works as a temporary solution. The container must be thick enough that a needle cannot puncture through it.
Disposal when the container is full
When your sharps container reaches the fill line (usually three-quarters full), seal it permanently. Do not compress the contents or try to overfill it. Options for disposal vary by location. Many pharmacies accept full sharps containers. Some municipalities offer drop-off locations. Mail-back programs exist for areas without local options. Your local health department website lists disposal options specific to your area.
Travel with sharps
Traveling with GLP-1 medication and injection supplies requires minimal planning. Keep medication in a cooler bag with ice packs during transport. Carry a small, sealable sharps container. If flying, GLP-1 medications and injection supplies are permitted in carry-on luggage. Bringing a copy of your prescription or a letter from your healthcare provider can smooth the security process, though TSA generally recognizes standard medication supplies without issue.
Injection confidence for beginners
The psychological barrier to self-injection is real and legitimate. Nobody is born comfortable with needles. If the idea of injecting yourself creates anxiety, that does not mean you are weak or being dramatic. It means you are human.
Start with the pen if possible
Pre-filled pens minimize the intimidation factor. The needle is short, thin, and hidden inside the mechanism. Many users report they barely feel the injection from a pen. If vial-and-syringe technique feels overwhelming at the start, beginning with a pen and transitioning to vials later is a completely valid approach.
Practice the motion without injecting
Some beginners benefit from practicing with a capped needle. Go through the motions. Hold the pen. Position it at the injection site (without uncapping). Press the button (without a needle attached). This builds muscle memory and familiarity with the sequence before the needle element enters the picture.
The first injection is the hardest
After the first one, anxiety drops dramatically for most people. The anticipation is almost always worse than the reality. Many researchers describe their first injection as an anticlimax, expecting pain that never came. By the third or fourth injection, the process becomes routine. By the tenth, it becomes automatic.
If anxiety persists beyond the first few injections, techniques like deep breathing before injection, listening to music during the process, or having someone present for moral support can help. These are practical strategies, not crutches. Use whatever works until the process feels normal.
SeekPeptides members frequently report that having access to detailed protocol guides and a community of experienced researchers made the difference between abandoning their GLP-1 protocol and staying consistent. Knowing that thousands of others have navigated the same anxiety and come out the other side matters more than any technique tip.
Advanced injection tips from experienced researchers
Once the basics are automatic, these refinements can improve your experience further.
The ice and press technique
Apply a clean ice cube to the injection site for 30 seconds. Remove. Immediately swab with alcohol. Inject while the area is still numb. This works particularly well for researchers who find certain sites more sensitive than others. The numbing effect lasts about 60 to 90 seconds, which is more than enough time to complete the injection.
The distraction method
Wiggle your toes during injection. This is not pseudoscience. Sensory gating theory explains it. When your brain processes a competing tactile stimulus (toe wiggling), it dedicates fewer processing resources to the injection sensation. The pain signal still arrives, but your perception of it diminishes. Some researchers tap their foot or squeeze a stress ball in their non-dominant hand.
Timing around physical activity
Avoid injecting immediately before or after vigorous exercise. Physical activity increases blood flow to muscles and surrounding tissue, which can accelerate medication absorption beyond the intended rate. A 30-minute buffer before or after intense activity is sufficient. Light activity like walking has no meaningful impact on absorption.
Temperature cycling awareness
If you are drawing from a multi-dose vial that goes in and out of the refrigerator, be aware that repeated temperature cycling can affect peptide stability over time. Remove the vial, draw your dose, and return it to the refrigerator promptly. Do not leave it sitting on the counter between injection days. Our peptide storage guide and post-reconstitution storage guide cover stability details comprehensively.
Injection logging
Keep a simple log of each injection: date, time, site location, dose, and any notes about your experience. This practice serves multiple purposes. It ensures proper site rotation. It tracks your titration schedule. It creates a record you can share with your healthcare provider. And it helps you identify patterns. Maybe you always bruise on the left thigh but never the right. Maybe morning injections consistently cause less nausea than evening ones. Without a log, these patterns stay invisible.
Specific GLP-1 medication injection guides
While the general injection technique applies across all GLP-1 medications, each specific medication has nuances worth understanding.
Semaglutide injection specifics
Semaglutide, whether as brand-name Ozempic/Wegovy or compounded, is a once-weekly subcutaneous injection. The semaglutide 5mg/mL dosage chart is the most common concentration for compounded formulations. At this concentration, relatively small volumes deliver clinically relevant doses, which means less liquid under the skin and less injection discomfort.
For researchers wondering about the math, our unit-to-milligram conversion guides cover the most common questions: 20 units, 50 units, and 100 units. Getting the conversion right ensures your injection delivers the exact dose your protocol requires.
Semaglutide has a half-life of approximately seven days, which is why weekly dosing works. This long half-life also means that if you inject a few hours early or late, the pharmacological impact is negligible. Consistency week to week matters more than precision to the hour.
Tirzepatide injection specifics
Tirzepatide is a dual GIP/GLP-1 receptor agonist, meaning it activates two incretin pathways rather than one. The injection technique is identical to semaglutide, but dosing protocols differ. Tirzepatide uses a different titration schedule and different target doses. Our tirzepatide injection dosage chart and unit-based dosage chart provide the specific numbers.
Compounded tirzepatide comes in various concentrations. Understanding which concentration you have is critical for accurate dosing. A compound tirzepatide dosage chart matched to your vial concentration eliminates guesswork. The most common compounded concentrations produce different volumes per dose, which affects how the injection feels. Higher concentrations mean smaller injection volumes, which generally means less discomfort.
Retatrutide and emerging GLP-1 medications
Newer GLP-1 compounds like retatrutide follow the same subcutaneous injection principles. Retatrutide is a triple agonist (GLP-1, GIP, and glucagon receptors) currently in clinical trials. The injection technique does not change. What changes is the dosing protocol, titration schedule, and reconstitution details if using research-grade material. Our retatrutide dosage chart and dosing schedule cover the specifics.
Injection supplies: where to get them
Sourcing quality injection supplies is straightforward once you know what to look for.
Syringes and needles
Insulin syringes are available at most pharmacies without a prescription in many states. Online medical supply retailers offer bulk pricing that reduces the per-unit cost significantly. When ordering, specify the gauge (29-31G), length (4-8mm for pen needles, 8-12.7mm for syringe needles), and volume (0.5mL or 1mL for insulin syringes). For specific syringe guidance matched to your GLP-1 dosing, see our syringe dosage chart.
Alcohol swabs
Standard 70% isopropyl alcohol prep pads work perfectly. Available in bulk boxes of 100 or 200 at any pharmacy or online retailer. Nothing fancy needed. The brand does not matter. The isopropyl alcohol concentration does. Seventy percent is the standard for skin antisepsis.
Sharps containers
Available at pharmacies, online retailers, and sometimes free from local health departments. A one-quart container handles several months of weekly injections. Larger containers are available for households with multiple users.
Bacteriostatic water
For researchers working with lyophilized compounded medications, bacteriostatic water is essential for reconstitution. Available from compounding pharmacies and medical supply retailers. Always use bacteriostatic water (which contains 0.9% benzyl alcohol as a preservative), never sterile water, for multi-dose vials. Sterile water lacks the preservative that prevents bacterial growth between uses. Our guide on which water to use for peptide mixing explains the differences.
When to seek medical attention
Most injection-related issues are minor and self-resolving. But some signs warrant professional evaluation.
Seek immediate medical attention for
Signs of severe allergic reaction: difficulty breathing, swelling of the face or throat, rapid heartbeat, severe dizziness. These are rare with GLP-1 medications but require emergency response if they occur.
Signs of injection site infection: increasing redness that spreads beyond the injection area, warmth, swelling that worsens over 24 to 48 hours, pus or discharge, fever, or red streaks extending from the injection site. Infections are extremely rare with proper sterile technique but require prompt antibiotic treatment when they occur.
Contact your healthcare provider for
Persistent nausea or vomiting that prevents you from eating or drinking for more than 24 hours. Severe abdominal pain. Injection site reactions that do not resolve within one week. Any concerns about allergic sensitivity to the medication or its components. Changes in mood, energy, or cognitive function that coincide with starting therapy. For a comprehensive overview of what to watch for, our peptide safety guide covers both common and rare concerns.
Building a sustainable injection routine
Long-term GLP-1 therapy means injecting weekly for months or years. Sustainability requires making the process as frictionless as possible.
Create a dedicated injection station
Designate a specific spot in your home for injections. A bathroom counter drawer or a small organizer box in the kitchen works. Keep all supplies in one place. When everything is within reach and organized, the injection process takes under two minutes from start to finish. Hunting for supplies adds unnecessary time and frustration that erodes compliance over time.
Set calendar reminders
A weekly calendar reminder for your injection day prevents missed doses. Set it for the same time each week. Some researchers set two reminders, one an hour before (to take medication out of the fridge) and one at injection time. Automated reminders remove the mental load of remembering.
Track your progress
GLP-1 therapy is a long game. Tracking progress, whether that means weight, waist circumference, energy levels, appetite changes, or other metrics, provides motivation during the weeks when changes feel slow. Our articles on how fast semaglutide works and tirzepatide timelines can help set realistic expectations for when to expect results.
If you are weeks into your protocol without seeing expected results, the issue may not be your injection technique. It could be dietary factors, titration timing, or other variables that our troubleshooting guides address.
For researchers serious about optimizing their peptide protocols, SeekPeptides offers the most comprehensive resource available, with evidence-based guides, proven protocols, and a community of thousands who have navigated these exact questions. Whether you are working with semaglutide or tirzepatide, brand-name or compounded formulations, the protocols and calculators available through SeekPeptides membership eliminate the guesswork that makes GLP-1 therapy unnecessarily complicated.
Frequently asked questions
Does injecting GLP-1 hurt?
Most users describe GLP-1 injections as a brief pinch that lasts one to two seconds, followed by a faint warmth at the site. Using a 30 or 31 gauge needle, letting medication reach room temperature, and inserting the needle quickly at a 90-degree angle minimizes discomfort significantly. Many researchers say they barely feel their weekly injection after the first few weeks.
Can I inject GLP-1 in my stomach?
Yes. The abdomen is the most commonly recommended injection site for GLP-1 medications. Inject into the fatty tissue at least two inches from the belly button. Avoid areas with scars, stretch marks, bruises, or moles. The abdomen offers consistent absorption and the largest area for site rotation.
How long do I hold the needle in after pressing the button?
Hold the needle in place for a full 10 seconds after the injection is complete. This ensures the full dose delivers into the subcutaneous tissue and prevents medication from leaking back out through the injection site. Counting slowly to 10 or watching a clock helps ensure adequate hold time.
What happens if I see blood after injecting?
A small amount of blood at the injection site is normal and happens occasionally when the needle nicks a small capillary. Apply gentle pressure with a cotton ball or gauze for 10 to 20 seconds. Do not rub. The blood does not mean your injection was unsuccessful or that the medication leaked out. Your dose was delivered as intended.
Can I shower or exercise after my injection?
Showering is fine immediately after injection. Exercise is fine with a 30-minute buffer. Avoid submerging the injection site in pools or hot tubs for 24 hours to minimize infection risk from the small skin puncture. Light activity like walking has no impact on medication absorption.
What if I forget to take my medication out of the fridge?
You can inject cold medication. It is safe and effective. The medication temperature does not affect its pharmacological properties. The only downside is increased stinging at the injection site. If you forgot to warm it, inject anyway rather than skipping your dose. Consistent dosing matters more than injection temperature.
How do I know if I injected into muscle instead of fat?
Intramuscular injection typically produces sharper pain during injection, more soreness for 24 to 48 hours afterward, and sometimes a small bruise. If you consistently experience these symptoms, try using a shorter needle, adjusting your pinch technique, or switching to a site with more subcutaneous fat. Occasional accidental intramuscular injection is not dangerous, but subcutaneous delivery is preferred for optimal absorption kinetics.
Is it normal to see liquid on the skin after removing the needle?
A tiny drop at the injection site can occur if the needle is withdrawn too quickly. This is why holding for 10 seconds matters. If you consistently see liquid after withdrawal, extend your hold time to 15 seconds. The amount lost is typically negligible, but proper technique prevents it entirely.
External resources
In case I do not see you, good afternoon, good evening, and good night. May your injections stay painless, your rotation stay consistent, and your protocols stay effective.