Feb 9, 2026

What if the reason your tirzepatide is not working has nothing to do with the peptide itself? What if the problem started the moment you opened the vial? Reconstitution sounds simple. Add water. Mix. Inject. But the gap between a properly reconstituted vial and a ruined one is measured in wasted money, inconsistent results, and frustration that makes people quit before the peptide ever had a chance to work.
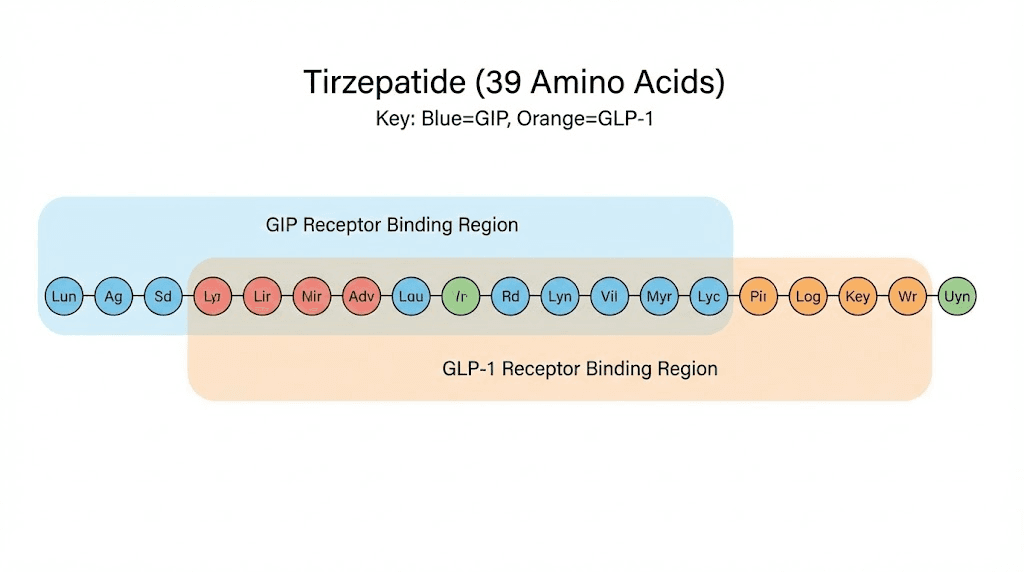
Tirzepatide is a 39-amino-acid synthetic peptide, a dual GIP and GLP-1 receptor agonist that arrives as a delicate lyophilized powder.
That powder holds enormous potential for weight loss, fat reduction, and metabolic improvement. But potential means nothing if you shatter the molecular structure during reconstitution, contaminate the solution with bacteria, or miscalculate the concentration so badly that every dose is wrong from day one. These are not hypothetical problems. They happen constantly. And most guides gloss over the details that actually matter.
This guide covers every step of tirzepatide reconstitution in genuine detail. Not the abbreviated version you find everywhere else. You will learn the exact supplies you need, the precise bacteriostatic water ratios for every common vial size, the math behind accurate dosing, and the storage protocols that keep your solution stable for the full 28 days. You will also learn the mistakes that ruin vials, the signs that something went wrong, and what to do when it does. SeekPeptides has helped thousands of researchers navigate these exact challenges, and everything in this guide reflects the protocols that consistently produce reliable results.
What tirzepatide is and why reconstitution matters
Before you touch a syringe, you need to understand what you are working with. Tirzepatide is not a simple chemical dissolved in water. It is a complex peptide with a specific three-dimensional structure that determines its biological activity. Damage that structure, and you have an expensive vial of nothing.
Tirzepatide is a 39-amino-acid linear peptide based on the native GIP (glucose-dependent insulinotropic polypeptide) sequence. Researchers at Eli Lilly engineered it with strategic amino acid substitutions that allow it to activate both the GIP receptor and the GLP-1 receptor simultaneously. A C20 fatty diacid moiety attached at position 20 extends its half-life dramatically, allowing once-weekly dosing instead of the multiple daily injections that earlier peptides required.
This dual agonist design is what makes tirzepatide different from semaglutide and other GLP-1 only agonists. Research published in JCI Insight describes tirzepatide as an "imbalanced and biased" dual agonist, meaning it shows equal affinity for the GIP receptor compared to native GIP but approximately 5-fold weaker affinity for the GLP-1 receptor compared to native GLP-1. This imbalance is intentional. GIP receptor activation does not produce the nausea and gastrointestinal distress that limits GLP-1 receptor dose escalation. By favoring GIP receptor potency, tirzepatide can fully engage the GIP pathway while keeping side effects more manageable.
The SURPASS clinical trial program demonstrated that tirzepatide at its highest dose (15 mg weekly) produced average weight loss of 20-25% of body weight, significantly exceeding the results seen with GLP-1 only agonists. The SURMOUNT-1 trial in participants without diabetes showed even more impressive results, with some dose groups achieving over 22% average weight reduction.
Why lyophilized powder requires reconstitution
Peptides degrade in solution. That is a fundamental biochemical reality. Water molecules attack peptide bonds through hydrolysis, bacteria multiply in liquid environments, and oxidation accelerates when peptides are dissolved. Manufacturers ship tirzepatide as a lyophilized (freeze-dried) powder specifically to avoid these degradation pathways.
Lyophilization removes water from the peptide through sublimation, leaving a stable powder that can maintain its integrity for months or even years when stored properly. The powder is sealed under vacuum or inert gas in glass vials with rubber stoppers designed to maintain sterility.
When you reconstitute the powder, you are reversing the lyophilization process. You are reintroducing water so the peptide can dissolve back into solution and become injectable. This sounds straightforward, but the process creates vulnerabilities. The moment water contacts the powder, the clock starts ticking on degradation. Every decision you make during reconstitution, from the type of water you use to the angle of the needle to the speed of mixing, affects how much active peptide remains in your vial.
Understanding this is not optional background knowledge. It is the foundation for every step that follows.
Essential supplies for tirzepatide reconstitution
Gathering your supplies before you start is not just good practice. It is a contamination prevention measure. Every time you pause mid-reconstitution to search for a missing item, you increase the window for bacterial exposure and the chance of making an error.
The tirzepatide vial
Compounded tirzepatide comes in several common sizes. The most frequently encountered are 5 mg, 10 mg, 15 mg, and 30 mg vials. The vial size determines how much bacteriostatic water you add, which determines the concentration of your final solution, which determines how many units you draw for each dose. Everything cascades from this starting point.
Before using any vial, check three things. First, verify the vial has not been previously opened or tampered with. The cap should be intact. Second, inspect the powder through the glass. It should appear as a white to off-white cake or powder. If it looks discolored, wet, or has an unusual appearance, do not use it. Third, check the expiration date. Lyophilized peptides have long shelf lives, but they are not infinite.
Bacteriostatic water
Bacteriostatic water is the standard diluent for peptide reconstitution. It contains 0.9% benzyl alcohol, which inhibits bacterial growth in the solution. This is critically important because you will be drawing multiple doses from the same vial over days or weeks, puncturing the rubber stopper each time and introducing potential contaminants.
Do not substitute sterile water for injection unless you plan to use the entire vial in a single session. Sterile water contains no preservative. Once you puncture the vial, bacteria can enter and multiply freely. With bacteriostatic water, the benzyl alcohol provides ongoing protection for up to 28 days when stored properly.
Never use saline solution. Never use tap water. Never use any liquid not specifically intended for injection. Saline can cause precipitation of the peptide. Tap water contains minerals, chlorine, and bacteria that will destroy the peptide and potentially cause serious infection.
Syringes and needles
You need two types of syringes for the reconstitution process.
For drawing and injecting the bacteriostatic water into the peptide vial, use a 3 mL syringe with an 18-22 gauge needle. The larger gauge allows you to draw the water smoothly and inject it slowly along the vial wall without excessive pressure.
For drawing your actual doses after reconstitution, use 1 mL insulin syringes with fixed 29-31 gauge needles. These smaller syringes allow precise measurement of small volumes. A standard U-100 insulin syringe has 100 unit markings across 1 mL, meaning each unit equals 0.01 mL. This precision matters enormously when your dose might be 0.25 mL or 0.10 mL.
Use a new syringe for every dose. Never reuse syringes. The cost savings are not worth the contamination risk.
Alcohol swabs and workspace supplies
Stock alcohol swabs (70% isopropyl alcohol). You will use these to clean vial stoppers before every puncture. Also prepare a clean, flat workspace. A cleared counter or desk works fine. Lay down a clean paper towel or tray to create a defined work area.
A sharps container is essential for disposing of used needles safely. Never throw needles in regular trash.
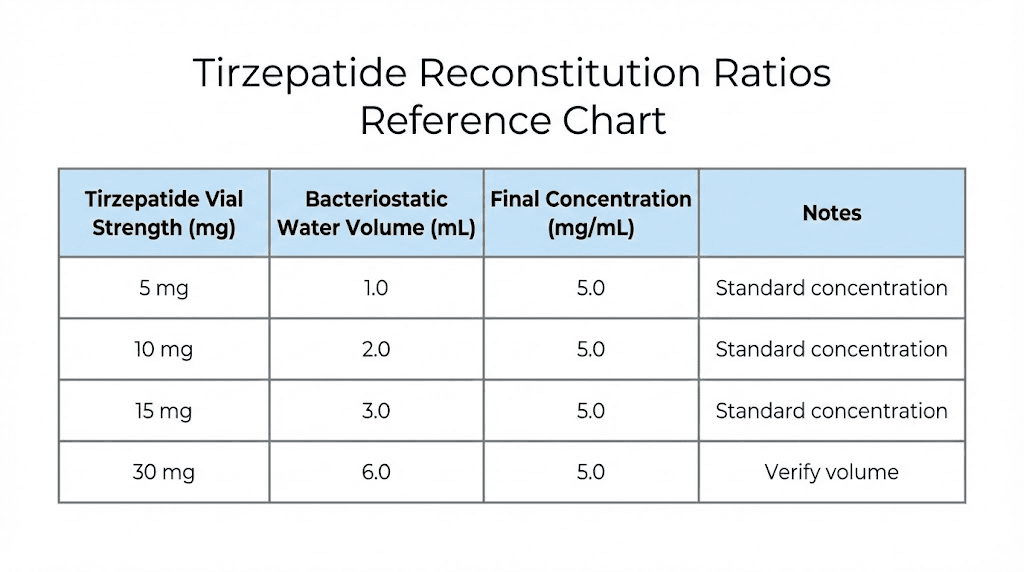
Bacteriostatic water ratios for every vial size
This is where most guides fail. They give you one example and expect you to figure out the rest. Here is every common vial size with the exact amount of bacteriostatic water to add and the resulting concentration.
The general principle is straightforward. More water means a lower concentration (more dilute), which means you draw a larger volume per dose. Less water means a higher concentration (more concentrated), which means you draw a smaller volume per dose. Neither approach is inherently better. The right choice depends on your target dose and your preference for injection volume.
5 mg tirzepatide vial
For a 5 mg vial, the most common reconstitution volume is 1 mL of bacteriostatic water.
This produces a concentration of 5 mg/mL. At this concentration, a 2.5 mg dose equals 0.50 mL (50 units on an insulin syringe). A 5 mg dose equals 1.0 mL (100 units), which uses the entire vial in one injection.
If you want to stretch the vial across multiple smaller doses, add 2 mL of bacteriostatic water instead. This gives you 2.5 mg/mL. A 2.5 mg dose now equals 1.0 mL. This works if you are starting at the lowest clinical dose and want the full vial to last two injections.
For microdosing protocols, some researchers add 2.5 mL to a 5 mg vial, creating a 2 mg/mL solution. This allows more granular dose control at very low doses. A 0.5 mg dose would equal 0.25 mL (25 units), which is easy to measure accurately on an insulin syringe.
10 mg tirzepatide vial
The 10 mg vial is one of the most popular sizes for researchers following standard tirzepatide dosing protocols.
Adding 1 mL of bacteriostatic water creates a 10 mg/mL concentration. This is highly concentrated. A 2.5 mg dose equals just 0.25 mL (25 units). A 5 mg dose equals 0.50 mL (50 units). The entire vial provides four 2.5 mg doses or two 5 mg doses.
Adding 2 mL creates a 5 mg/mL concentration. A 2.5 mg dose equals 0.50 mL (50 units). A 5 mg dose equals 1.0 mL (100 units). This is the most common ratio for 10 mg vials because it balances concentration with easy measurement.
Some researchers prefer adding 2.5 mL for a 4 mg/mL concentration, especially when they need finer dose adjustments during dose titration phases.
15 mg tirzepatide vial
The 15 mg vial works well for researchers at moderate to higher doses.
Adding 1.5 mL creates a 10 mg/mL concentration. This is the ratio many compounding references recommend. At this concentration, each 0.1 mL (10 units on an insulin syringe) delivers exactly 1 mg of tirzepatide. This makes dose calculation remarkably simple. Want 2.5 mg? Draw 25 units. Want 5 mg? Draw 50 units. Want 7.5 mg? Draw 75 units.
Adding 3 mL creates a 5 mg/mL concentration. A 2.5 mg dose equals 0.50 mL. This gives you six doses of 2.5 mg or three doses of 5 mg from a single vial.
30 mg tirzepatide vial
The 30 mg vial is the most economical for researchers at higher doses or those who want fewer reconstitution sessions.
Adding 3 mL creates a 10 mg/mL concentration. Same easy math as the 15 mg vial at 1.5 mL. Each 10 units on the syringe equals 1 mg. A 5 mg dose is 50 units. A 10 mg dose is 100 units (1 mL). A 15 mg dose would require 1.5 mL, which means either using a larger syringe or splitting into two draws.
Adding 2 mL creates a 15 mg/mL concentration. This is very concentrated. A 5 mg dose equals roughly 0.33 mL (33 units). The math is less clean, but the injection volumes are very small, which some researchers prefer.
Adding 6 mL creates a 5 mg/mL concentration. A 5 mg dose equals 1.0 mL. This is the most dilute practical option and gives you six 5 mg doses from a single vial, though the larger liquid volume means the vial needs to be large enough to accommodate it.
Quick reference table
Vial size | BAC water added | Concentration | 2.5 mg dose | 5 mg dose | 10 mg dose |
|---|---|---|---|---|---|
5 mg | 1 mL | 5 mg/mL | 0.50 mL (50 units) | 1.0 mL (100 units) | N/A |
5 mg | 2 mL | 2.5 mg/mL | 1.0 mL (100 units) | N/A | N/A |
10 mg | 1 mL | 10 mg/mL | 0.25 mL (25 units) | 0.50 mL (50 units) | 1.0 mL (100 units) |
10 mg | 2 mL | 5 mg/mL | 0.50 mL (50 units) | 1.0 mL (100 units) | N/A |
15 mg | 1.5 mL | 10 mg/mL | 0.25 mL (25 units) | 0.50 mL (50 units) | 1.0 mL (100 units) |
15 mg | 3 mL | 5 mg/mL | 0.50 mL (50 units) | 1.0 mL (100 units) | N/A |
30 mg | 3 mL | 10 mg/mL | 0.25 mL (25 units) | 0.50 mL (50 units) | 1.0 mL (100 units) |
30 mg | 6 mL | 5 mg/mL | 0.50 mL (50 units) | 1.0 mL (100 units) | 2.0 mL |
Use the SeekPeptides reconstitution calculator to verify these numbers for your specific vial size and target dose. Getting the math right at this stage prevents every downstream dosing error.
Step-by-step reconstitution process
You have your supplies. You know your ratios. Now let us walk through the actual reconstitution process in detail that goes beyond what most guides offer.
Step 1: wash your hands thoroughly
This is not a suggestion. Wash your hands with soap and warm water for at least 20 seconds. Get under your nails. Dry with a clean towel or paper towel, not a used hand towel hanging in the bathroom. Your hands are the primary vector for introducing bacteria into the reconstitution process.
Some researchers wear nitrile gloves as an additional barrier. This is reasonable practice, especially if you have any cuts or abrasions on your hands.
Step 2: prepare your workspace
Clear a flat surface. Wipe it down with an alcohol swab or disinfectant spray. Lay out all your supplies so everything is within reach. You should have your tirzepatide vial, bacteriostatic water, the larger syringe with needle for drawing water, alcohol swabs, and your sharps container.
Good organization prevents the scrambling that leads to contamination. Think of this as setting up a surgical field in miniature.
Step 3: clean both vial stoppers
Take an alcohol swab and firmly wipe the rubber stopper on your bacteriostatic water vial. Use a circular motion from the center outward. Let it air dry for about 10 seconds. Do not blow on it.
Repeat with the tirzepatide vial stopper. Use a fresh alcohol swab.
This step removes bacteria that have settled on the stoppers during storage and shipping. Skipping it is one of the most common contamination sources.
Step 4: draw the bacteriostatic water
Attach the 18-22 gauge needle to your 3 mL syringe. Remove the cap from the needle. Pull back the plunger to draw air into the syringe equal to the volume of water you plan to withdraw. If you are adding 2 mL of bacteriostatic water to your tirzepatide vial, draw 2 mL of air.
Insert the needle through the rubber stopper of the bacteriostatic water vial. Push the plunger to inject the air into the vial. This equalizes pressure and makes drawing liquid much easier. Invert the vial so the needle tip is submerged in the liquid. Slowly pull the plunger back to draw the exact amount of bacteriostatic water you need.
Check for air bubbles. If you see large bubbles, push the water back into the vial and redraw. Small bubbles can be tapped to the top of the syringe and pushed out. Accuracy matters here. Adding significantly more or less water than intended changes your concentration and throws off every subsequent dose.
Step 5: add water to the tirzepatide vial (the critical step)
This single step is where most reconstitution errors happen.
Insert the needle through the rubber stopper of the tirzepatide vial at a slight angle. Here is the critical detail: do NOT inject the water directly onto the powder cake. Instead, aim the needle tip toward the inside wall of the vial, near the top.
Push the plunger slowly. Let the water trickle down the glass wall of the vial and pool at the bottom, gradually contacting the powder. This gentle approach prevents the forceful disruption that can damage peptide bonds and create foam.
Think of it like pouring a beer down the side of a glass to minimize foam. The physics are similar. Direct impact creates turbulence, aeration, and potential denaturation. Wall-directed flow creates gentle dissolution.
The entire injection should take 30-60 seconds. There is no prize for speed. There is a significant penalty for rushing.
Step 6: mix gently (never shake)
Remove the needle from the vial. Now you need to mix the solution, and how you do this matters enormously.
Never shake the vial. Shaking creates violent agitation that introduces air bubbles throughout the solution and generates shear forces that can denature the peptide. Denatured peptide is permanently damaged. It does not recover. You cannot fix it.
Instead, gently roll the vial between your palms. Hold the vial horizontally and slowly rotate it back and forth. Think of the motion as warming a cold drink in your hands, gentle and even.
Alternatively, you can swirl the vial in small circles. Hold it upright and move your wrist in a gentle circular motion, like swirling wine in a glass.
Continue for 60-90 seconds. Then set the vial down and let it rest for 2-3 minutes. Check if the powder has fully dissolved. If you can still see particles or undissolved powder at the bottom, repeat the gentle rolling. Some vials dissolve quickly. Others take 5-10 minutes of patient, intermittent rolling.
Step 7: inspect the solution
Once the powder is fully dissolved, hold the vial up to a light source and examine the solution carefully.
A properly reconstituted tirzepatide solution should be clear and colorless. It might have a very slight yellow tint, which is normal for some formulations. What you should NOT see is cloudiness, visible particles floating in the solution, foam that does not dissipate within a few minutes, or any discoloration beyond very faint yellow.
If the solution is cloudy or has particles, do not use it. Cloudiness indicates either bacterial contamination, degraded peptide forming aggregates, or incompatible diluent causing precipitation. None of these are safe to inject.
If you see persistent foam that will not settle after 10-15 minutes, you likely shook the vial too vigorously. The foam itself is not dangerous, but it indicates potential peptide damage from mechanical stress. Additionally, foam makes accurate volume measurement impossible.
The dosing math explained
Understanding reconstitution math is not optional. If you cannot calculate your dose from your concentration, you should not be administering peptides. The math is simple once you understand the relationship between three numbers: the total peptide amount, the volume of water added, and the dose you want.
The fundamental formula
Concentration = Total peptide (mg) divided by Total water (mL)
That gives you mg per mL. From there:
Volume to draw (mL) = Desired dose (mg) divided by Concentration (mg/mL)
And to convert mL to insulin syringe units:
Units = Volume (mL) multiplied by 100
Three formulas. That is all you ever need.
Worked example: 10 mg vial with 2 mL water
Concentration: 10 mg divided by 2 mL = 5 mg/mL
For a 2.5 mg dose: 2.5 divided by 5 = 0.50 mL = 50 units
For a 5 mg dose: 5 divided by 5 = 1.0 mL = 100 units
For a 7.5 mg dose: 7.5 divided by 5 = 1.5 mL = 150 units (requires a larger syringe or two draws)
Worked example: 30 mg vial with 3 mL water
Concentration: 30 mg divided by 3 mL = 10 mg/mL
For a 2.5 mg dose: 2.5 divided by 10 = 0.25 mL = 25 units
For a 5 mg dose: 5 divided by 10 = 0.50 mL = 50 units
For a 10 mg dose: 10 divided by 10 = 1.0 mL = 100 units
For a 15 mg dose: 15 divided by 10 = 1.5 mL = 150 units
Notice how the 10 mg/mL concentration makes the math cleanest. Every 10 units on the syringe equals exactly 1 mg. This is why many researchers prefer reconstitution ratios that produce round concentrations.
Worked example: 15 mg vial with 1.5 mL water
Concentration: 15 mg divided by 1.5 mL = 10 mg/mL
Same clean math. 10 units = 1 mg. 25 units = 2.5 mg. 50 units = 5 mg.
If math is not your strong suit, bookmark the SeekPeptides peptide calculator and use it every single time. A miscalculation of even 10-20% can mean the difference between a therapeutic dose and a dose that triggers unnecessary side effects or provides inadequate results.
Understanding the insulin syringe
A standard U-100 insulin syringe holds 1 mL and is marked in 100 units. The markings typically appear at every 2-unit increment, with numbers at every 10 units. Knowing this system is essential for accurate dosing.
The relationship is always: 100 units = 1.0 mL = 1 cc. These three expressions mean the same thing.
When you see a dose expressed as "50 units," that means 0.50 mL. When someone says they drew "25 units," they drew 0.25 mL. If your concentration is 10 mg/mL and you draw 50 units (0.50 mL), you have 5 mg of tirzepatide in that syringe.
Some insulin syringes come in 0.5 mL (50 unit) or 0.3 mL (30 unit) sizes. These smaller syringes have finer graduation marks, making it easier to measure very small doses accurately. If your typical dose is 25 units or less, consider using a 0.3 mL syringe for better precision.
For more on converting between units and milligrams of tirzepatide, our dedicated conversion guides walk through every common scenario.
Tirzepatide dose escalation and how reconstitution supports it
Tirzepatide is not a peptide you start at full dose. The standard clinical protocol involves gradual dose escalation designed to minimize gastrointestinal side effects while building toward therapeutic levels. Understanding this escalation schedule matters for reconstitution planning because it determines how many doses you get per vial and when you need to reconstitute the next one.
Standard clinical dose escalation
The FDA-approved Mounjaro (brand tirzepatide) follows this schedule:
Weeks 1-4: 2.5 mg once weekly (starting dose, allows GI adaptation)
Weeks 5-8: 5 mg once weekly (first therapeutic dose increase)
Weeks 9-12: 7.5 mg once weekly (if tolerated and additional effect needed)
Weeks 13-16: 10 mg once weekly (continued escalation)
Weeks 17-20: 12.5 mg once weekly (approaching maximum)
Week 21+: 15 mg once weekly (maximum approved dose)
Each dose is maintained for at least four weeks before escalation. This is not arbitrary. The body needs time to adapt to each dose level, and GI side effects (nausea, decreased appetite, occasional diarrhea) tend to peak within the first 1-2 weeks of a new dose and then diminish. Escalating before your body has adapted means stacking side effects on top of side effects.
For researchers following tirzepatide dosing for weight loss, understanding this schedule helps you plan which vial sizes to purchase and how to reconstitute them efficiently.
How vial selection maps to dose escalation
During the 2.5 mg starting phase, a single 10 mg vial reconstituted with 2 mL of bacteriostatic water (5 mg/mL) provides four weekly doses. That covers your entire first month from one vial.
At 5 mg weekly, the same 10 mg vial provides two weekly doses, covering two weeks. A 30 mg vial reconstituted with 3 mL (10 mg/mL) provides six doses of 5 mg, lasting six weeks.
At 10 mg weekly, a 30 mg vial at 10 mg/mL provides three doses, covering three weeks. At 15 mg weekly, the same vial provides two doses, covering two weeks.
Planning your vial purchases and reconstitution schedule around your escalation timeline prevents waste. A vial reconstituted with bacteriostatic water should be used within 28 days. If you reconstitute a 30 mg vial but only need one dose before the 28-day window closes, the remaining peptide is wasted.
Microdosing considerations
Some researchers use tirzepatide microdosing protocols that involve doses below the standard 2.5 mg starting point. Doses like 0.5 mg, 1 mg, or 1.5 mg require more dilute reconstitution to ensure accurate measurement.
For microdosing, consider reconstituting a 5 mg vial with 2.5 mL of bacteriostatic water (2 mg/mL concentration). At this concentration, a 1 mg dose equals 0.50 mL (50 units), which is easy to measure precisely. A 0.5 mg dose equals 0.25 mL (25 units), still within comfortable accuracy range on an insulin syringe.
The lower the dose, the more important reconstitution accuracy becomes. A 10% error on a 10 mg dose means you got 9 mg or 11 mg, a relatively minor variance. A 10% error on a 0.5 mg dose means you got 0.45 mg or 0.55 mg, which is a proportionally larger deviation from your target.
Storage after reconstitution
Your reconstituted tirzepatide requires specific storage conditions to maintain potency and safety. Get this wrong, and the peptide degrades regardless of how perfectly you reconstituted it.
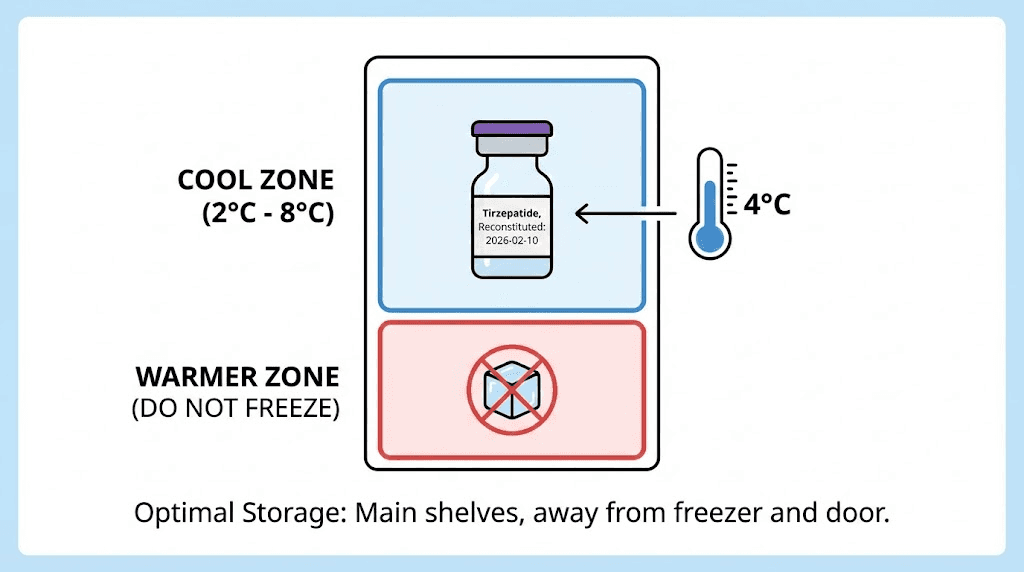
Refrigeration is mandatory
Store reconstituted tirzepatide at 2-8 degrees Celsius (36-46 degrees Fahrenheit). This means your refrigerator, not your freezer, not your counter, not a cool dark cabinet. The refrigerator.
Place the vial in the main body of the refrigerator, not in the door. Door shelves experience significant temperature fluctuations every time you open the fridge. The back of a middle shelf is the most temperature-stable location.
Some researchers use a small dedicated mini-fridge for their peptides. This eliminates the temperature swings from frequent opening and closing associated with a kitchen refrigerator. If you store food and peptides in the same fridge, place the peptide vial in a sealed container or bag to prevent any cross-contamination.
For detailed guidance on how long tirzepatide lasts in the fridge and what factors affect its shelf life, our dedicated storage guide covers every scenario.
Never freeze reconstituted tirzepatide
Freezing a reconstituted peptide solution is not the same as storing lyophilized powder at low temperatures. When a solution freezes, ice crystals form. These crystals physically shear peptide molecules, breaking bonds and permanently altering the three-dimensional structure. The peptide may look fine after thawing, the solution may appear clear, but the biological activity has been compromised.
If your reconstituted tirzepatide accidentally freezes (perhaps placed too close to the back of a very cold fridge or left in a freezer by mistake), discard it. Do not thaw it and use it. The damage is invisible but real.
The 28-day rule
Once reconstituted with bacteriostatic water, tirzepatide should be used within 28 days. This is not a rough guideline. It is the practical limit of bacteriostatic water preservative effectiveness combined with the peptide degradation rate in solution.
After 28 days, two things have happened. First, the benzyl alcohol in the bacteriostatic water has progressively lost effectiveness against bacterial contamination from repeated needle punctures. Second, the peptide has undergone ongoing hydrolysis and oxidation in solution, reducing potency.
Label your vial with the reconstitution date. Write it on a piece of tape and stick it to the vial. If you cannot remember when you reconstituted it, that alone is a sign your protocol needs tightening.
Need help understanding tirzepatide refrigeration requirements in more detail? Our complete storage guide addresses every temperature scenario, including travel and temporary storage situations.
Common reconstitution mistakes and how to avoid them
Learning what NOT to do is as important as learning the correct procedure. These mistakes are common. They are also entirely preventable.
Mistake 1: shaking the vial
We covered this, but it bears repeating because it is the single most common error. Shaking feels intuitive. You have powder at the bottom and water on top. Your instinct says shake it. Resist that instinct.
Shaking creates foam, introduces air throughout the solution, and generates mechanical stress that can denature the peptide. Denatured tirzepatide is biologically inactive. It will not bind to GIP or GLP-1 receptors. It will not suppress appetite. It will not promote weight loss. You just converted an active pharmaceutical ingredient into an expensive clear liquid with no therapeutic value.
Gentle rolling. Always.
Mistake 2: injecting water directly onto the powder
Forcing a stream of water directly into the lyophilized cake creates localized turbulence and can splash powder particles up the sides of the vial where they dry and become difficult to dissolve. It can also create foam at the point of impact.
Always direct the needle toward the glass wall. Let water trickle down slowly. Patience here prevents problems later.
Mistake 3: using the wrong diluent
Bacteriostatic water is the standard for multi-dose vials. Sterile water for injection works for single-use situations but offers no bacterial protection for subsequent punctures. Normal saline (0.9% sodium chloride) can cause peptide precipitation with some formulations. Tap water is never acceptable.
If you are drawing multiple doses from the same vial over days or weeks, bacteriostatic water is the only appropriate choice. For more on which water to use for peptide reconstitution, our dedicated guide explains every option.
Mistake 4: adding too much or too little water
Adding more water than intended dilutes the solution beyond your planned concentration. Every dose you draw will contain less tirzepatide than you calculated. You might think you are injecting 5 mg but you are actually injecting 3.5 mg. Your results suffer, and you blame the peptide when the real problem was measurement error during reconstitution.
Adding too little water creates an overly concentrated solution. Doses become larger than intended, increasing the risk of side effects and accelerating through your dose escalation faster than planned.
Measure carefully. Double-check by holding the syringe at eye level and confirming the meniscus aligns with your target volume mark. Use the reconstitution calculator to verify your target volume before drawing.
Mistake 5: reusing syringes
This seems like an obvious one, but cost-cutting behavior is real. Used syringes harbor bacteria. The needle tip dulls after a single puncture, making subsequent injections more painful and causing more tissue damage. Used syringes also lose their silicone coating, increasing friction and making accurate plunger control more difficult.
New syringe, every time. No exceptions.
Mistake 6: not cleaning the vial stopper before each draw
You cleaned the stopper during initial reconstitution. Good. But do you clean it again before drawing your second dose three days later? Your third dose next week? Every needle puncture is an opportunity for contamination. Wipe the stopper with a fresh alcohol swab before every single draw.
Mistake 7: storing at room temperature
Reconstituted tirzepatide left at room temperature degrades rapidly. The higher temperature accelerates both hydrolysis and bacterial growth. Even bacteriostatic water cannot fully compensate for warm storage conditions. An hour or two at room temperature while you prepare and administer a dose is fine. Leaving the vial on your bathroom counter between doses is not.
Mistake 8: losing track of the reconstitution date
If you cannot remember when you reconstituted the vial, you cannot know if you are within the 28-day use window. By the time you wonder if it has been too long, it probably has been. Label every vial on the day you reconstitute it. Write the date clearly. Check it before every draw.
Troubleshooting reconstitution problems
Even with perfect technique, things occasionally go wrong. Here is how to identify and respond to common issues.
The powder will not dissolve
If gentle rolling for 10-15 minutes does not fully dissolve the powder, there are a few possibilities. The water might not have reached all the powder, especially if some dried to the upper walls of the vial during shipping. Try tilting the vial at various angles while gently rolling to ensure the water contacts all surfaces. Let it sit for 10 minutes, then try again.
If undissolved particles remain after 20-30 minutes of patient effort, the peptide may have been damaged during shipping or storage. Exposure to high temperatures during transit can partially denature lyophilized peptides, making them resist dissolution. In this case, contact the supplier.
The solution is cloudy
Cloudiness after reconstitution is a warning sign. It can indicate peptide aggregation (clumping of denatured peptide molecules), bacterial contamination, or incompatible diluent. If the solution is cloudy immediately after adding water, wait 15-30 minutes. Some initial cloudiness resolves as the peptide fully dissolves. If cloudiness persists, do not use the vial.
You see foam that will not settle
Foam indicates air incorporation from overly aggressive mixing or direct water injection onto the powder. Wait 30-60 minutes. Most foam will dissipate on its own. If significant foam remains, you likely need to gently roll the vial periodically to help air bubbles reach the surface and pop. The foam itself is not toxic, but it makes volume measurement inaccurate and suggests the peptide experienced mechanical stress.
You accidentally added the wrong amount of water
If you added too much water, your concentration is lower than planned but the peptide is not damaged. Simply recalculate your concentration based on the actual volume added and adjust your dose accordingly. If you added 3 mL instead of 2 mL to a 10 mg vial, your concentration is 3.33 mg/mL instead of 5 mg/mL. To get 2.5 mg, draw 0.75 mL (75 units) instead of 0.50 mL (50 units).
If you added too little water, you can add more bacteriostatic water to reach your intended total volume. Clean the stopper again, draw the additional water, and inject it the same way, slowly along the vial wall. Then recalculate to confirm your final concentration.
The rubber stopper is coring
If small pieces of rubber break off into the vial when you insert the needle, you are using a needle that is too large or inserting it incorrectly. Use a 22 gauge or smaller needle for stopper punctures. Insert at a 45-degree angle with the bevel up, then straighten to 90 degrees once through the stopper. This technique minimizes the chance of cutting a rubber core.
If you see rubber fragments in your solution, the vial is contaminated and should not be used.
How reconstituted tirzepatide compares to pre-mixed formulations
You might wonder why anyone reconstitutes tirzepatide from powder when pre-filled pens and pre-mixed solutions exist. The answer involves cost, flexibility, and availability.
Lyophilized powder advantages
Lyophilized tirzepatide from compounding pharmacies costs significantly less than brand-name Mounjaro pens. For researchers exploring affordable tirzepatide options, compounded lyophilized powder represents substantial savings.
Powder also offers dosing flexibility that pre-filled pens cannot match. With a pen, you get fixed dose increments. With reconstituted powder, you can dial in any dose to the nearest fraction of a milligram. This is particularly valuable during dose titration when you might want to increase by 1.25 mg increments rather than the standard 2.5 mg jumps.
Shelf life in lyophilized form is also longer than in solution. Unreconstituted powder stored properly can remain stable for months, while pre-mixed solutions typically have shorter expiration windows.
Pre-mixed solution advantages
Pre-mixed solutions eliminate the reconstitution step entirely. No math errors. No contamination risk during mixing. No need for separate bacteriostatic water and reconstitution syringes. For people who want maximum simplicity, pre-mixed is easier.
Brand-name pens (Mounjaro, Zepbound) are manufactured under stringent FDA-regulated conditions with validated stability data and precise concentration verification. Each pen delivers an exact, pre-measured dose.
Which is right for you?
If you value precision control, cost savings, and flexibility, lyophilized powder with proper reconstitution is the better choice. If you value convenience and are willing to pay premium pricing, pre-filled options simplify the process.
For a detailed comparison of semaglutide versus tirzepatide and how their reconstitution processes differ, our comparison page breaks down every relevant factor.
Injection technique after reconstitution
Reconstitution gets your peptide into solution. But the process is not complete until the solution is properly administered. Poor injection technique can waste peptide, cause unnecessary pain, or result in suboptimal absorption.
Drawing your dose
Clean the vial stopper with an alcohol swab. Let it dry. Take a fresh insulin syringe (29-31 gauge needle). Pull back the plunger to draw air equal to the volume you plan to withdraw. Insert the needle through the stopper, inject the air, invert the vial, and slowly draw your dose.
Pull slightly more than you need, then push the plunger gently to expel air bubbles and reach your exact target volume. Tap the side of the syringe barrel to move stubborn bubbles to the top near the needle. Push them out. Confirm your volume at eye level.
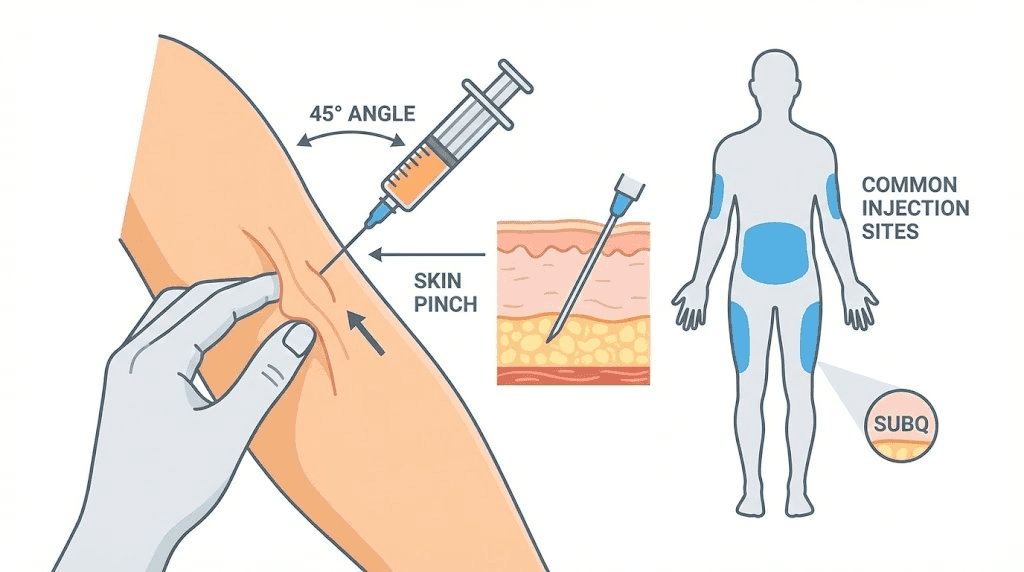
Selecting an injection site
Tirzepatide is administered subcutaneously, meaning into the fat layer beneath the skin. Common injection sites include the abdomen (at least 2 inches from the navel), the front of the thighs, and the back of the upper arms (if someone else is administering).
Rotate injection sites with each dose. Using the same spot repeatedly can cause lipodystrophy, localized changes in the fat layer that create lumps or indentations and can affect absorption consistency.
For more guidance on peptide injection technique and best injection practices, our comprehensive guides cover everything from needle angle to aftercare.
Administering the injection
Clean the injection site with an alcohol swab. Let it dry completely. Alcohol stings if the needle passes through wet alcohol into the skin.
Pinch a fold of skin at the injection site. Insert the needle at a 45-90 degree angle (90 degrees for areas with more subcutaneous fat, 45 degrees for leaner areas). Push the plunger slowly and steadily. Do not rush. A slow injection reduces pain and allows the solution to distribute into the tissue more evenly.
After fully depressing the plunger, wait 5-10 seconds before withdrawing the needle. This prevents solution from leaking back out through the needle track. Release the skin fold. Apply light pressure with an alcohol swab if there is any bleeding, but do not rub the injection site.
Advanced reconstitution topics
For researchers who have mastered the basics and want to optimize their reconstitution protocol further, these advanced considerations can make a meaningful difference.
Reconstitution for travel
Traveling with reconstituted tirzepatide requires maintaining the cold chain. Use an insulated travel case with gel ice packs. The vial should stay between 2-8 degrees Celsius throughout transit. TSA allows medically necessary injectable supplies through security checkpoints, though carrying documentation (prescription label, letter from provider) can smooth the process.
For flights, keep your peptides in your carry-on luggage, never checked baggage. Cargo holds can reach extreme temperatures that will destroy the peptide. The cabin stays climate-controlled.
If you are traveling for more than a few days, consider whether it makes more sense to bring lyophilized powder and reconstitute at your destination rather than trying to maintain a cold chain for reconstituted solution. Unreconstituted powder is far more temperature-stable than reconstituted solution.
Using reconstituted tirzepatide with other peptides
Researchers stacking tirzepatide with other compounds like BPC-157 for gut health support or TB-500 for general tissue recovery should never mix peptides in the same syringe or vial unless specifically directed by a protocol that has verified compatibility. Different peptides can interact, aggregate, or inactivate each other when combined in solution.
Administer each peptide separately with its own syringe at different injection sites. For guidance on how many peptides can be taken concurrently and how to time them, our stacking guide addresses these questions in detail.
Reconstitution with different water volumes for dose changes
When your dose changes during escalation, you have two options. You can keep the same reconstitution ratio and simply draw a different volume. Or you can change the reconstitution ratio for the next vial to keep your draw volume consistent.
For example, if you always want to draw 50 units (0.50 mL) per dose for consistency:
At 2.5 mg dose: Reconstitute for 5 mg/mL (2.5 divided by 5 = 0.50 mL)
At 5 mg dose: Reconstitute for 10 mg/mL (5 divided by 10 = 0.50 mL)
At 7.5 mg dose: Reconstitute for 15 mg/mL (7.5 divided by 15 = 0.50 mL)
This "consistent draw" approach reduces the chance of dosing errors when transitioning between dose levels because you always draw the same volume. The only thing that changes is the concentration, which you set during reconstitution.
Dealing with dead space in syringes
Every syringe has a small amount of "dead space" in the hub where the needle attaches to the barrel. This space retains a tiny amount of solution that does not get injected. For standard insulin syringes with fixed needles, dead space is minimal (around 0.005-0.01 mL). For syringes with removable needles, dead space can be larger (0.03-0.05 mL).
Over multiple draws from a single vial, dead space loss accumulates. If you expect 4 doses from a 10 mg vial, the dead space loss across 4 draws might mean your final draw is slightly short. Account for this by adding 0.1-0.2 mL extra bacteriostatic water during reconstitution, or simply accept that the last draw from a vial may be slightly less than intended.
Low dead-space syringes are available and worth the small additional cost for researchers who want maximum precision. These syringes are designed to minimize the retained volume, ensuring more of each dose reaches the injection site.
Understanding tirzepatide stability in solution
The moment you add water to tirzepatide powder, you start a countdown. Understanding what drives degradation helps you make better storage and usage decisions.
Hydrolysis
Water molecules attack peptide bonds, breaking the chain at susceptible points. This is a slow, continuous process that accelerates with temperature. At 4 degrees Celsius (refrigerator temperature), hydrolysis proceeds slowly enough that the peptide retains the vast majority of its activity for 28 days. At 25 degrees Celsius (room temperature), hydrolysis accelerates significantly. At 37 degrees Celsius (body temperature), the rate increases further.
This is why refrigeration is not a recommendation. It is a requirement. Every hour at room temperature consumes a small fraction of your peptide activity that you do not get back.
Oxidation
Dissolved oxygen in the reconstitution water can oxidize sensitive amino acid residues in the tirzepatide chain, particularly methionine and cysteine residues if present. Oxidation alters the peptide structure and reduces receptor binding affinity.
You cannot eliminate dissolved oxygen entirely, but you can minimize exposure by keeping the vial sealed (minimizing headspace), storing it upright (reducing the air-liquid interface), and using the solution within the 28-day window.
Microbial contamination
Even with bacteriostatic water, contamination risk exists. The benzyl alcohol preservative inhibits most bacterial growth but does not sterilize the solution. Each needle puncture through the rubber stopper is an opportunity for microorganisms to enter the vial.
If the solution becomes cloudy, develops particles, changes color, or develops an unusual smell at any point during the 28-day usage window, discard it immediately. These are signs of contamination that no preservative can reverse.
For comprehensive guidance on storing peptides after reconstitution and maximizing shelf life, our storage guide covers every factor that affects stability.
Reconstitution math for common tirzepatide dosing schedules
Let us bring together everything we have covered and apply it to real-world dosing scenarios. These complete examples show how to plan your reconstitution around specific dose schedules.
Scenario 1: starting at 2.5 mg weekly with 10 mg vials
You have 10 mg vials and are beginning at 2.5 mg per week.
Reconstitute with 2 mL bacteriostatic water. Concentration: 5 mg/mL.
Week 1: Draw 0.50 mL (50 units) for 2.5 mg. Remaining: 7.5 mg in 1.50 mL.
Week 2: Draw 0.50 mL for 2.5 mg. Remaining: 5.0 mg in 1.0 mL.
Week 3: Draw 0.50 mL for 2.5 mg. Remaining: 2.5 mg in 0.50 mL.
Week 4: Draw 0.50 mL for 2.5 mg. Vial empty.
One 10 mg vial lasts exactly 4 weeks at 2.5 mg per week. The 28-day stability window aligns perfectly.
Scenario 2: escalating from 5 mg to 7.5 mg with 30 mg vials
You are transitioning from 5 mg to 7.5 mg weekly and have 30 mg vials.
Reconstitute with 3 mL bacteriostatic water. Concentration: 10 mg/mL.
Week 1: 5 mg = 0.50 mL (50 units). Remaining: 25 mg.
Week 2: 5 mg = 0.50 mL. Remaining: 20 mg.
Week 3 (escalate): 7.5 mg = 0.75 mL (75 units). Remaining: 12.5 mg.
Week 4: 7.5 mg = 0.75 mL. Remaining: 5.0 mg.
You still have 5 mg left in the vial. If this falls within the 28-day window, you could use it for a reduced dose or combine it with a fresh vial (by using this remainder first and making up the difference from the new vial). Proper planning prevents this awkward leftover situation.
Scenario 3: stable 10 mg weekly with 30 mg vials
You have reached your maintenance dose of 10 mg weekly.
Reconstitute 30 mg vial with 3 mL bacteriostatic water. Concentration: 10 mg/mL.
Week 1: 10 mg = 1.0 mL (100 units). Remaining: 20 mg.
Week 2: 10 mg = 1.0 mL. Remaining: 10 mg.
Week 3: 10 mg = 1.0 mL. Vial empty.
Three weeks from one vial. Well within the 28-day window.
For additional dosing scenarios and calculations, explore the tirzepatide dosage in units guide and the units to milligrams conversion guide for detailed reference tables.
Why tirzepatide reconstitution differs from other peptides
If you have experience reconstituting other peptides, you might assume tirzepatide follows the same rules. It mostly does, but there are important nuances.
Sensitivity to mechanical stress
Tirzepatide, like all larger peptides, is more susceptible to denaturation from mechanical stress (shaking, vigorous mixing) than smaller peptides. Its 39-amino-acid chain with the attached fatty acid moiety creates a complex three-dimensional structure that depends on precise folding for biological activity. Mechanical stress can unfold or aggregate these structures.
Smaller peptides like BPC-157 (15 amino acids) are somewhat more resilient to rough handling, though gentle technique is still recommended for all peptides.
The fatty acid modification
Tirzepatide C20 fatty diacid modification at position 20 is critical for its extended half-life. This lipid modification allows the peptide to bind to albumin in the bloodstream, slowing its clearance and enabling once-weekly dosing. However, this lipid tail also affects the peptide solubility characteristics. Tirzepatide may take slightly longer to dissolve than peptides without lipid modifications, and the solution may exhibit subtle differences in surface tension.
Be patient during dissolution. If it takes 5-10 minutes of gentle rolling to achieve a clear solution, that is normal for a lipid-modified peptide.
Concentration range considerations
Because tirzepatide doses are in the milligram range (2.5-15 mg), rather than the microgram range used for many research peptides, the reconstitution concentrations are correspondingly higher. A 10 mg/mL tirzepatide solution is common, whereas a typical BPC-157 solution might be 2.5 mg/mL or lower.
Higher concentrations mean the solution is more viscous and may push slightly harder through the syringe. This is normal and does not indicate a problem.
Comparison with semaglutide reconstitution
Researchers who have reconstituted semaglutide will find tirzepatide reconstitution nearly identical in process. Both are GLP-1 pathway peptides supplied as lyophilized powders. Both use bacteriostatic water as the standard diluent. Both require gentle mixing, refrigerated storage, and the same 28-day use window.
The main differences are in typical vial sizes (tirzepatide vials tend to be larger because the doses are higher) and dose ranges. For a side-by-side comparison of these two peptides beyond just reconstitution, our complete semaglutide vs tirzepatide comparison covers efficacy, side effects, dosing schedules, and cost.
Frequently asked questions
Can I use sterile water instead of bacteriostatic water for tirzepatide?
You can, but only if you use the entire vial in a single session. Sterile water for injection contains no preservative, so once the vial is punctured, there is no protection against bacterial growth. For multi-dose vials (which most tirzepatide vials are), bacteriostatic water is the correct and safe choice.
How do I know if my reconstituted tirzepatide has gone bad?
Look for cloudiness, visible particles, color changes (beyond very faint yellow), unusual smell, or foam that will not dissipate. Any of these signs mean the solution should be discarded. Also discard if it has been more than 28 days since reconstitution or if the vial has been stored at room temperature for extended periods. For detailed peptide storage guidelines, see our complete guide.
What happens if I add too much bacteriostatic water?
Your solution becomes more dilute than planned. The peptide is not damaged. Simply recalculate your concentration (total mg divided by total mL) and adjust the volume you draw for each dose accordingly. The only downside is larger injection volumes.
Can I mix tirzepatide and semaglutide in the same syringe?
No. Never mix different peptides in the same syringe or vial unless a verified protocol specifically confirms compatibility. Different peptides can interact, degrade each other, or form aggregates. Administer each peptide separately. If you are comparing these two GLP-1 agents, our switching guide covers the transition protocol.
How long does tirzepatide take to dissolve during reconstitution?
Most vials dissolve within 2-5 minutes of gentle rolling. Some may take up to 10-15 minutes, especially larger vials or those with denser lyophilized cakes. This is normal. Never rush the process by shaking. If it has not dissolved after 20-30 minutes of intermittent gentle rolling, contact the supplier about a potential quality issue.
Do I need to refrigerate tirzepatide before reconstitution?
Lyophilized (unreconstituted) tirzepatide should be stored at controlled room temperature or refrigerated, depending on the manufacturer instructions. Most compounding pharmacies recommend refrigeration for long-term storage of the powder, though brief periods at room temperature during shipping are generally acceptable. After reconstitution, refrigeration at 2-8 degrees Celsius is mandatory.
Can I travel with reconstituted tirzepatide?
Yes, with proper cold chain maintenance. Use an insulated travel case with gel ice packs to maintain 2-8 degrees Celsius. For air travel, keep peptides in carry-on luggage, never checked bags. Carry documentation of the medical necessity. For extended trips, bringing unreconstituted powder and bacteriostatic water separately may be more practical than maintaining a cold chain for pre-mixed solution. Read our guide on how long peptides last at room temperature to understand your safety margins during transit.
What is the best vial size for beginners?
For researchers starting at 2.5 mg weekly, a 10 mg vial is ideal. Reconstituted with 2 mL of bacteriostatic water (5 mg/mL), it provides exactly 4 doses of 2.5 mg, aligning perfectly with the 4-week initial dose period and the 28-day stability window. This minimizes waste while providing enough doses to complete the starting phase. As you escalate to higher doses, larger vials become more economical.
How many units is 2.5 mg of tirzepatide?
It depends entirely on your reconstitution concentration. At 5 mg/mL, 2.5 mg equals 50 units. At 10 mg/mL, 2.5 mg equals 25 units. At 2.5 mg/mL, 2.5 mg equals 100 units. Always calculate based on YOUR specific concentration. For a detailed breakdown with every concentration, see our complete units conversion guide.
External resources
PubMed: Tirzepatide dual GIP/GLP-1 receptor co-agonist research
JCI Insight: Tirzepatide imbalanced and biased dual agonist mechanism
For researchers serious about optimizing their tirzepatide protocols, SeekPeptides offers the most comprehensive resource available, with evidence-based guides, precise reconstitution calculators, proven dose escalation protocols, and a community of thousands who have navigated these exact challenges. From your first reconstitution to your maintenance dose, SeekPeptides provides the tools and guidance to get it right every time.
In case I do not see you, good afternoon, good evening, and good night. May your reconstitutions stay sterile, your concentrations stay accurate, and your results stay consistent. Join here.