Feb 18, 2026
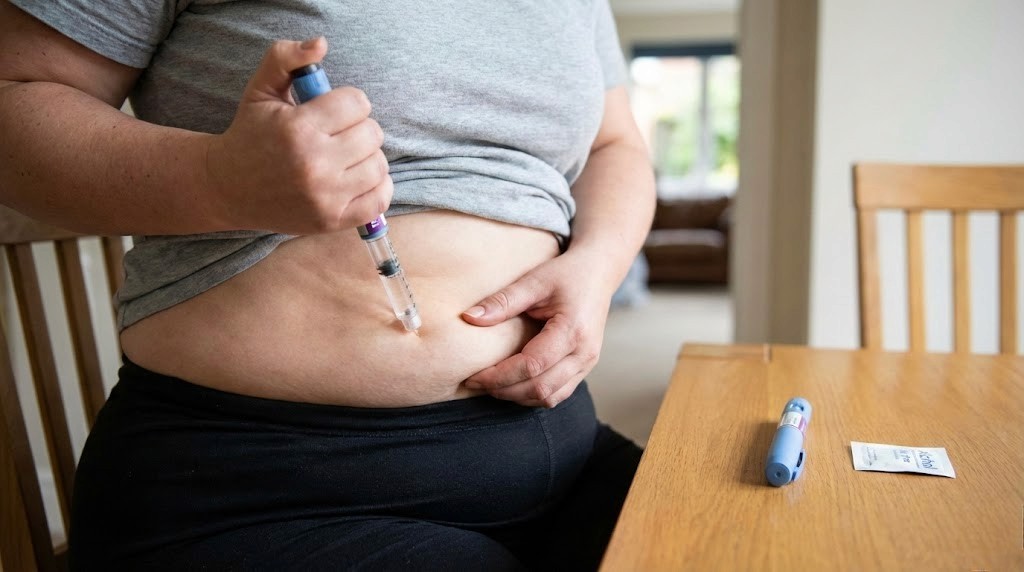
You have read the dosing charts. You have watched the videos. You have your tirzepatide pen or vial sitting on the counter in front of you. And yet, your hand will not stop shaking. The needle looks bigger than it did in the tutorial. Your stomach suddenly feels like the wrong place to put it. That hesitation you are feeling right now? Thousands of people feel it every single week before their tirzepatide injection.
Here is the truth. Injecting tirzepatide in the stomach is one of the simplest medical procedures you will ever perform on yourself. The abdomen offers the largest injection area on your body, the most consistent absorption rates, and for most people, the least amount of pain. But simple does not mean careless. A wrong angle, a skipped rotation, a cold vial pulled straight from the fridge, and suddenly you are dealing with bruises, lumps, stinging, and inconsistent results from your tirzepatide protocol.
This guide covers everything. The exact technique for a painless stomach injection. Where precisely to place the needle and where to avoid. How to rotate sites so you never develop those stubborn lumps under the skin. What needle gauge and length actually matter. How to handle injection site reactions when they appear. And the small details that separate a smooth weekly routine from one that makes you dread every dose. Whether you are using a Mounjaro or Zepbound pen, a compounded tirzepatide vial with an insulin syringe, or switching from another GLP-1 injection method, the fundamentals remain the same. SeekPeptides members consistently report that mastering proper injection technique was the single biggest factor in reducing side effects and improving their overall experience with tirzepatide.
Why the stomach is the best injection site for tirzepatide
Not all injection sites are created equal. Your body absorbs subcutaneous medications at different rates depending on where you inject, and the stomach consistently outperforms other options for tirzepatide administration. Understanding why helps you make better decisions about your entire tirzepatide dosing protocol.
Absorption rates and consistency
The abdomen has a rich network of blood vessels sitting just beneath the subcutaneous fat layer. This vascular density means tirzepatide gets absorbed at a steady, predictable rate when injected into stomach tissue. Compared to the thigh, where absorption can vary based on muscle activity and fat distribution, the stomach provides a more uniform delivery profile throughout the week between your scheduled doses.
Research on subcutaneous injection absorption has consistently shown that abdominal injections deliver medication into the bloodstream more reliably than thigh or upper arm sites. For a once-weekly medication like tirzepatide, this consistency matters. You want the same steady release pattern every week, not a faster absorption one week because you happened to inject into your thigh right before a workout.
This is why most healthcare providers recommend the stomach as the primary injection site, particularly for people just starting their tirzepatide journey.
Pain comparison across injection sites
The stomach hurts less. That is not just anecdotal. The abdominal area has fewer nerve endings per square centimeter compared to the thigh, which makes the initial needle insertion noticeably more comfortable. The thigh, by contrast, has dense nerve pathways running through it, and injecting into certain areas can produce a sharp, stinging sensation that the stomach rarely causes.
Users who have tried all three approved sites, stomach, thigh, and upper arm, overwhelmingly prefer the abdomen. The upper arm can be difficult to reach without assistance. The thigh stings more frequently. The stomach? Quick pinch. Done.
Of course, pain tolerance varies between individuals. Some people genuinely prefer the thigh. But if you are new to tirzepatide and have not established a preference, start with the stomach. You can always explore other sites later once you have the basic technique down.
Accessibility and ease of self-injection
Try reaching your upper arm with a pen while keeping steady pressure. It is awkward at best, impossible for some. The stomach, on the other hand, sits right in front of you. You can see exactly where you are injecting, control the angle precisely, and use both hands comfortably throughout the process.
This accessibility matters more than people realize. When an injection site is easy to reach and easy to see, you perform the technique correctly more often. You hold the pen at the right angle. You press firmly enough. You wait the full duration. Mistakes happen when you are twisting awkwardly trying to reach your arm or craning your neck to see the back of your thigh.
Preparing for your tirzepatide stomach injection
Preparation is half the battle. Rush through it, and you end up with a painful injection, a bruised stomach, or worse, an improperly administered dose that does not absorb correctly. Take five minutes to prepare properly, and the actual injection takes less than thirty seconds.
Gather your supplies
Before you start, have everything within arm's reach. Nothing derails an injection faster than realizing you forgot the alcohol swab and having to walk across the room with a needle in your hand.
For pen users (Mounjaro or Zepbound):
Your tirzepatide pen at the correct dose
Alcohol swabs
A sharps disposal container
A clean, flat surface to work on
For vial users (compounded tirzepatide):
An insulin syringe (29G to 31G, discussed in detail below)
Alcohol swabs
A sharps disposal container
Your dosage calculator or chart for reference
Missing supplies mid-injection creates stress, and stress creates shaky hands. Lay everything out first.
Temperature matters more than you think
Cold tirzepatide stings. That is not a myth and it is not placebo. When you inject a refrigerated solution directly into warm tissue, the temperature difference causes the surrounding blood vessels to constrict. This slows absorption, increases local irritation, and makes the injection noticeably more uncomfortable.
Remove your tirzepatide pen or vial from the refrigerator 15 to 30 minutes before injecting. Let it sit at room temperature. Do not microwave it. Do not run it under hot water. Do not try to speed up the process. Just set it on the counter while you prepare your other supplies, wash your hands, and select your injection site. By the time you are ready, the medication will be comfortable to inject.
This single step, letting the medication warm up, is the number one tip experienced users share for reducing injection discomfort. It costs nothing and takes almost no effort. If you have been injecting cold tirzepatide and wondering why it burns, this is your answer.
One important note on storage: once a tirzepatide pen has been used, check the manufacturer guidelines for how long it remains stable at room temperature versus refrigerated. Compounded tirzepatide from a vial typically needs to stay refrigerated between uses. Refer to your tirzepatide storage guide for specifics.
Inspect your medication
Before every injection, look at the solution. Tirzepatide should be clear and colorless to slightly yellow. If it looks cloudy, has particles floating in it, or has changed color significantly, do not use it. This applies to both brand-name pens and compounded tirzepatide solutions.
Also check the expiration date. Expired medication may have degraded, reducing its effectiveness or potentially causing irritation at the injection site. If your tirzepatide has been sitting out of the fridge for too long, refer to stability guidelines. Compounded tirzepatide left out of the fridge has specific time limits you should not exceed.
Wash your hands thoroughly
Soap. Water. Twenty seconds minimum. This is not optional. You are about to puncture your skin and introduce a foreign substance into subcutaneous tissue. Clean hands prevent bacterial contamination that could cause an injection site infection.
Dry your hands completely with a clean towel before handling your pen or syringe. Wet hands slip, and slipping during an injection is exactly as unpleasant as it sounds.
Choosing the exact injection spot on your stomach
The stomach is a large area, but not all of it is fair game. Knowing precisely where to inject, and more importantly where NOT to inject, prevents complications and ensures proper absorption of your tirzepatide dose.
The approved injection zone
The approved abdominal injection area forms a wide band across your lower torso. The boundaries are:
Top boundary: Below your rib cage (the costal margin)
Bottom boundary: Above your hip bones (the iliac crests)
Side boundaries: Around to your flanks (love handle area)
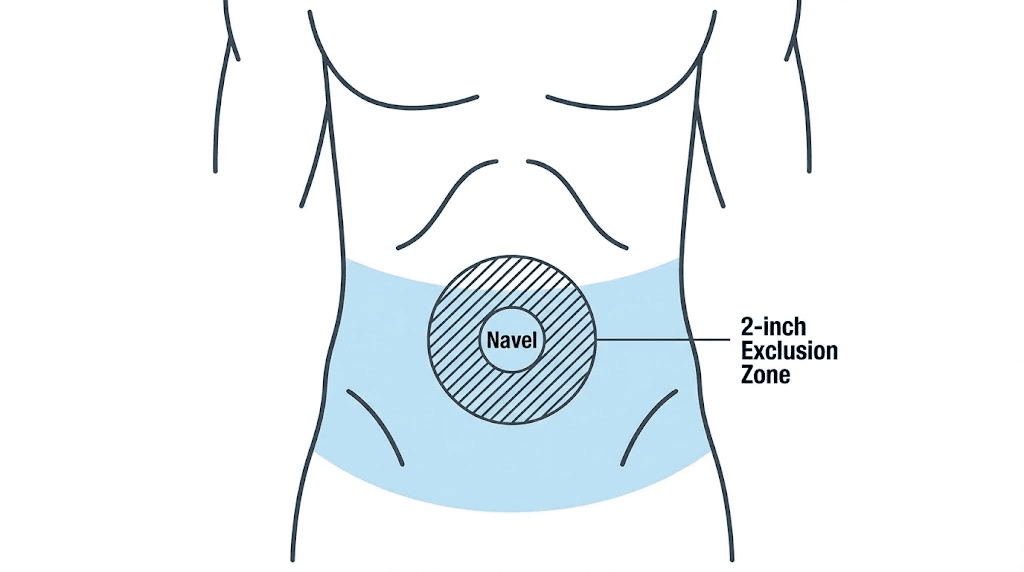
Center exclusion: At least 2 inches (5 centimeters) away from your belly button in every direction
That 2-inch exclusion zone around the navel is critical. The area immediately surrounding your belly button has a different tissue structure, including the remnant of the umbilical cord attachment, denser connective tissue, and a different vascular pattern. Injecting too close to the navel increases pain, reduces absorption consistency, and raises the risk of hitting a blood vessel.
Two inches. Not one. Not "close but not right on it." A full two inches in every direction from the center of your belly button. When in doubt, go wider.
Best spots within the zone
Within that approved area, some spots are better than others. The ideal injection location has:
At least one inch of pinchable fat. When you pinch the skin between your thumb and forefinger, you should be able to gather a fold that is about an inch thick. This confirms you have enough subcutaneous tissue for the needle to deposit the medication in the correct layer.
No visible veins. If you can see blue or green veins through the skin at your chosen spot, move to a different location. Injecting into or near a visible vein increases bruising risk significantly.
No scars, stretch marks, or skin damage. Scar tissue has altered structure that can affect absorption. Stretch marks indicate areas where the skin has thinned. Avoid both. If you have concerns about your injection sites, discuss them with your healthcare provider.
No existing bruises or lumps. If a previous injection left a mark, stay at least an inch away from it. Injecting into already-irritated tissue compounds the problem.
For most people, the best spots are the areas to the left and right of the belly button, about 2 to 4 inches out, in the soft tissue between the rib cage and hip bone. These areas typically have adequate fat, minimal nerve density, and are easy to reach and see during the injection process.
Areas to absolutely avoid
Never inject tirzepatide into:
Within 2 inches of your belly button
Directly on your waistband line (constant friction from clothing irritates injection sites)
Areas with skin conditions (rashes, eczema, psoriasis, sunburn)
Hard or thickened skin (could indicate lipohypertrophy from repeated injections)
Areas where you will wear a tight belt (pressure on a fresh injection site increases bruising)
Think of your abdomen as a clock face centered on your belly button. You have positions at 2 o'clock, 4 o'clock, 8 o'clock, and 10 o'clock that all sit in the sweet spot for comfortable, effective injections. That gives you four distinct zones for your weekly rotation schedule.

Step-by-step injection technique for pen users
If you are using a Mounjaro or Zepbound single-dose pen, the process is straightforward. The pen does most of the work. Your job is positioning, angle, and patience.
Step 1: Clean the injection site
Take an alcohol swab and wipe the chosen area in a circular motion, starting from the center and spiraling outward. This cleans bacteria from the skin surface. Let the area dry completely. Do not blow on it, do not fan it, do not wipe it with a towel. Let the alcohol evaporate on its own, which takes about 15 to 20 seconds.
Injecting into wet alcohol stings because the alcohol gets dragged under the skin by the needle. Those extra seconds of drying time save you unnecessary discomfort during your weekly tirzepatide dose.
Step 2: Remove the pen cap
Pull the base cap straight off. Do not twist it. The pen is designed for a straight pull. Once the cap is removed, you will see the needle housing at the bottom of the pen. Do not put the cap back on after removal, as this can damage the internal needle mechanism.
You should hear or feel a click when the cap releases properly. If the cap will not come off with reasonable force, the pen may be defective. Contact your pharmacy for a replacement rather than forcing it.
Step 3: Position the pen on your stomach
Place the clear base of the pen flat against your skin at the injection site. The pen should be perpendicular to your body, meaning a 90-degree angle. Not tilted. Not angled. Straight in.
Press the base firmly against your skin. You need good contact. The pen is designed to automatically insert the needle to the correct depth when you activate it, but only if the base sits flush against the skin surface. A loose or angled placement can result in a too-shallow injection that leaks medication back out of the puncture site.
Some people find it helpful to use their non-dominant hand to gently pull the skin taut (flat and slightly stretched) at the injection site while positioning the pen with their dominant hand. This creates a firmer surface for the pen base to rest against.
Step 4: Unlock and inject
Turn the lock ring until it aligns with the unlock symbol (the green padlock icon on most pen models). Then press and hold the purple injection button firmly.
You will hear a first click. This means the needle has inserted and the injection has begun. Keep holding the button. Do not lift the pen. The medication is being delivered.
Wait for the second click. This signals the injection is complete. After the second click, continue holding the pen against your skin for an additional 5 to 10 seconds. This ensures the full dose has been delivered and prevents medication from leaking back out through the needle track.
The total process from first click to removal takes approximately 10 to 15 seconds. It feels longer than it is. Count slowly in your head if it helps. Rushing this step is the most common mistake pen users make, and it leads to incomplete dosing and reduced effectiveness.
Step 5: Remove and dispose
Lift the pen straight up and away from your skin. Do not angle it during removal. You may see a small drop of blood or medication at the injection site. This is normal. Dab gently with a tissue or cotton ball if needed, but do not rub or massage the area.
Place the used pen immediately into your sharps disposal container. Single-dose pens cannot be reused and should never go into regular trash where someone could accidentally get stuck by the needle.
Step-by-step injection technique for vial and syringe users
Compounded tirzepatide from a vial requires a slightly different process. You are drawing the medication yourself and using an insulin syringe, which gives you more control but also more responsibility for getting the technique right.
Step 1: Draw your dose
If your tirzepatide vial needs reconstitution, that should already be done before you reach this step. Your vial should contain a clear, ready-to-inject solution. Refer to the tirzepatide reconstitution chart if you need guidance on mixing.
Clean the rubber stopper of the vial with an alcohol swab. Draw air into the syringe equal to the volume you plan to withdraw. Insert the needle through the rubber stopper and push the air in. This equalizes pressure inside the vial and makes drawing the medication easier.
Invert the vial and slowly pull back the plunger to your target volume. Check for air bubbles. If you see any, tap the syringe barrel gently with your finger to move them to the top, then push the plunger slightly to expel the air. Confirm your dose volume matches your tirzepatide dosage chart in milliliters.
Remove the syringe from the vial. You are ready to inject.
Step 2: Clean the injection site
Same process as pen users. Alcohol swab in a circular motion. Let it dry completely. Patience here prevents stinging.
Step 3: Pinch and insert
This is where vial injection differs most from pen injection. With an insulin syringe, you control the depth and angle manually.
The pinch technique: Using your non-dominant hand, gently pinch a fold of skin at the injection site between your thumb and forefinger. Lift the fold slightly away from the underlying muscle. This creates a clear target of subcutaneous fat for the needle.
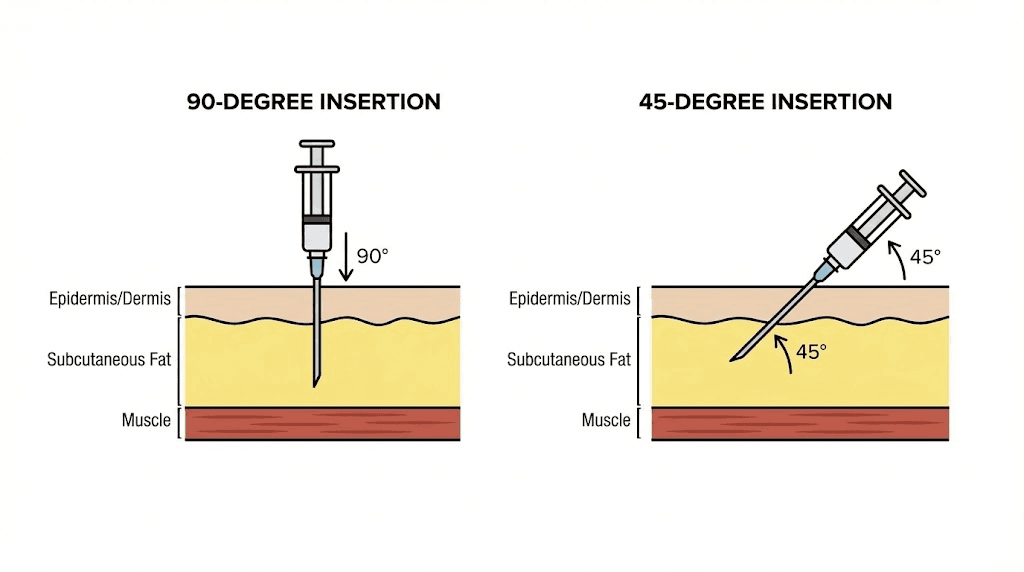
The amount of pinchable tissue determines your insertion angle:
More than 1 inch of pinched fat: Insert the needle at a 90-degree angle (straight in)
Less than 1 inch of pinched fat: Insert the needle at a 45-degree angle
The goal is reaching the subcutaneous layer, which sits between the skin and the muscle. Too shallow and the medication pools just under the skin surface, causing a visible bump and slow absorption. Too deep and you hit muscle tissue, which hurts more and absorbs the medication too quickly, potentially causing unwanted side effects.
Insert the needle smoothly and quickly in a single motion. Slow, hesitant insertion is actually more painful because the needle drags against tissue rather than cleanly puncturing through it. Think of it like pulling off a bandage. Quick is better.
Step 4: Inject the medication
With the needle fully inserted, release the skin pinch. Then slowly push the plunger down to inject the medication. Slow and steady wins here. Injecting too quickly forces the liquid into the tissue faster than it can comfortably absorb, which creates pressure, stinging, and sometimes a visible welt.
A good pace is about 5 to 10 seconds for the full dose. If you are injecting a larger volume (some compounded tirzepatide concentrations require more volume per dose), go even slower. The larger the volume, the more important injection speed becomes.
Step 5: Wait, then withdraw
After the plunger reaches the bottom, leave the needle in place for 5 to 10 seconds. This allows the medication to begin dispersing into the tissue and prevents it from tracking back up the needle path when you withdraw.
Pull the needle out at the same angle you inserted it. Press a clean cotton ball or tissue gently against the site. Do not massage. Do not rub. Just light pressure to catch any blood or medication that might seep from the puncture.
Dispose of the syringe in a sharps container immediately. Never recap a used needle, as this is how accidental needlestick injuries happen.
Needle selection for stomach injections
If you are using a pre-filled pen, the needle is built in and already optimized. This section is primarily for compounded medication users who need to select their own syringes.
Needle gauge explained
Needle gauge measures thickness, and here is the counterintuitive part: higher numbers mean thinner needles. A 31G needle is thinner than a 29G needle. Thinner needles hurt less but require slightly more force to push medication through.
For tirzepatide stomach injections, the recommended range is:
29G: Standard option. Reliable, easy to find, slight more sensation during insertion
30G: Good middle ground between comfort and ease of use
31G: Best for comfort. Minimal insertion pain. Slightly slower to inject through
32G: Ultra-thin. Maximum comfort but can be difficult to handle and may bend during insertion
Most experienced users settle on 30G or 31G as their preferred gauge. The difference between 29G and 31G in terms of pain is noticeable but not dramatic. The difference between using any appropriate gauge versus a dull or reused needle is significant. Never reuse needles. Each use dulls the tip and introduces contamination risk.
Needle length for stomach injections
Needle length determines how deep the injection goes. For subcutaneous abdominal injections, you want to reach the fat layer without penetrating through to the muscle beneath it.
4mm needles: Best for lean individuals with less abdominal fat. Combined with a 90-degree angle, these reliably reach subcutaneous tissue without risking intramuscular injection
6mm needles: The most universally appropriate length. Works well for the majority of body types
8mm needles: Suitable for individuals with more subcutaneous fat. May require the 45-degree angle technique for leaner users to avoid hitting muscle
If you are unsure which length to use, start with 6mm. It is the safest default for most people injecting tirzepatide into the stomach. Your pharmacist or healthcare provider can also provide guidance based on your specific body composition.
Syringe volume
Insulin syringes come in different volumes: 0.3mL, 0.5mL, and 1.0mL are the most common. Choose a syringe volume that is closest to (but still larger than) your dose volume. A 0.3mL syringe has finer graduation marks, making it easier to measure small doses precisely. If your tirzepatide dose is 0.15mL, a 0.3mL syringe gives you much better accuracy than a 1.0mL syringe where the markings are spaced farther apart.
Accurate dosing is critical with tirzepatide. Even small measurement errors can affect your results over time. Use the smallest syringe that fits your dose, and double-check the volume markings every time. Refer to tirzepatide unit conversion guides if you are unclear on how milligrams translate to units or milliliters on your syringe.
The injection site rotation system
Rotation is not a suggestion. It is a requirement.
Injecting into the same spot week after week causes lipohypertrophy, a condition where fatty tissue at the injection site thickens and hardens into a lump. These lumps are more than cosmetic. They dramatically reduce medication absorption, which means your carefully measured dose may not be fully entering your system. Some people who think tirzepatide has stopped working are actually experiencing absorption failure from damaged injection sites.
The four-quadrant rotation system
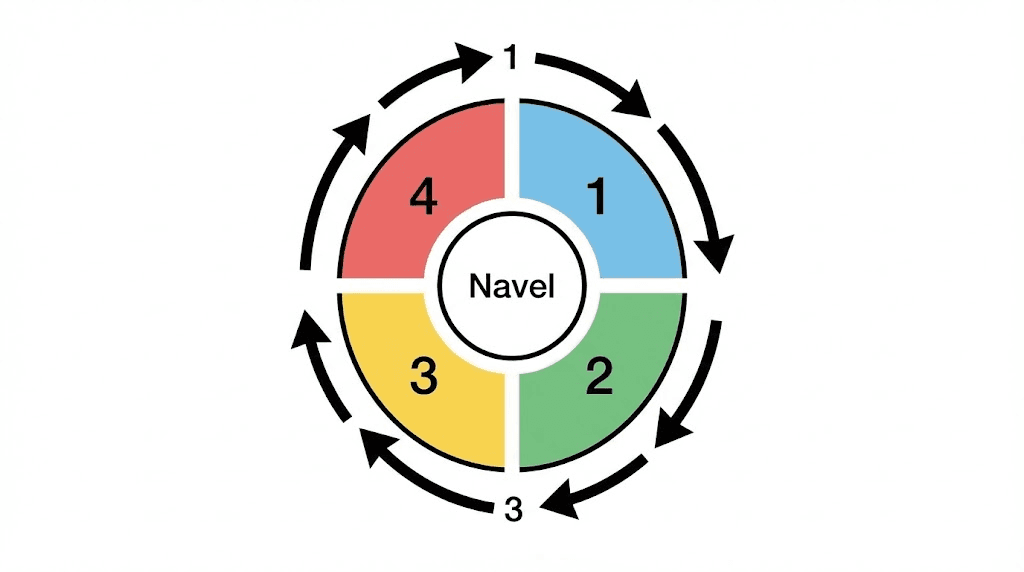
Divide your abdomen into four quadrants using your belly button as the center point:
Quadrant 1: Upper right (above navel, to the right)
Quadrant 2: Lower right (below navel, to the right)
Quadrant 3: Lower left (below navel, to the left)
Quadrant 4: Upper left (above navel, to the left)
Each week, move to the next quadrant in order. Week 1 upper right, week 2 lower right, week 3 lower left, week 4 upper left, then back to upper right for week 5. This gives each quadrant a full three weeks of rest between injections, which is more than enough time for the tissue to recover completely.
Within each quadrant, vary the exact spot by at least one inch from your previous injection in that quadrant. This creates a micro-rotation within the macro-rotation, ensuring you never inject the same precise location more than once a month at absolute most.
Tracking your rotation
Memory is unreliable. After a few weeks, you will not remember which quadrant you used last. Use one of these tracking methods:
The simple calendar method: After each injection, write which quadrant you used (UR, LR, LL, UL) on your calendar or in a note on your phone. Takes three seconds and eliminates all guesswork.
The clockwise rule: Always rotate clockwise. If you can remember the last quadrant you used, the next one is always the next position clockwise. Simple, consistent, foolproof.
The body landmark method: Associate each quadrant with a physical landmark you can feel. Upper right might be next to a specific rib. Lower left might be above the left hip bone. Physical anchors stick in memory better than abstract quadrant numbers.
However you track it, just track it. The consequences of not rotating, lumps, reduced absorption, injection site damage, are entirely preventable with a basic system. SeekPeptides offers tools and trackers that members use to stay on top of their tirzepatide protocols, including injection site tracking.
Adding thighs and arms to your rotation
While this guide focuses on stomach injections, some people expand their rotation to include the thigh and upper arm. This is especially useful if you are on long-term GLP-1 therapy and need to give abdominal tissue extended rest periods.
The thigh injection site is the front of the thigh, roughly in the middle third between the knee and the hip. The upper arm site is the fatty area on the back of the arm, typically requiring someone else to administer the injection. If you expand your rotation, treat each body region as a separate zone in your tracking system.
That said, many users stick with stomach-only rotation for years without issues, as long as they rotate properly within the four abdominal quadrants. The stomach alone provides more than enough real estate for weekly injections.
Reducing pain and discomfort during stomach injections
Zero pain is possible. Not every time, but most times, with the right technique. These tips come from both medical best practices and the collective experience of thousands of people who inject tirzepatide weekly.
The ice trick
Hold an ice cube against the injection site for 15 to 20 seconds before cleaning with alcohol. The cold numbs the nerve endings in the area, reducing or eliminating the sensation of the needle entering the skin. Remove the ice, wait a moment for any moisture to evaporate, then clean with your alcohol swab and proceed normally.
This technique is most useful during your first few injections when anxiety is amplifying pain perception. Most people stop using ice after a month or two because they have become comfortable enough with the process that the brief needle sensation no longer bothers them.
Breathing technique
Take a slow, deep breath in. Begin exhaling slowly. Insert the needle during the exhale. Exhaling naturally relaxes the abdominal muscles, which makes the subcutaneous layer softer and more receptive to the needle. It also distracts your brain from the injection, reducing perceived pain.
Do not hold your breath. Holding your breath tenses muscles. Tensed abdominal muscles push the subcutaneous fat layer thinner, making the injection more likely to be uncomfortably deep or to hit muscle tissue.
Speed of insertion
Quick insertion hurts less than slow insertion. This is counterintuitive because everything in your brain screams "go slow, be careful." But needles are designed to cut cleanly through tissue when inserted with a smooth, swift motion. Slow insertion drags the needle through tissue, engaging more nerve endings and creating more sensation.
For pen users, this means pressing the pen firmly and decisively against your skin. For syringe users, it means a confident, single-motion insertion rather than a tentative, gradual approach.
Distraction methods
Watch a video. Listen to music. Talk to someone. Have the television on. Anything that occupies your attention during the few seconds of needle insertion reduces pain perception. This is not psychological hand-waving. It is well-documented neuroscience. Pain signals compete with other sensory input for brain attention. Occupy the brain with something else, and the pain signal gets turned down.
Many tirzepatide users develop a weekly routine, a specific show they watch, a specific playlist they listen to, while doing their injection. The routine itself becomes a cue that calms anxiety over time.
Avoid injection-day mistakes that increase pain
Some common errors that make stomach injections more painful than they need to be:
Injecting cold medication (let it warm up first)
Injecting through wet alcohol (let the swab site dry)
Reusing needles (dull tips tear rather than cut tissue)
Injecting into the same spot repeatedly (damaged tissue hurts more)
Tensing your abdominal muscles (relax, breathe out)
Injecting too fast (slow medication delivery, quick needle insertion)
Injecting near the waistband line (clothing friction irritates the site afterward)
Eliminate these mistakes and you eliminate the vast majority of injection-related discomfort. The needle itself is tiny. It is the technique errors around it that create most of the unpleasant experiences people report.
Handling injection site reactions
Even with perfect technique, injection site reactions happen occasionally. Approximately 2 to 5 percent of tirzepatide users experience some form of local reaction. Knowing what is normal, what is concerning, and how to manage each type keeps you calm and confident.
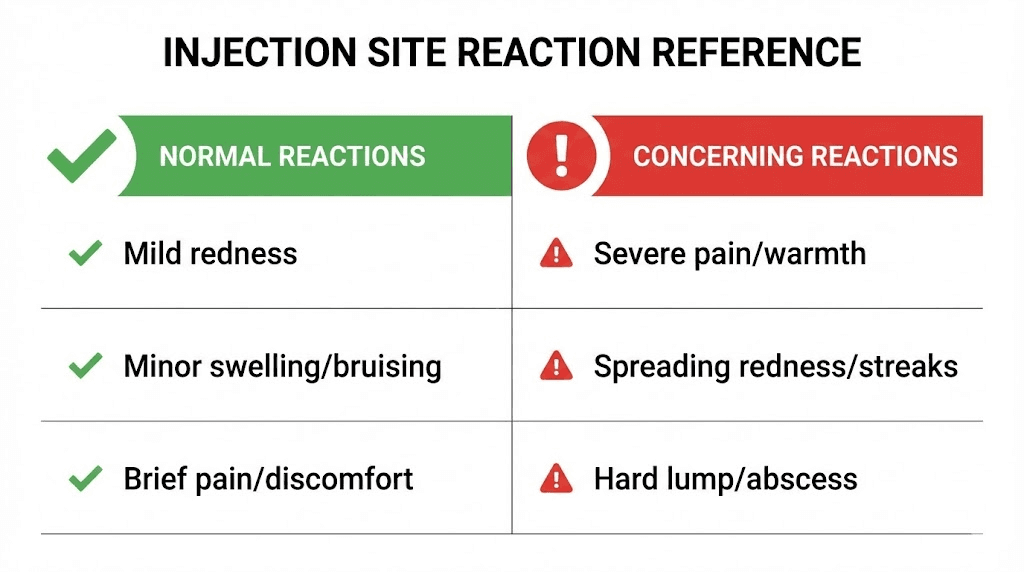
Normal reactions (no cause for alarm)
Small red mark at the injection site. This is the most common reaction. The needle causes minor tissue trauma, and your body responds with localized inflammation. A small red dot or circle at the puncture site that fades within a few hours to a day is completely normal.
Minor bruising. You nicked a small blood vessel under the skin. The resulting bruise is cosmetic only and does not affect how the medication works. It will follow the normal bruise cycle, changing colors over several days before fading completely. Users on blood thinners or those who take fish oil, aspirin, or similar supplements may bruise more easily.
Slight itching. Some people experience mild itching around the injection site as the medication disperses through the tissue. This typically resolves within an hour. Avoid scratching, which can introduce bacteria into the fresh puncture site.
A small, firm bump under the skin. This is a localized medication depot, essentially a small pocket where the tirzepatide is sitting before being fully absorbed. These bumps are usually painless and disappear within 24 to 48 hours. If you are consistently getting bumps, you may be injecting too quickly or too shallowly.
Reactions that need attention
Persistent redness or swelling that grows over days. Normal redness shrinks over time. If the red area is expanding, becoming warmer, or increasing in tenderness, this could indicate infection or an allergic response. Contact your healthcare provider.
Hard lumps that do not resolve within a week. Persistent lumps could be lipohypertrophy from repeated injection in the same area, or a localized inflammatory response. Discuss with your provider and ensure you are rotating sites properly.
Pus, drainage, or streaking redness. These are signs of potential infection. Seek medical attention promptly. Do not attempt to squeeze, drain, or treat an infected injection site on your own.
Severe pain disproportionate to the injection. If you experience sharp, radiating pain that is significantly worse than the usual brief sting, the needle may have hit a nerve. This is rare but can happen. The pain typically resolves on its own, but if it persists beyond a few hours, contact your provider.
Managing reactions at home
For normal, mild reactions:
Cold compress: Apply a wrapped ice pack for 10 to 15 minutes to reduce swelling and discomfort
Gentle pressure: A cotton ball held gently against the site for a minute can stop minor bleeding
Over-the-counter antihistamine: If itching is significant, a standard oral antihistamine can help
Leave it alone: Do not pick at, scratch, or massage the injection site
For persistent or worsening reactions, your healthcare provider is your first resource. Bring notes about which quadrant you injected, what time, and any products you used (alcohol type, any creams or lotions on the skin) so they can help identify the cause.
Common mistakes that ruin stomach injections
After years of community experience with tirzepatide, certain mistakes show up over and over again. Learn from other people's errors so you do not repeat them.
Mistake 1: Not waiting after the click
Pen users hear the second click and immediately pull the pen away. The problem? A small amount of medication may still be flowing from the needle tip. Pulling out too early means you get 90% of your dose instead of 100%. Over weeks and months, this consistent underdosing adds up. Five to ten seconds after the second click. Every time.
Mistake 2: Massaging the injection site
It seems logical. You rub the area to help spread the medication, right? Wrong. Massaging the injection site after a subcutaneous injection pushes the medication deeper or spreads it laterally in ways that can increase redness, irritation, and bruising. It can also speed up absorption unpredictably, which for a once-weekly medication designed for slow, steady absorption is not what you want.
Light pressure with a cotton ball to stop bleeding is fine. Rubbing, kneading, or massaging is not. Let the subcutaneous tissue absorb the medication at its natural pace.
Mistake 3: Reusing needles
A needle that has been used once has a dulled tip. Under a microscope, the difference between a fresh needle and a used one is dramatic. The sharp, clean point becomes a barbed, jagged edge that tears tissue rather than cleanly penetrating it. This causes more pain, more bruising, more tissue damage, and increases infection risk significantly.
One needle, one use, one disposal. The cost of insulin syringes is minimal compared to the cost of an infected injection site or damaged subcutaneous tissue that no longer absorbs medication properly.
Mistake 4: Injecting into muscle
Tirzepatide is designed for subcutaneous administration. Intramuscular injection delivers the medication too quickly, can cause more pain, and changes the pharmacokinetic profile in ways that are not intended. This happens most often when:
The needle is too long for the person's body fat percentage
The person is very lean and does not pinch the skin
Abdominal muscles are tensed during injection
The injection angle is steeper than intended
If you notice that injections consistently hurt more than expected, produce a deeper ache rather than surface-level stinging, or leave you with more side effects than your dosage should produce, you may be accidentally hitting muscle. Try a shorter needle, a 45-degree angle with the skin pinch technique, and focus on relaxing your abdomen during injection.
Mistake 5: Inconsistent injection day and time
While this is not a technique mistake per se, inconsistent timing affects how your body processes tirzepatide between doses. Taking your injection at roughly the same time on the same day each week maintains the steadiest blood levels. Major variations, injecting on Monday one week and Friday the next, create peaks and troughs in medication levels that can worsen side effects like gastrointestinal symptoms.
Pick a day. Pick a time. Stick to it. If you need to adjust your injection day, guidelines exist for safely shifting your schedule without doubling up or skipping.
Mistake 6: Skipping the alcohol swab
"It is just a tiny needle. What could happen?" Infection. That is what could happen. Skin bacteria, even on clean-looking skin, can be introduced into subcutaneous tissue through the needle puncture. An alcohol swab kills surface bacteria and takes five seconds. An injection site infection takes antibiotics and weeks to resolve.
Always clean the site. Every single time. No exceptions. This applies equally to pen users and compounded tirzepatide vial users.
Special considerations for different body types
Body composition affects injection technique more than most guides acknowledge. A one-size-fits-all approach works for the average case, but you may not be the average case. Adjusting your technique based on your body delivers better results and less discomfort.
For individuals with more abdominal fat
The good news is that more subcutaneous fat makes stomach injections easier and less painful. You have a larger target area, more cushion for the needle, and less risk of accidentally hitting muscle. Use the standard 90-degree insertion angle with a 6mm or 8mm needle. The pinch technique is helpful but not strictly necessary when there is ample fat tissue.
The primary concern with more abdominal fat is ensuring the medication reaches the subcutaneous layer rather than staying too superficial. If you consistently see bumps or welts at the injection site, you may need a slightly longer needle to get past the upper skin layers into the deeper subcutaneous tissue where absorption is optimal.
For leaner individuals
Less abdominal fat means a thinner target layer between skin and muscle. The 45-degree insertion angle becomes essential, and the pinch technique is mandatory. Use a 4mm or 6mm needle. Avoid 8mm needles entirely unless your healthcare provider specifically recommends one based on an assessment of your tissue depth.
Always pinch a fold of skin and fat before inserting the needle at 45 degrees. This lifts the subcutaneous layer away from the underlying muscle, creating a clear target. Insert into the base of the pinched fold, not into the side. Release the pinch after the needle is fully inserted but before pushing the plunger.
If you are very lean and finding stomach injections consistently painful, the thigh may actually be a better primary site for you, as it often has more accessible subcutaneous tissue in lean individuals. Discuss options with your prescriber.
For people with loose or excess abdominal skin
Loose skin can shift during the injection process, potentially causing the needle to enter at an unintended angle or depth. The key is stabilizing the injection site. Use your non-dominant hand to pull the skin taut (flat and slightly stretched) before inserting the needle. This creates a firm, stable surface.
Alternatively, the pinch technique works well here too. Gathering a fold of tissue creates a defined target that stays in place during the injection. Whichever method you choose, the goal is eliminating tissue movement during needle insertion.
Tirzepatide stomach injection and nausea: clearing up the myth
One of the most persistent myths about tirzepatide injection is that injecting in the stomach causes more nausea than injecting in the thigh or arm. This is false. There is no scientific evidence supporting this claim.
Tirzepatide-related nausea and gastrointestinal effects are caused by the medication's systemic effect on GLP-1 and GIP receptors throughout your body, not by where you inject it. The injection site is simply the delivery point. Once the medication reaches the bloodstream, it circulates everywhere regardless of where the needle went in.
If you experience nausea after your injection, it is the medication dose itself, not the injection location. Managing GI side effects involves dietary adjustments, proper dose titration, and sometimes supplemental support like glycine or B12. Switching injection sites will not change your nausea level.
That said, injecting into the stomach on a very full stomach can feel uncomfortable simply because the tissue is stretched and more sensitive when your abdomen is distended. Many people find it more comfortable to inject either before a meal or several hours after eating. This is a comfort preference, not a medical requirement.
Timing your stomach injection for best results
When during the day should you inject? The honest answer is that tirzepatide's pharmacokinetics are not significantly affected by time of day. It is a once-weekly medication with a long half-life. Whether you inject at 7 AM or 9 PM, the steady-state blood levels over the week will be nearly identical.
However, practical considerations matter. The best time to inject any GLP-1 medication is the time you will consistently remember and be able to do properly.
Morning injectors
Injecting in the morning means you have all day for any initial side effects (mild nausea, reduced appetite) to manifest while you are awake and able to manage them. It also means you are not tired or rushing through the process, which reduces technique errors.
Evening injectors
Some people prefer evening injections so that any initial discomfort from the injection site or early GI effects can be slept through. If you tend to feel slightly unwell in the hours after injection, nighttime dosing lets you skip that window by sleeping through it.
The consistency factor
Pick whichever time works for your schedule and stick with it. The worst time is "whenever I remember," because inconsistency in timing leads to inconsistency in blood levels, which leads to more pronounced peaks and troughs of the medication's effects throughout the week.
If you are transitioning between GLP-1 medications, maintaining a consistent injection schedule becomes even more important during the switchover period.
Storing your tirzepatide between injections
Proper storage directly affects injection quality. Degraded medication can cause more injection site reactions, reduced effectiveness, and in some cases, unexpected side effects. Your storage protocol matters just as much as your injection technique.
Refrigeration requirements
Unopened tirzepatide pens and vials should be stored in the refrigerator at 36 to 46 degrees Fahrenheit (2 to 8 degrees Celsius). Once opened or first used, check the specific product guidelines:
Brand-name pens (Mounjaro, Zepbound): Can be stored at room temperature (up to 86 degrees F / 30 degrees C) for up to a specified number of days after first use. Check your specific pen's labeling.
Compounded tirzepatide: Typically requires continuous refrigeration between uses. Stability at room temperature varies by compounder and formulation.
Never freeze tirzepatide. Freezing can denature the peptide, destroying its biological activity. If your medication has been accidentally frozen, do not use it. If you are traveling with your medication, use an insulated cooler bag with ice packs to maintain temperature, being careful not to let the medication make direct contact with ice.
Light and stability
Tirzepatide should be stored in its original packaging to protect from light. UV exposure can degrade the peptide over time, reducing potency. Do not leave your pen or vial sitting on a windowsill, in your car, or in direct sunlight. The back of the refrigerator (away from the light that turns on when you open the door) is ideal.
Comparing stomach injections to other injection sites
While this guide focuses on the stomach, understanding how it compares to alternatives helps you make informed decisions about your injection rotation and preferences.
Stomach vs. thigh
Factor | Stomach | Thigh |
|---|---|---|
Pain level | Lower (fewer nerve endings) | Moderate (more nerve endings) |
Self-injection ease | Easy (full visibility and access) | Easy (full visibility, requires stable position) |
Absorption rate | Consistent and moderate | Can vary with physical activity |
Bruising risk | Low to moderate | Moderate |
Best for | Primary site for most users | Rotation alternative or primary for lean individuals |
The thigh is a perfectly valid injection site and makes an excellent addition to your rotation schedule. Some lean individuals actually find the thigh more comfortable because they have more subcutaneous fat there than on their abdomen. The key advantage of the stomach remains its consistent absorption and accessibility for self-administration.
Stomach vs. upper arm
Factor | Stomach | Upper arm |
|---|---|---|
Pain level | Lower | Variable |
Self-injection ease | Easy | Difficult without help |
Absorption rate | Consistent | Generally faster |
Bruising risk | Low to moderate | Higher |
Best for | Self-administration | When administered by someone else |
The upper arm is primarily useful when someone else is administering your injection, as it is difficult to reach properly on your own. For self-injectors, the stomach and thigh are far more practical options. If someone else is giving you your weekly tirzepatide shot, the upper arm can be added to the rotation for additional site variety.
Injection technique for specific tirzepatide formulations
Not all tirzepatide is delivered the same way. The specific formulation you are using affects certain aspects of the injection process.
Pre-filled pen injections
Pre-filled pens (Mounjaro, Zepbound) are the simplest method. The needle is pre-attached, the dose is pre-measured, and the injection mechanism is automated. Your technique focus should be on:
Firm, flat placement of the pen base against the skin
90-degree perpendicular angle
Holding still during the injection (no movement or shifting)
Waiting 5 to 10 seconds after the second click before removal
The main advantage of pens is that they eliminate dosing errors and depth errors. The disadvantage is that you cannot adjust the needle length or choose a different gauge. What comes in the pen is what you use.
Compounded vial injections
Compounded tirzepatide from a vial gives you more control but also more responsibility. You select the needle, measure the dose, control the insertion depth, and manage the injection speed. The technique described in the syringe section of this guide applies here.
The advantage is customization. You can choose the thinnest, most comfortable needle gauge and the exact length appropriate for your body type. You can control injection speed precisely. The trade-off is that more steps mean more opportunity for error, particularly in dose measurement. Always double-check your dose in milliliters against your intended milligram dose before injecting.
Compounded tirzepatide with additives
Some compounded formulations include additional ingredients like glycine and B12 or niacinamide. These additives can sometimes affect the injection experience. B12 (cyanocobalamin or methylcobalamin) can occasionally cause a mild stinging sensation during injection. Niacinamide at certain concentrations can cause temporary warmth or flushing at the injection site.
If you are using a compounded formulation with additives and experiencing more injection site discomfort than expected, the additives may be contributing. This does not mean the formulation is bad, just that your technique may need slight adjustment. Slower injection speed often resolves stinging from B12-containing compounds.
Building a weekly injection routine
The best injection is the one that becomes automatic. When you do not have to think about it, when it is simply part of your weekly rhythm, you perform the technique better, experience less anxiety, and maintain consistency with your tirzepatide protocol.
Sample weekly injection routine
30 minutes before injection:
Remove tirzepatide from refrigerator
Set a timer if needed
Place pen or vial on counter to warm to room temperature
5 minutes before injection:
Wash hands with soap and water
Gather supplies (alcohol swab, sharps container, tissue)
Check your rotation tracker for which quadrant to use
Inspect medication for clarity and color
Injection time:
Clean injection site with alcohol swab
Wait for alcohol to dry (15 to 20 seconds)
Position pen or prepare syringe
Breathe out, inject
Hold for 5 to 10 seconds after completion
Remove, dab gently if needed
After injection:
Dispose of needle or pen in sharps container
Record which quadrant you used
Return vial to refrigerator (if applicable)
Note any unusual reactions
Total time: approximately 5 to 10 minutes including warmup wait. This becomes second nature within a few weeks. The first injection is nerve-wracking. The fifth is routine. The twentieth is something you barely think about.
Troubleshooting common stomach injection problems
Even experienced injectors run into issues occasionally. Here are the most common problems and their solutions.
Problem: Medication leaks back out after injection
Cause: Removing the needle too quickly, not holding long enough after the injection completes, or the needle track creating a channel for fluid to escape.
Solution: Wait a full 10 seconds after the injection is complete before removing the needle. When you do remove it, pull straight out and immediately apply gentle pressure with a cotton ball. If leaking persists, try the Z-track technique: before inserting the needle, use your non-dominant hand to pull the skin slightly to one side. Inject through the displaced skin. When you release after removing the needle, the skin slides back to its original position, offsetting the puncture in the skin from the puncture in the deeper tissue, effectively sealing the track.
Problem: Persistent bruising
Cause: Hitting small blood vessels during injection, using too thick a needle, or injecting too close to previous injection sites.
Solution: Avoid visible veins at the injection site. Switch to a thinner gauge needle (30G or 31G). Ensure proper site rotation with at least one inch between injection points. If you are taking blood-thinning medications or supplements (aspirin, fish oil, vitamin E), discuss with your provider whether adjusting the timing of those supplements relative to injection day could help.
Problem: Hard lumps that do not go away
Cause: Lipohypertrophy from repeated injection in the same area, or injecting too quickly, creating a concentrated medication depot.
Solution: Avoid the affected area entirely for at least 4 to 6 weeks. Adhere strictly to your four-quadrant rotation system. Inject more slowly. If lumps persist beyond 6 weeks of avoiding the area, consult your healthcare provider. Established lipohypertrophy sometimes requires medical evaluation.
Problem: Injection is much more painful than usual
Cause: Hit a nerve ending, cold medication, dull needle, tense muscles, or injecting into an area with less subcutaneous fat than expected.
Solution: If a specific spot hurts significantly, you likely hit a nerve cluster. Pull out and try a different spot an inch or two away. Verify your medication is at room temperature. Use a fresh needle. Relax your abdomen by exhaling slowly during insertion. If pain is consistently worse than your early injections, you may be developing injection site fatigue and should expand your rotation to include additional sites.
Problem: Pen does not click or feels incomplete
Cause: Pen malfunction, not pressing firmly enough, or the pen was not properly positioned.
Solution: Ensure the base is flat against your skin. Press the button firmly and hold it. If the pen still does not activate, it may be defective. Do not try to force it. Contact your pharmacy for a replacement. Do not try to extract medication from a malfunctioning pen with a syringe, as the delivery system is not designed for this and you could contaminate the medication or misdose.
When to involve your healthcare provider
Self-injection is straightforward for most people, but certain situations require professional guidance. Do not hesitate to reach out to your prescriber or pharmacist if you experience any of the following.
Contact your provider if:
Injection site reactions are worsening with each dose rather than improving
You develop signs of infection (spreading redness, warmth, pus, fever)
Persistent lumps do not resolve after 6 weeks of avoiding the area
You experience severe pain that lasts more than a few hours after injection
You are consistently unable to complete the injection (pen malfunction, inability to insert needle)
You notice skin changes like pitting, thickening, or discoloration at injection sites
Your tirzepatide seems less effective despite consistent dosing (could indicate absorption issues from site damage)
Healthcare providers can assess your technique in person, check for tissue damage, adjust your injection approach, and identify whether your issues stem from technique, equipment, or the medication itself. Do not try to troubleshoot medical complications alone when professional help is available.
Advanced tips from experienced users
These tips go beyond the basics. They come from people who have been injecting tirzepatide weekly for months or years and have refined their process to minimize every possible source of discomfort and maximize results.
The skin-flat technique
Instead of pinching, some experienced users prefer pulling the skin taut (flat and tight) over the injection area with their non-dominant hand, then inserting the needle quickly at 90 degrees. This technique works well for people with adequate abdominal fat because it creates a firm, stable target. The taut skin also reduces the sensation of the needle entering because the tissue does not move or give during insertion. This is an alternative to pinching, not a replacement for it. Try both and see which feels more comfortable for your body type.
The look-away method
Some people find that watching the needle enter their skin triggers a pain response that is more psychological than physical. Looking away during the moment of insertion, while keeping your hand steady, can reduce perceived pain. This works because your brain processes visual and tactile pain signals together. Remove the visual component and the tactile sensation often feels less significant.
Obviously, you need to position everything correctly before looking away. Get the pen placed or the syringe positioned, confirm the angle, and then turn your head.
Post-injection positioning
After your injection, avoid tight clothing over the site for a few hours if possible. A tight waistband pressing against a fresh injection site can increase irritation and bruising. If you inject in the morning before getting dressed, let the site rest for a few minutes before putting on pants with a snug waistband.
Similarly, avoid strenuous abdominal exercises immediately after injecting in the stomach. Crunches, planks, and similar movements contract the abdominal muscles and can increase discomfort at the injection site. Wait at least a few hours before your core workout.
Keeping a brief injection journal
A simple log of each injection, date, time, quadrant, any reactions, and pain level on a 1 to 10 scale, helps you identify patterns over time. You might discover that one quadrant consistently gives you less discomfort, or that injecting at a certain time of day correlates with fewer side effects. Data-driven adjustments beat guesswork every time.
SeekPeptides members often use tracking tools within the platform to log their tirzepatide protocols, including injection details. Having a structured system makes pattern recognition much easier than trying to remember details from weeks ago.
Switching from other injection sites to the stomach
If you have been injecting tirzepatide in your thigh or upper arm and want to switch to the stomach, the transition is simple. You do not need to adjust your dose, change your schedule, or do anything differently from a medication standpoint. The only change is the injection location.
For your first stomach injection, follow all the preparation steps in this guide carefully. Your technique for thigh injection may have included different muscle relaxation cues or a different angle. The stomach has its own rhythm. Give yourself a few weeks to get comfortable with the abdominal technique before deciding whether it is an improvement for you.
Some people who switch find that stomach injections absorb slightly differently, not in a medically significant way, but in a way that might subtly shift when they feel side effects peak or trough during the week. This is normal and typically stabilizes within two to three injection cycles.
Frequently asked questions
Does injecting tirzepatide in the stomach cause more stomach pain or nausea?
No. Nausea and gastrointestinal effects from tirzepatide are caused by the medication's systemic action on GLP-1 and GIP receptors, not by the injection site. Whether you inject in your stomach, thigh, or arm, the GI effects remain the same. The injection site is just the delivery point. If you experience significant nausea, explore dietary strategies and discuss dose titration with your provider.
How far from the belly button should I inject?
At least 2 inches (5 centimeters) in every direction from the center of your belly button. The tissue immediately around the navel has a different structure that can affect absorption and increase discomfort. When in doubt, go farther out rather than closer in. The sides of your abdomen, 3 to 4 inches from the navel, are excellent injection zones with ample subcutaneous tissue.
Can I inject tirzepatide in the same spot every week?
No. Repeated injection in the same spot causes lipohypertrophy, hardened lumps of fat and scar tissue that reduce medication absorption. Use the four-quadrant rotation system described in this guide, rotating clockwise each week and varying the exact spot within each quadrant by at least one inch. This gives each area three full weeks of rest between injections.
What do I do if I see blood after removing the needle?
Apply gentle pressure with a clean tissue or cotton ball. A small amount of blood is normal and means you nicked a tiny blood vessel, which happens occasionally regardless of technique. If the bleeding does not stop within a minute or two of gentle pressure, or if the bleeding is significant, contact your healthcare provider. Do not massage or rub the area.
Is it normal to feel a burning sensation during injection?
A brief, mild stinging or burning during injection is common and usually harmless. Common causes include cold medication (let it warm up), injecting through wet alcohol (wait for the swab to dry), injecting too quickly (slow down the plunger push), or the medication formulation itself (some compounded tirzepatide with B12 stings slightly). If burning is severe or persists long after the injection is complete, contact your provider.
Should I pinch the skin or pull it flat?
Both techniques work. Pinching is recommended for leaner individuals to ensure the needle reaches subcutaneous tissue without penetrating muscle. Pulling the skin taut works well for individuals with adequate abdominal fat. Try both and use whichever feels more comfortable and gives you better results. The goal with either technique is a stable injection surface where the needle enters subcutaneous fat tissue reliably.
How do I know if I injected into muscle instead of fat?
Intramuscular injection typically causes sharper, deeper pain at the moment of injection and may produce a lingering ache for hours afterward. You might also notice faster onset of medication effects (and potentially stronger side effects) because muscle absorbs medication more quickly than subcutaneous fat. If this happens consistently, switch to a shorter needle, use the 45-degree angle with pinch technique, and focus on relaxing your abdominal muscles during injection.
Can I shower or bathe right after injecting in my stomach?
Wait at least 15 to 30 minutes after injection before showering or bathing. Hot water can increase blood flow to the injection site, potentially affecting absorption rates and increasing the chance of bleeding or bruising. The puncture site needs a few minutes to close naturally. After that waiting period, showering is perfectly fine.
External resources
For researchers committed to optimizing every aspect of their peptide protocols, SeekPeptides provides the most comprehensive resource available, with evidence-based guides, injection technique tutorials, dose calculators, protocol tracking tools, and a community of thousands who have navigated these exact questions. Members gain access to detailed tirzepatide dosing guides, personalized calculators, and expert-reviewed protocols that take the guesswork out of peptide research.
In case I do not see you, good afternoon, good evening, and good night. May your injections stay painless, your rotation stay consistent, and your results stay on track.