Feb 26, 2026
What if the problem is not your tirzepatide dose, but how you are delivering it? Thousands of people draw medication into an insulin syringe each week, push the plunger, and hope for the best. Some see incredible results within the first few weeks of their tirzepatide protocol. Others struggle with inconsistent absorption, painful injections, bruising that will not fade, and the nagging suspicion that something in their technique is wrong. The difference between these two groups almost always comes down to one thing. Proper injection technique.
Injecting tirzepatide with a syringe is not difficult. But it does require precision. The wrong needle angle sends medication into muscle tissue instead of the subcutaneous fat layer where it belongs. The wrong syringe size makes accurate dosing nearly impossible. And drawing from a compounded vial introduces variables that pre-filled pen users never have to consider, from air bubble management to proper reconstitution techniques that preserve peptide integrity.
This guide covers every detail of the syringe injection process. From selecting the right needle gauge and length to drawing medication from a vial without losing a single unit, from choosing the best injection site on your body to managing discomfort so you barely feel the needle enter your skin. Whether you are working with compounded tirzepatide from a multi-dose vial or transitioning from a brand-name pen, the step-by-step process below will give you confidence that every single injection delivers your full prescribed dose exactly where it needs to go. SeekPeptides members frequently report that mastering syringe technique was the turning point where their results finally became consistent.
Why syringe injections are different from pen injections
If you have used a Mounjaro or Zepbound auto-injector pen before, injecting with a syringe will feel like an entirely different experience. The pen does most of the work for you. It controls needle depth, injection speed, and dose measurement automatically. A syringe puts all of those variables in your hands.
That is not a disadvantage. It is actually an advantage for many users.
Compounded tirzepatide, which arrives in multi-dose vials rather than single-use pens, has become enormously popular because of its significantly lower cost compared to brand-name versions. Many people choose compounded tirzepatide specifically because the savings are substantial, sometimes thousands of dollars per year. But using compounded tirzepatide means you need to learn proper syringe technique, because there is no auto-injector doing the work for you.
The key differences between pen and syringe injection come down to three factors. First, dose measurement. With a pen, you dial your dose and the device delivers it. With a syringe, you must draw the correct volume by reading the markings on the barrel, and understanding the relationship between tirzepatide dosage in units and milligrams is essential. Second, needle selection. Pens come with attached or supplied needles. With syringes, you choose your own needle gauge and length, which directly affects comfort and medication delivery. Third, injection speed. Pens deliver medication at a preset rate, while syringe injection speed is controlled entirely by how fast you push the plunger.
None of these differences make syringe injection harder. They simply require more knowledge and attention. Once you understand the process, syringe injections become routine, taking less than two minutes from start to finish. Many experienced users actually prefer syringes because of the dosing flexibility they provide, especially for microdosing protocols that require precise, small-volume adjustments impossible with standard pen increments.
The injectable form of tirzepatide remains the gold standard for bioavailability and consistent results. While oral tirzepatide options and orally disintegrating tablets are emerging, subcutaneous injection with a syringe continues to deliver the most reliable absorption and outcomes.
Everything you need before your first injection
Preparation is not optional. Having the right supplies organized and within reach before you begin prevents contamination, reduces errors, and makes the entire process smoother. Here is exactly what you need.
Essential supplies
Your supply list is straightforward, but every item matters. You will need your tirzepatide vial (stored properly according to refrigeration guidelines), a new sterile insulin syringe with an attached needle, alcohol swabs for cleaning the vial top and injection site, a sharps disposal container for used needles, and cotton balls or gauze for post-injection pressure.
If your tirzepatide arrived as a lyophilized powder rather than a pre-mixed liquid, you will also need bacteriostatic water and a separate mixing syringe. Our guide on how much bacteriostatic water to mix with tirzepatide walks through the reconstitution math, and the peptide reconstitution calculator can handle the calculations automatically. Make sure reconstitution is complete before attempting to draw your injection dose.
Never reuse syringes or needles. A fresh syringe for every injection is non-negotiable. Reused needles become dull after a single use, which increases pain, tissue damage, and infection risk. They also lose their sterile coating, making each subsequent injection more uncomfortable than the last.
Workspace preparation
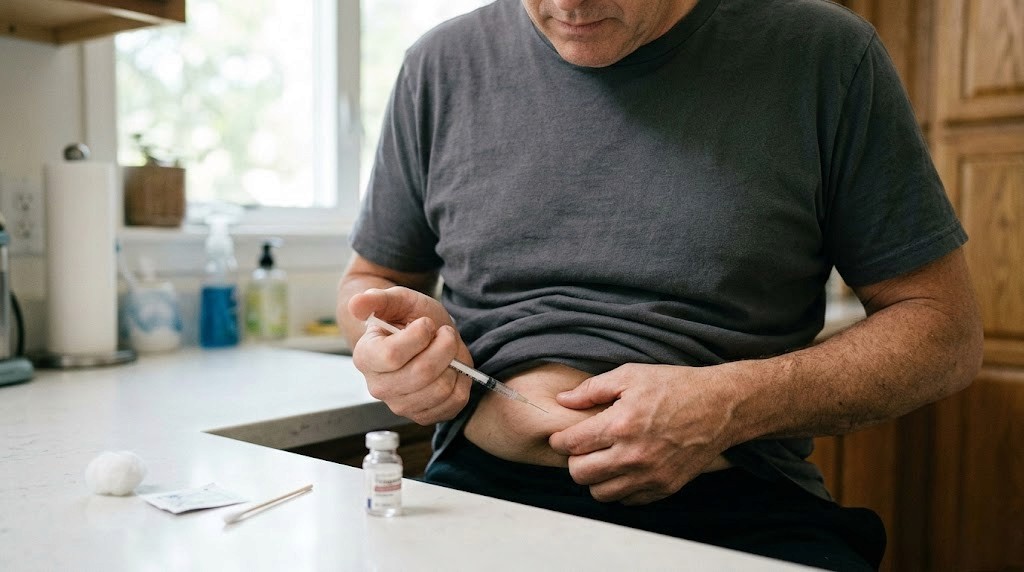
Choose a clean, well-lit area with a flat surface. Your kitchen counter or bathroom vanity works fine. Wipe the surface down and lay out all supplies before touching anything else. Good lighting is critical because you need to read the fine unit markings on your syringe barrel accurately.
Wash your hands thoroughly with soap and warm water for at least 20 seconds. Dry them with a clean towel. Do not skip this step. Your hands will touch the syringe, the vial, and potentially the injection site. Every surface your hands contact becomes a potential contamination pathway.
Medication temperature
Cold medication hurts more going in. If your tirzepatide has been stored in the refrigerator (as recommended in our tirzepatide storage guide), remove it 15 to 30 minutes before injection and let it reach room temperature naturally. Do not microwave it, run it under hot water, or place it near a heat source. Gentle warming at room temperature is the only safe method.
How long can it stay out? Our guide on how long compounded tirzepatide can be out of the fridge covers the exact timeframes. Generally, 30 minutes at room temperature for warming is perfectly safe and will not affect potency. Just do not leave it out for hours.
Before drawing your dose, inspect the vial visually. The liquid should be clear and colorless. If it appears cloudy, contains particles, or has changed color, do not use it. Refer to our article on what happens if tirzepatide gets warm if you suspect your vial has been temperature-compromised, or check whether your compounded tirzepatide has passed its expiration date.
Choosing the right syringe and needle
This decision affects everything. Comfort, accuracy, and medication delivery all depend on selecting the correct syringe size and needle specifications for your dose and body type.
Syringe size selection
Insulin syringes come in three standard sizes: 0.3 mL (30 units), 0.5 mL (50 units), and 1.0 mL (100 units). The right choice depends on your injection volume, which depends on your dose and the concentration of your compounded tirzepatide.
Here is the principle. Always use the smallest syringe that can hold your full dose. Smaller syringes have larger, easier-to-read markings for each unit increment, which dramatically improves dosing accuracy. If your dose is 15 units, a 0.3 mL syringe gives you much finer control than a 1.0 mL syringe where those same 15 units occupy a tiny fraction of the barrel.
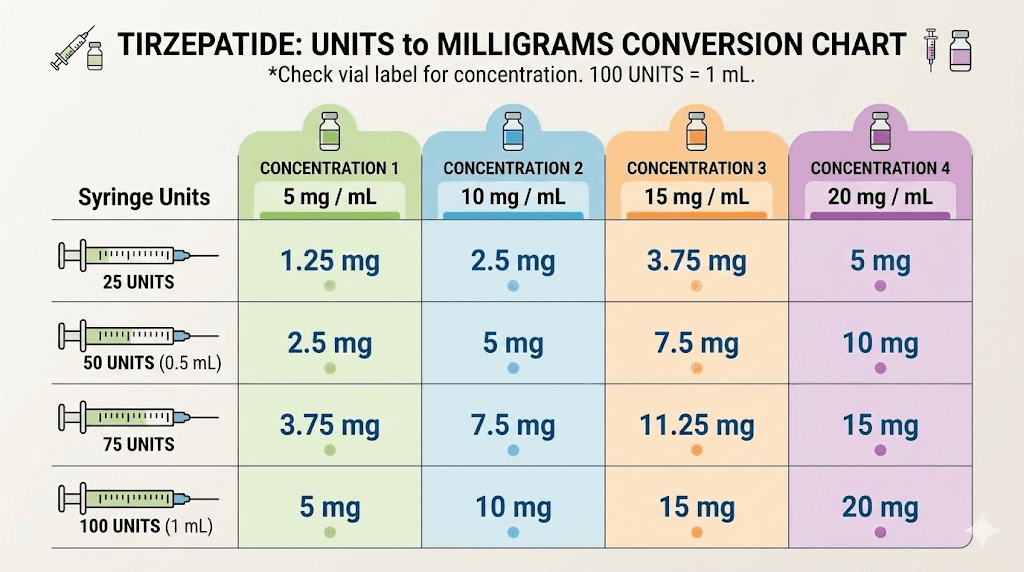
Understanding the relationship between units and milligrams is essential here. Units on an insulin syringe measure volume, not drug content. One unit equals 0.01 mL. So 25 units equals 0.25 mL, 50 units equals 0.50 mL, and 100 units equals 1.0 mL. The actual milligrams of tirzepatide per unit depends entirely on concentration. A 5 mg dose might require anywhere from 10 to 50 units depending on whether your vial is compounded at 100 mg/mL, 50 mg/mL, or another concentration.
Use the compounded tirzepatide dosage calculator to determine your exact injection volume before selecting a syringe size. Getting this calculation right prevents both underdosing and overdosing.
Injection volume | Recommended syringe | Why this size |
|---|---|---|
Up to 0.3 mL (30 units) | 0.3 mL insulin syringe | Finest unit markings, best accuracy for small doses |
0.3 to 0.5 mL (30-50 units) | 0.5 mL insulin syringe | Good accuracy with adequate volume capacity |
0.5 to 1.0 mL (50-100 units) | 1.0 mL insulin syringe | Only option for larger volumes, wider markings |
Most compounded tirzepatide users will find that a 0.5 mL syringe covers nearly all dose ranges comfortably. If you are following a microdosing tirzepatide schedule, the 0.3 mL syringe is often the better choice for the precision it provides at very small volumes.
Needle gauge and length
Needle gauge refers to the thickness of the needle. Higher numbers mean thinner needles. For subcutaneous tirzepatide injections, the recommended range is 29-gauge to 31-gauge, with 30-gauge being the most popular choice that balances comfort with easy medication flow.
A 29-gauge needle is slightly thicker, which means the medication flows through it more easily, but you feel it slightly more during insertion. A 31-gauge needle is thinner and less painful going in, but drawing medication takes a bit longer because the narrower opening creates more resistance. For most people, 30-gauge hits the sweet spot.
Needle length matters too. For subcutaneous injection, you want the needle to reach the fat layer beneath the skin without penetrating into the muscle below. Most adults do well with a needle length between 4 mm and 8 mm (roughly 5/16 inch to 5/16 inch). The standard recommendation is:
4 mm to 5 mm needles: Ideal for lean individuals with less subcutaneous fat
6 mm needles: Good all-purpose length for most body types
8 mm needles: Appropriate for individuals with more subcutaneous fat tissue
If you can pinch a full two inches of skin at your injection site, a 6 mm to 8 mm needle at a 90-degree angle works perfectly. If you can only pinch about one inch, a shorter needle or a 45-degree angle prevents accidental intramuscular injection. The technique for injecting tirzepatide in the stomach uses the same needle selection principles.
Most insulin syringes come with permanently attached needles in the 29-31 gauge range with lengths around 8 mm (5/16 inch), which works well for the majority of injection sites and body types. This is the same type of syringe used for semaglutide syringe injections and other GLP-1 peptide injections.
How to draw tirzepatide from a vial
This is where most mistakes happen. Drawing medication from a vial requires a specific sequence that prevents contamination, ensures accurate dosing, and avoids the air bubble problems that frustrate new users. Follow each step exactly.
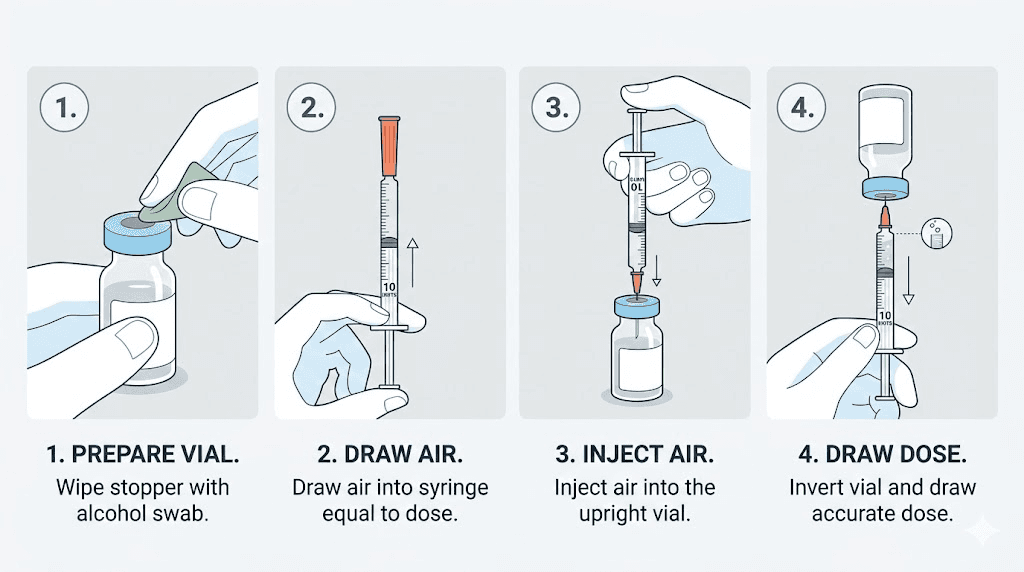
Step 1: Clean the vial top
Remove the plastic flip cap from the top of your tirzepatide vial to expose the rubber stopper beneath. Do not remove the rubber stopper itself. Take a fresh alcohol swab and firmly wipe the entire surface of the rubber stopper using a single circular motion from center to edge. Let the alcohol dry completely, roughly 10 to 15 seconds. Injecting a needle through a wet alcohol surface can sting and potentially introduce alcohol into the medication.
Step 2: Prepare the syringe with air
This step confuses many first-time users, but it serves an important purpose. Before drawing any medication, pull the syringe plunger back to draw in a volume of air equal to the volume of medication you plan to withdraw. If your dose is 25 units, pull the plunger back to the 25-unit mark, filling the barrel with air.
Why air first? Vials are sealed containers. If you simply push a needle in and try to pull medication out, you create a vacuum inside the vial. That vacuum makes drawing medication difficult, causes air bubbles to form in the liquid, and can even pull the plunger back after you remove the syringe, wasting medication. Injecting air first equalizes the pressure.
Step 3: Insert needle and inject air
Hold the vial upright on your flat surface. Push the needle straight through the center of the rubber stopper. Once the needle is through, push the plunger down firmly to inject all of the air into the vial. Keep the needle in the vial throughout this process.
Step 4: Invert and draw medication
With the needle still inserted, turn the vial upside down so the rubber stopper faces the floor. Position the tip of the needle so it remains submerged in the liquid. Now slowly pull the plunger back until the syringe fills to your prescribed dose marking.
Pull slowly. Rushing creates bubbles. Keep your eyes level with the syringe markings so you can read the volume accurately. The bottom of the plunger stopper (the flat rubber piece inside the barrel) should align with your target unit marking.
At this point, check your dose against a reliable reference. If you are taking 7.5 mg of tirzepatide, verify that the units you have drawn correspond to that dose at your specific concentration. The peptide calculator can confirm your math in seconds. Getting this right is the single most important step in the entire process, because even a small volume error changes the actual dose significantly. Our detailed tirzepatide dose chart provides quick reference for common concentrations and volumes.
Step 5: Remove air bubbles
With the vial still inverted and the needle still inside, look for air bubbles in the syringe barrel. Small bubbles are common and harmless in subcutaneous injections because the medication goes into fat tissue, not a blood vessel. But large bubbles take up volume that should be occupied by your medication, meaning you would inject less tirzepatide than intended.
To remove bubbles, gently tap the side of the syringe barrel with your fingernail. This dislodges bubbles from the walls and lets them float to the top, near the needle end. Once the bubbles collect at the top, slowly push the plunger just enough to push the air back into the vial. Then pull back again to refill to your correct dose marking.
You may need to repeat this tap-push-pull cycle two or three times to get a bubble-free syringe. Patience here pays off in dosing accuracy.
Step 6: Remove syringe from vial
Once your syringe contains the correct dose with no significant air bubbles, pull the needle straight out of the vial. Do not bend or angle the needle as you remove it. Place the protective cap back on the needle if your syringe came with one, but do not set the syringe down on any surface without the cap.
If you are using a multi-dose vial, note approximately how much medication remains for future doses. Understanding how long compounded tirzepatide stays good after the first puncture helps you plan your dosing schedule and avoid waste. Return the vial to the refrigerator promptly after drawing your dose, following proper tirzepatide shelf life guidelines.
Choosing your injection site
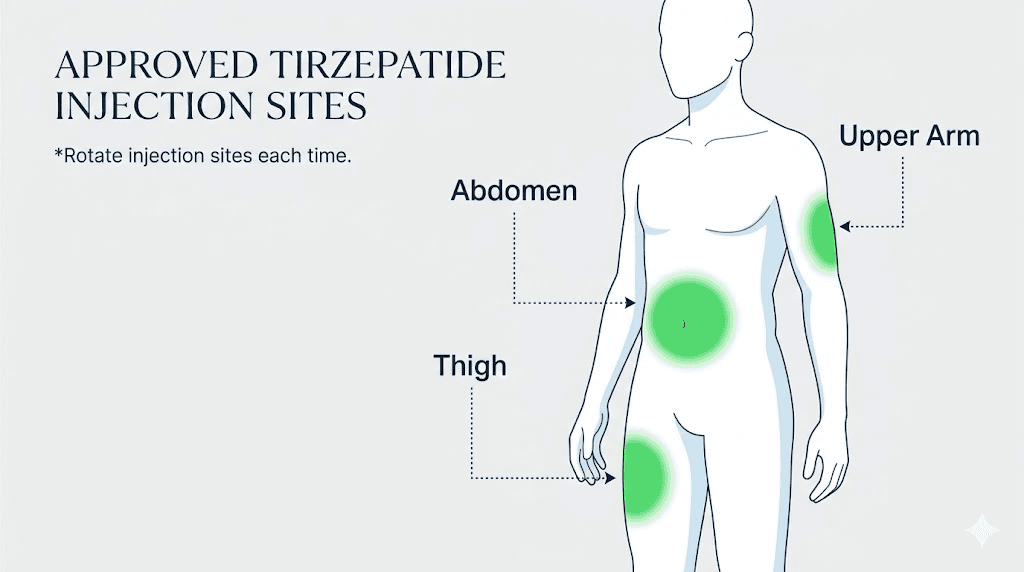
Three areas of the body are approved for subcutaneous tirzepatide injection: the abdomen, the front or outer thigh, and the back of the upper arm. Each site has advantages and considerations that affect comfort, absorption, and ease of self-injection.
The abdomen
The abdomen is the most popular injection site for tirzepatide, and for good reason. It offers the largest surface area of accessible subcutaneous fat, it is easy to see and reach, and most people find it the least painful option. The fat layer on the abdomen tends to be thicker than other sites, which provides a generous target for the needle and reduces the chance of accidentally hitting muscle.
When injecting in the abdomen, stay at least two inches away from the navel in all directions. The area around the belly button has different tissue composition and blood flow, which can affect absorption and increase bruising risk. Avoid any areas with scars, stretch marks, moles, or visible veins.
Our complete guide on how to inject tirzepatide in the stomach covers abdomen-specific techniques in greater detail, including the exact zones that tend to be most comfortable.
The thigh
The front and outer portions of the thigh provide another excellent injection site. Choose a spot in the middle third of your thigh, between the knee and the hip, focusing on the front or outer surface where subcutaneous fat is most accessible. Avoid the inner thigh, where skin is thinner and blood vessels are closer to the surface.
Thigh injections work particularly well for people who find their abdomen too sensitive or who have limited abdominal fat. The thigh also provides a large rotation area, which matters for weekly injections that need consistent site variation. One disadvantage: some people find thigh injections slightly more painful than abdominal injections because the fat layer tends to be thinner, especially in athletic individuals.
The upper arm
The back of the upper arm, specifically the fleshy area between the shoulder and the elbow, is the third approved site. The challenge here is accessibility. Injecting the back of your own arm is awkward, and most people need a partner to help. If you have someone willing to administer the injection, the upper arm works well. Otherwise, the abdomen or thigh is more practical for self-injection.
Site rotation is non-negotiable
You must rotate injection sites every week. This is not a suggestion. Repeated injections in the same spot cause lipodystrophy, a condition where the fat tissue under the skin hardens, thins, or develops lumps. Lipodystrophy affects medication absorption and can make future injections more painful. The general principle also applies to all GLP-1 injections, not just tirzepatide.
Create a rotation system that works for you. A simple approach: left abdomen one week, right abdomen the next, left thigh the third week, right thigh the fourth week, then repeat. Within each site, vary the exact spot by at least one inch from the previous injection in that area. Keep a simple log if it helps you remember where you last injected.
The same rotation principles apply whether you are injecting tirzepatide, semaglutide, retatrutide, or any other subcutaneous peptide. Healthy tissue at the injection site is one of the most overlooked factors in consistent medication absorption.
Injection site | Pain level | Self-injection ease | Fat layer thickness | Best for |
|---|---|---|---|---|
Abdomen | Low | Easy | Thick | Most users, first-time injectors |
Front/outer thigh | Low to moderate | Easy | Moderate | Users who prefer leg injection, rotation |
Upper arm (back) | Low to moderate | Difficult alone | Moderate | Partner-administered injections |
The complete injection process step by step
You have your supplies. Your medication is at room temperature. Your syringe is loaded with the correct dose. Now it is time to inject. Follow these steps in order.
Step 1: Clean the injection site
Take a fresh alcohol swab and clean a two-inch circular area at your chosen injection site. Use a firm, single-direction wiping motion from center to edge. Let the alcohol dry completely before proceeding. This takes about 10 to 15 seconds. Injecting through wet alcohol stings and can introduce alcohol into the subcutaneous tissue, causing unnecessary irritation.
Step 2: Pinch the skin
Using your non-dominant hand, pinch a one to two inch fold of skin at the cleaned injection site. Use your thumb and index finger. The pinch should be firm enough to lift a fold of skin and underlying fat away from the muscle beneath, but not so tight that it hurts or turns the skin white.
Pinching serves two purposes. It creates a stable target for the needle, and it lifts the subcutaneous fat layer away from the muscle, dramatically reducing the chance of an intramuscular injection. Pinching is especially important for people with less body fat and for injection sites where the fat layer is naturally thinner.
Step 3: Insert the needle
Hold the syringe in your dominant hand like a pencil or a dart. With the skin pinched, insert the needle smoothly and quickly at a 90-degree angle to the skin surface. A quick, confident motion hurts less than a slow, hesitant push. The needle should enter the skin fully until the hub of the syringe touches or nearly touches the skin surface.
For people with very lean body composition or minimal subcutaneous fat at the injection site, a 45-degree angle may be more appropriate to ensure the needle stays in the fat layer. If you can only pinch about one inch of skin, use the 45-degree approach. If you can pinch two inches or more, the standard 90-degree angle is ideal.
This technique is identical to the approach used for retatrutide injections and semaglutide syringe injections. Once you master subcutaneous technique for one peptide, it transfers directly to all others.
Step 4: Inject the medication
With the needle fully inserted, slowly push the plunger down with steady, even pressure. Do not rush. A slow injection (roughly 5 to 10 seconds for a standard dose) is less painful than a fast one because it gives the subcutaneous tissue time to accommodate the fluid volume. Rapid injection forces liquid into the tissue too quickly, which creates pressure, stinging, and sometimes a burning sensation.
Push the plunger all the way down until it stops. Every fraction of a unit matters, especially at smaller doses.
Step 5: Hold and remove
After the plunger is fully depressed, count to five before removing the needle. This brief pause allows the medication to disperse slightly in the tissue and prevents medication from leaking back through the needle track when you withdraw. Some guidelines recommend holding for up to ten seconds, and longer holds never hurt.
Pull the needle straight out in the same direction it went in. Do not angle it during removal. Release the skin pinch after the needle is fully withdrawn. You may see a tiny drop of blood or medication at the injection site. This is normal and does not mean your dose was compromised.
Step 6: Post-injection pressure
If there is any bleeding, press a cotton ball or gauze gently against the injection site for 10 to 15 seconds. Do not rub. Rubbing can spread the medication too quickly through the subcutaneous tissue, potentially increasing irritation, and can worsen bruising by aggravating damaged capillaries. Light pressure is all you need.
Do not apply a bandage unless bleeding continues, which is rare with the thin needles used for subcutaneous injection.
Step 7: Dispose of the syringe safely
Immediately place the used syringe and needle into a sharps disposal container. Do not recap the needle unless your container requires it for safe insertion. Recapping needles is actually one of the leading causes of accidental needlestick injuries. If you must recap, use the one-handed scoop technique where you slide the cap onto the needle using the table surface, never holding the cap with your other hand.
Never throw loose needles in regular trash. Sharps containers are available at pharmacies inexpensively, and many communities offer free sharps disposal programs. When your container is full, seal it and dispose of it according to local regulations.
Understanding your dose in units and milligrams
One of the most common sources of injection errors is confusion between units and milligrams. These are not the same measurement, and mixing them up leads to significant dosing mistakes that can cause either subtherapeutic results or unnecessary side effects.
Units on an insulin syringe measure volume. One unit equals 0.01 mL of liquid. That is all a unit represents. It tells you nothing about how much tirzepatide is in that volume. The actual drug content depends entirely on the concentration of your compounded formulation.
Here is a practical example. If your compounded tirzepatide has a concentration of 60 mg/mL and your prescribed dose is 5 mg, you need approximately 8.3 units (0.083 mL). But if your vial is compounded at 30 mg/mL for the same 5 mg dose, you need approximately 16.7 units (0.167 mL). Same dose, dramatically different volumes.
This is why knowing your concentration is absolutely critical before drawing any medication. Check the vial label carefully. If you are unsure, contact your prescribing provider or compounding pharmacy before injecting.
For quick reference conversions at common dose levels, see these detailed guides:
And for reverse lookups when you know the units but need the milligrams:
The SeekPeptides peptide calculator handles all of these conversions automatically. Enter your concentration and desired dose, and it returns the exact number of units to draw. This eliminates math errors and gives you confidence that every injection is precisely dosed.
Reducing injection pain and discomfort
Some people barely feel the needle. Others dread injection day. The difference is rarely about pain tolerance. It is almost always about technique and preparation. Here are the most effective strategies for making your tirzepatide injections as comfortable as possible.
Let the medication reach room temperature
This is the single most impactful change you can make. Cold medication causes a stinging or burning sensation as it enters the subcutaneous tissue because the temperature difference triggers nerve endings. Allowing your vial to sit at room temperature for 15 to 30 minutes before injection eliminates this entirely.
Do not leave medication out for hours. Just 15 to 30 minutes is sufficient. And never heat it artificially. The goal is gentle warming, not cooking.
Use ice or numbing cream before injection
If you are particularly sensitive to needle insertion, apply an ice pack or cold compress to the injection site for 10 to 15 minutes before injecting. The cold numbs the surface nerve endings, making needle entry virtually painless. Remove the ice, quickly clean the site with alcohol, let it dry, and inject while the area is still numb.
Over-the-counter numbing creams containing lidocaine work similarly. Apply the cream 20 to 30 minutes before injection, wipe it off, clean with alcohol, and inject. Consult your healthcare provider before using topical anesthetics to confirm compatibility with your treatment plan.
Master the quick insertion
A confident, swift needle insertion hurts far less than a slow, hesitant one. Think of it like removing a bandage. Fast and decisive beats slow and cautious every time. The needle should pierce the skin in one smooth motion, not a gradual push.
If you find yourself hesitating, try the distraction technique: take a deep breath in, and insert the needle as you exhale. The breathing pattern shifts your attention just enough to reduce the anticipation component of pain, which for many people is actually worse than the physical sensation itself.
Inject slowly
While the needle should enter quickly, the medication itself should enter slowly. Push the plunger over 5 to 10 seconds for a standard dose. Slow injection gives the subcutaneous tissue time to expand and accommodate the fluid, which prevents the pressure buildup that causes stinging and post-injection soreness.
Choose less sensitive sites
The abdomen is generally the least painful injection site because of its thicker fat layer. Within the abdomen, the areas lateral to (beside) the navel tend to be less sensitive than areas above or below it. If you experience consistent pain at one site, try a different area. Your injection site reaction may simply be a signal to rotate more aggressively.
If you are experiencing ongoing discomfort, redness, or itching after injections, our guide on tirzepatide injection site redness and itching covers management strategies in detail. Most reactions resolve within 24 to 48 hours and become less frequent as your body adapts to the treatment.
Post-injection care and what to expect
Your injection is complete. Now what? The minutes and hours after injection matter more than most people realize.
Immediately after injection
Apply gentle pressure with a cotton ball if there is any bleeding. Do not rub. A small amount of clear fluid or blood at the injection site is completely normal and does not indicate that your dose leaked out. The volume of medication that could possibly escape through a 30-gauge needle track is negligible.
You may notice a small, painless lump at the injection site. This is the medication sitting in the subcutaneous tissue before it absorbs. It typically dissipates within 30 to 60 minutes as the tirzepatide spreads through the tissue. Do not massage the area.
The first few hours
Mild soreness, slight redness, or a faint bruise at the injection site are all common and expected. These minor injection site reactions typically resolve within a day or two. If the redness expands significantly, becomes warm to the touch, or produces discharge, contact your healthcare provider as these may indicate infection.
As the tirzepatide begins absorbing, you may start noticing the appetite-suppressing effects within the first few hours. Our guide on how long tirzepatide takes to suppress appetite covers the typical timeline, though individual experiences vary significantly.
Common side effects to monitor
Tirzepatide can cause gastrointestinal side effects, especially during the early weeks or after dose increases. Nausea, mild stomach discomfort, and reduced appetite are the most common. These are systemic effects of the medication, not injection technique problems, and they typically improve as your body adjusts.
For guidance on managing specific side effects, these resources provide detailed, actionable information:
SeekPeptides provides comprehensive side effect management guides for members, covering each potential reaction with specific, protocol-based strategies that go far beyond generic advice.
Tracking your results
Consistent injection technique is one piece of the puzzle. Tracking your overall progress helps you and your healthcare provider determine whether your dose is appropriate and whether adjustments are needed. Many users find that proper syringe technique, combined with the right dose, produces noticeable results within the first several weeks of treatment. If your results have plateaued, our guide on tirzepatide not working anymore may help identify factors beyond injection technique.
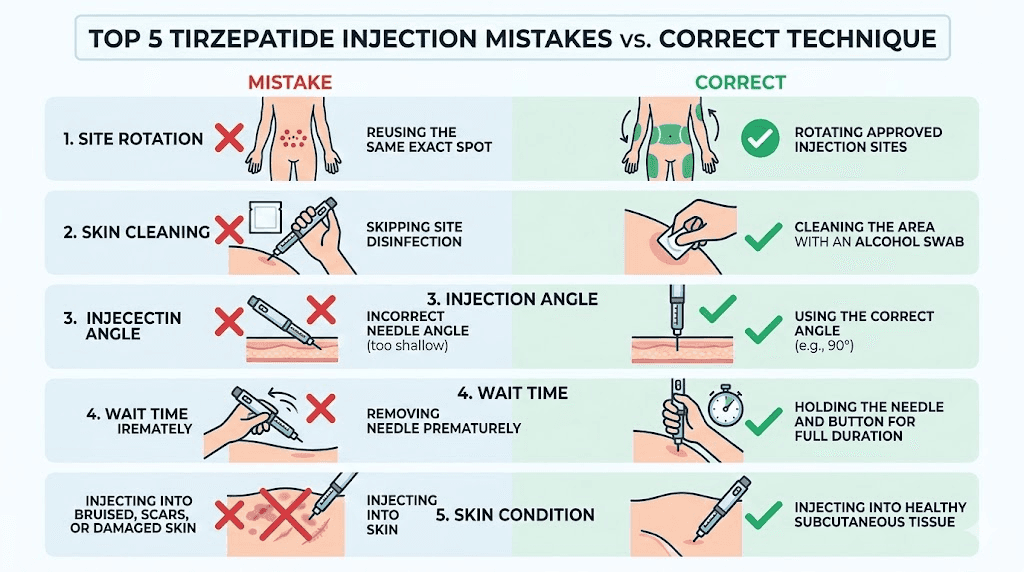
Common injection mistakes and how to avoid them
Even experienced users make these errors. Recognizing them before they happen saves you pain, wasted medication, and suboptimal results.
Mistake 1: Injecting cold medication
This is the most common complaint from new users. They pull the vial from the fridge and inject immediately. The result is stinging, burning, and unnecessary discomfort that makes them dread the next injection. Always allow 15 to 30 minutes of room temperature warming. Always.
Mistake 2: Using the wrong syringe for your dose
A 1.0 mL syringe for a 10-unit dose means your measurement window is tiny and nearly impossible to read accurately. Each minor movement of the plunger changes the dose substantially. Use the smallest syringe that fits your dose. If you are unsure which syringe size matches your compounded tirzepatide dosage, consult the dosing chart for your specific concentration.
Mistake 3: Not injecting air into the vial first
Skipping the air injection step creates a vacuum in the vial. This makes drawing medication harder, introduces excessive air bubbles into the syringe, and can cause the rubber stopper to depress inward. The air-first step takes five seconds and prevents all of these problems.
Mistake 4: Injecting into muscle
If the needle enters muscle tissue instead of subcutaneous fat, the medication absorbs differently and the injection hurts significantly more. Muscle injections can also cause localized pain that lasts for days. Prevent this by pinching the skin properly, using the correct needle length, and adjusting your angle based on body composition.
Mistake 5: Injecting in the same spot repeatedly
We covered site rotation above, but it bears repeating. Lipodystrophy from repeated same-site injection is a real problem that develops gradually and silently. By the time you notice the lumps or hardened tissue, the damage is done. Rotate every single week without exception.
Mistake 6: Hesitant needle insertion
Pushing the needle in slowly does not make it hurt less. It makes it hurt more. The slow push gives your nerve endings more time to register the sensation, and the needle creates a larger disruption path through the skin as it moves. Quick and confident is always better.
Mistake 7: Pulling the needle out at an angle
Insert straight, remove straight. Angling the needle during withdrawal tears a wider track through the tissue, which increases bruising, leaking, and post-injection soreness. Maintain the same straight path in and out.
Mistake 8: Forgetting to check the medication visually
Always look at your tirzepatide before drawing it. Clear and colorless is correct. Cloudy, discolored, or particle-containing medication should not be used. Check the expected color of your specific formulation if you are using a compound that includes B12 or other additives, as some formulations have a normal pink or reddish tint from the B12 component.
Mistake 9: Storing medication improperly between doses
Your injection technique can be perfect, but if your medication has degraded from improper storage, the results will be inconsistent. Follow the storage guidelines precisely. Keep compounded tirzepatide refrigerated, protect it from light, and track the expiration date carefully. If you suspect temperature exposure, review what happens when tirzepatide gets warm before using the vial.
Special considerations for different tirzepatide formulations
Not all compounded tirzepatide arrives in the same form. The formulation you receive may include additional ingredients that affect appearance, handling, or injection experience.
Tirzepatide with B12
Many compounding pharmacies add methylcobalamin (vitamin B12) to tirzepatide formulations. This combination, covered in our complete tirzepatide with B12 guide, produces a characteristically pink or reddish solution. This color is normal and expected. The injection technique remains identical to plain tirzepatide.
B12-containing formulations may sting slightly more than plain tirzepatide for some people. If this is an issue, ensuring room temperature and using the ice/numbing techniques above usually resolves it. The tirzepatide methylcobalamin combination has become one of the most popular compounded formulations because of the added energy and neurological benefits of B12.
Tirzepatide with glycine
Glycine is added to some formulations as a stabilizer that may also reduce injection site reactions. The tirzepatide glycine formulation uses the same injection process. Some users report that glycine-containing formulations feel smoother during injection, though individual experiences vary.
Tirzepatide with glycine and B12
The triple combination of tirzepatide, glycine, and B12 is another popular formulation. It combines the stabilizing benefits of glycine with the energy-supporting effects of B12. The injection process is the same, though the solution may be slightly more viscous than plain tirzepatide, meaning you should inject a touch more slowly to prevent tissue pressure buildup.
Tirzepatide with niacinamide
Some compounds include niacinamide (vitamin B3) alongside tirzepatide. The tirzepatide niacinamide combination follows the same injection protocol. Niacinamide can occasionally cause a mild flushing sensation at the injection site, which is harmless and temporary.
Dosing schedules and timing
Tirzepatide is typically injected once per week, on the same day each week. Consistency matters for maintaining stable blood levels and predictable appetite suppression. Choose an injection day that works with your schedule and stick to it.
If you miss your scheduled injection day, most guidelines allow injection within a few days of the missed dose. Our article on taking tirzepatide a day early covers timing flexibility, and some users following specific protocols may split their dose across two weekly injections for smoother side effect management.
Standard tirzepatide dosing starts at 2.5 mg weekly for the first four weeks, then increases to 5 mg. Subsequent increases to 7.5 mg, 10 mg, 12.5 mg, and 15 mg follow based on tolerability and treatment response, as outlined in the complete tirzepatide dosing guide.
For users exploring sub-standard dosing approaches, the microdosing tirzepatide chart provides detailed protocols. Microdosing requires even more precise syringe technique because the volumes involved are very small, making syringe selection and careful drawing technique even more critical.
When to contact a healthcare provider
Most injection-related issues resolve on their own within 24 to 48 hours. However, certain situations warrant medical attention.
Contact your healthcare provider promptly if you experience any of the following after injection: significant swelling or hardness at the injection site that does not resolve within 48 hours, redness that expands beyond two inches from the injection point, warmth or heat radiating from the injection site combined with pain, any discharge from the injection site including pus or cloudy fluid, fever following injection, severe allergic reaction signs including hives or difficulty breathing, or persistent pain that intensifies rather than improving over 24 hours.
These symptoms are uncommon with proper technique and sterile supplies, but they require professional evaluation if they occur. Most are signs of localized infection or allergic reaction that respond well to early treatment.
Also contact your provider if you are unsure about your dose, suspect you accidentally injected into muscle, or have questions about switching between formulations. The side effect profiles differ between GLP-1 medications, and your provider can help determine whether any symptoms you experience are injection-related or medication-related.
Tips from experienced tirzepatide users
Beyond the clinical technique, there are practical tips that come only from doing this week after week. These insights from the community can make your injection routine smoother and more comfortable.
Establish a ritual. Same day, same time, same location, same preparation sequence. When injection becomes routine, the anxiety component disappears. Many people inject Sunday evenings, which gives them the weekend to manage any initial side effects before the work week.
Keep a log. Track your injection site, dose, any side effects, and how you felt that week. Patterns emerge that help you optimize timing, site selection, and dose adjustments. This data becomes invaluable during appointments with your prescribing provider.
Buy supplies in bulk. Running out of syringes or alcohol swabs mid-protocol creates unnecessary stress. Keep at least a two-month supply on hand at all times.
Pair your injection with nutrition. Many users find that what they eat on injection day affects how well they tolerate the medication. Lighter meals on injection day can reduce nausea. Our tirzepatide diet plan and foods to avoid on tirzepatide guides provide detailed nutritional strategies that complement your injection protocol.
Consider supportive supplements. Some users benefit from specific supplements alongside tirzepatide to manage side effects and support overall wellness during treatment. Discuss any supplements with your healthcare provider to avoid interactions.
Be patient with yourself. The first few injections feel awkward. By injection four or five, the process becomes nearly automatic. Do not judge your long-term experience by the first couple of attempts.
For researchers serious about optimizing their peptide protocols, SeekPeptides offers the most comprehensive resource available, with evidence-based guides, proven protocols, and a community of thousands who have navigated these exact questions. Members access detailed injection technique tutorials, dosing calculators, and personalized protocol guidance that goes beyond what any single article can cover.
Comparing syringe injection to other tirzepatide delivery methods
Syringe injection from a vial is just one way to receive tirzepatide. Understanding how it compares to alternatives helps you make an informed choice about your preferred delivery method.
Pre-filled auto-injector pens (Mounjaro and Zepbound) are the most common delivery method for brand-name tirzepatide. They eliminate the need for dose measurement and simplify the injection process, but they cost significantly more and offer less dosing flexibility. Our oral versus injection tirzepatide comparison explores the broader landscape of delivery options.
Sublingual tirzepatide drops offer a needle-free alternative for people who cannot tolerate injections. Absorption through the oral mucosa bypasses the injection process entirely, though bioavailability and onset timing differ from subcutaneous administration.
Tirzepatide tablets and orally disintegrating tablets represent emerging alternatives. These oral formulations are gaining popularity for their convenience, though the injectable versus oral peptide comparison consistently shows higher bioavailability with subcutaneous injection.
For most users, syringe injection from a compounded vial provides the best balance of cost, dosing precision, and proven effectiveness. The technique investment you make learning proper syringe injection pays dividends in both financial savings and treatment flexibility.
How tirzepatide syringe injection compares to other peptides
If you are managing multiple peptide protocols or considering adding tirzepatide alongside other research compounds, the injection technique transfers remarkably well. Subcutaneous injection fundamentals are universal across peptides.
The same syringe technique used for tirzepatide applies identically to semaglutide syringe injection. The only differences are dose volumes and specific concentration calculations. Users who also inject retatrutide will find the process identical, with the main consideration being proper reconstitution ratios for each peptide.
Some users stack tirzepatide with other compounds like AOD-9604 or combine it with additional weight loss medications. When injecting multiple peptides, use a separate syringe for each one and inject at different sites. Never mix peptides in the same syringe unless specifically directed by a healthcare provider, and always consider whether combining treatments has been addressed by checking resources like our guide on taking semaglutide and tirzepatide together.
Understanding how semaglutide and tirzepatide compare can also help you evaluate whether you are on the right GLP-1 medication for your goals. Some users switch between these medications based on response, tolerability, or cost considerations, and proper syringe technique remains constant regardless of which peptide you inject.
Frequently asked questions
What size syringe should I use for tirzepatide?
Use the smallest insulin syringe that can hold your full dose volume. A 0.3 mL syringe works best for doses under 30 units, a 0.5 mL syringe handles doses up to 50 units, and a 1.0 mL syringe covers larger volumes. Smaller syringes provide more precise tirzepatide syringe dosage measurement. Always calculate your volume based on your specific concentration before selecting a syringe size.
What gauge needle is best for tirzepatide injection?
A 30-gauge needle with a length of 5 to 8 mm is ideal for most people. This gauge provides a good balance between comfort during insertion and easy medication flow during injection. Thinner 31-gauge needles hurt less going in but take slightly longer to draw medication. The same needle recommendations apply to all GLP-1 subcutaneous injections.
Is it normal to see blood after injecting tirzepatide?
Yes. A small drop of blood at the injection site is completely normal and occurs when the needle nicks a tiny capillary. Apply gentle pressure with a cotton ball. Do not rub. The bleeding should stop within seconds. Occasional bruising is also normal and does not affect medication absorption. If you experience frequent bruising, review our guide on tirzepatide injection site reactions for prevention strategies.
What do I do if there are air bubbles in my syringe?
Small air bubbles in a subcutaneous injection are not dangerous because the medication enters fat tissue, not a blood vessel. However, large bubbles displace medication volume, which means you receive a smaller dose than intended. Tap the syringe barrel to move bubbles to the top, then push the plunger gently to expel them back into the vial before withdrawing the needle.
Does injecting tirzepatide with a syringe hurt?
Most people describe the sensation as a brief pinch that lasts less than a second during needle insertion, followed by mild pressure as the medication enters the tissue. Using room-temperature medication, a thin-gauge needle, and the quick-insertion technique described above minimizes discomfort significantly. Many experienced users report barely noticing the injection at all after the first few weeks.
Can I inject tirzepatide in my thigh instead of my stomach?
Yes. The front and outer thigh are approved injection sites for tirzepatide, along with the abdomen and back of the upper arm. Clinical studies show comparable absorption across all three sites. Choose whichever site is most comfortable for you and rotate between all available sites weekly. Our complete injection site guide covers each option in detail.
How do I know if I accidentally injected into muscle?
Intramuscular injection typically produces sharper, more intense pain during injection, followed by prolonged soreness at the site lasting several days. You may also notice deeper bruising or a harder lump compared to a standard subcutaneous injection. Prevent this by pinching the skin properly, using an appropriate needle length, and adjusting to a 45-degree angle if you have minimal subcutaneous fat at the injection site.
How long after reconstitution is tirzepatide good for?
Most compounded tirzepatide should be used within 28 to 30 days after the first needle puncture, though exact timelines vary by pharmacy and formulation. Check your vial label for specific guidance and store it properly according to refrigeration guidelines. Always inspect the solution visually before each dose.
Can I use the same syringe technique for semaglutide?
Absolutely. The subcutaneous injection technique described in this guide applies identically to semaglutide and other GLP-1 peptides. The only differences are dose calculations, which depend on the specific medication concentration. Our semaglutide syringe injection guide covers medication-specific details.
What should I do if medication leaks out after injection?
A tiny drop of medication at the injection site after withdrawal is normal and represents an insignificant amount. Do not attempt to re-inject the lost amount. To minimize leaking, hold the needle in place for 5 to 10 seconds after fully depressing the plunger before withdrawing. This gives the medication time to disperse in the tissue.
External resources
In case I do not see you, good afternoon, good evening, and good night. May your injections stay painless, your doses stay accurate, and your results stay consistent.