Feb 23, 2026

Experienced researchers know something beginners miss about retatrutide. The peptide itself only accounts for part of the equation. Injection technique, reconstitution accuracy, needle selection, site rotation, and timing all determine whether a protocol delivers maximum results or falls flat. Two people can use the same vial, the same dose, and the same schedule, yet get completely different outcomes. The variable is almost always technique.
That gap matters more with retatrutide than with most peptides. As a triple-receptor agonist targeting GLP-1, GIP, and glucagon pathways simultaneously, retatrutide demands precise subcutaneous delivery to reach the tissue layers where absorption happens efficiently. Inject too shallow and the peptide sits in the dermis.
Inject too deep and it hits muscle, changing the absorption profile entirely. Neither scenario is what the retatrutide dosing protocols were designed around.
This guide covers everything. From gathering supplies and reconstituting lyophilized powder, to selecting the right needle gauge and mastering the actual injection technique. You will learn the complete retatrutide dosing schedule, the best sites for subcutaneous administration, how to manage the gastrointestinal side effects that come with titration, and the storage protocols that keep your peptide potent for weeks. Whether this is your first injectable peptide or you are transitioning from semaglutide injections or tirzepatide protocols, the principles here will sharpen your technique and protect your investment.
What is retatrutide and why does injection technique matter
Retatrutide (LY3437943) is a triple-hormone-receptor agonist developed by Eli Lilly. Unlike semaglutide which targets only GLP-1 receptors, retatrutide activates three pathways at once: GLP-1, GIP, and glucagon. That triple mechanism is what produced the headline-grabbing results from the Phase 2 NEJM trial, where the 12 mg dose group achieved an average 24.2% body weight reduction over 48 weeks.
Those numbers matter.
In that same trial, 100% of participants in the 8 mg group lost at least 5% of their body weight. Ninety-one percent lost 10% or more. Seventy-five percent crossed the 15% threshold. No other single-agent weight loss peptide has posted numbers like that in a randomized controlled trial. The retatrutide versus semaglutide comparison shows a clear advantage for the triple agonist, and the retatrutide versus Ozempic data tells a similar story.
But here is the part that gets overlooked. Those trial results came from participants who received properly administered subcutaneous injections under clinical supervision. The medication reached the subcutaneous fat layer consistently. Absorption was predictable. Bioavailability was optimized. When researchers attempt to replicate those protocols at home without understanding proper injection technique, the results can vary dramatically. Improper needle depth, inconsistent site selection, and poor reconstitution practices all introduce variables that the clinical trials controlled for.
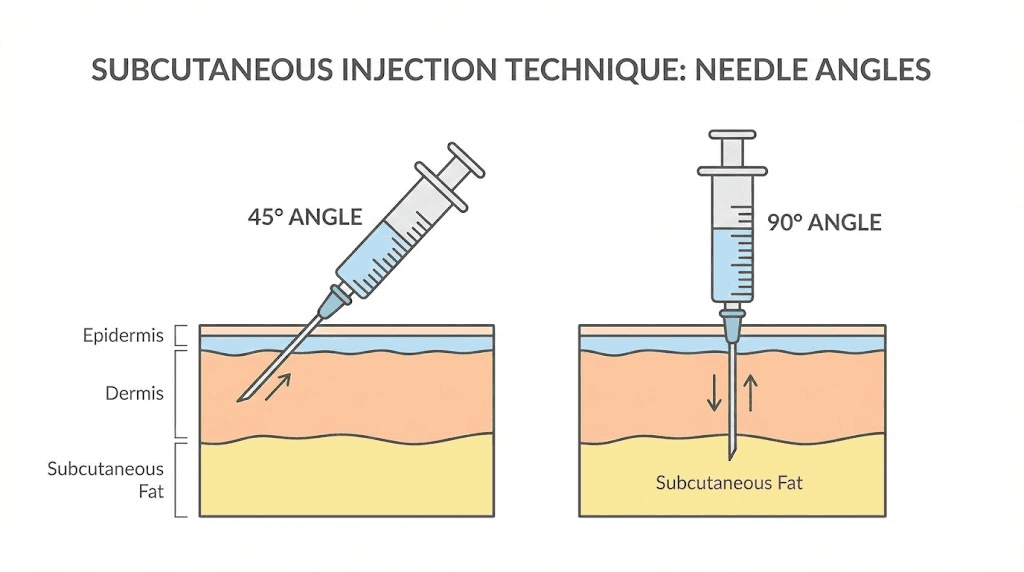
Subcutaneous injection is not complicated. But it is precise. The subcutaneous tissue layer sits between the dermis above and the muscle below, typically 4 to 8 millimeters deep depending on body composition and injection site. Retatrutide needs to reach this layer, not the skin above it and not the muscle below it. The difference between a 45-degree angle and a 90-degree angle, between a 4mm needle and an 8mm needle, between pinching the skin and injecting flat, all of these determine where the peptide ends up. And where it ends up determines how it works.
The general principles of GLP-1 injection apply to retatrutide, but this peptide has specific considerations around its titration schedule, reconstitution ratios, and side effect management that warrant a dedicated guide. Understanding these details before your first injection sets the foundation for a successful protocol.
Supplies you need before your first retatrutide injection
Gathering everything before you start prevents interruptions during reconstitution and injection. Missing a single item mid-process, like reaching for an alcohol swab with a loaded syringe in hand, creates contamination risk and wastes time. Preparation is not optional.
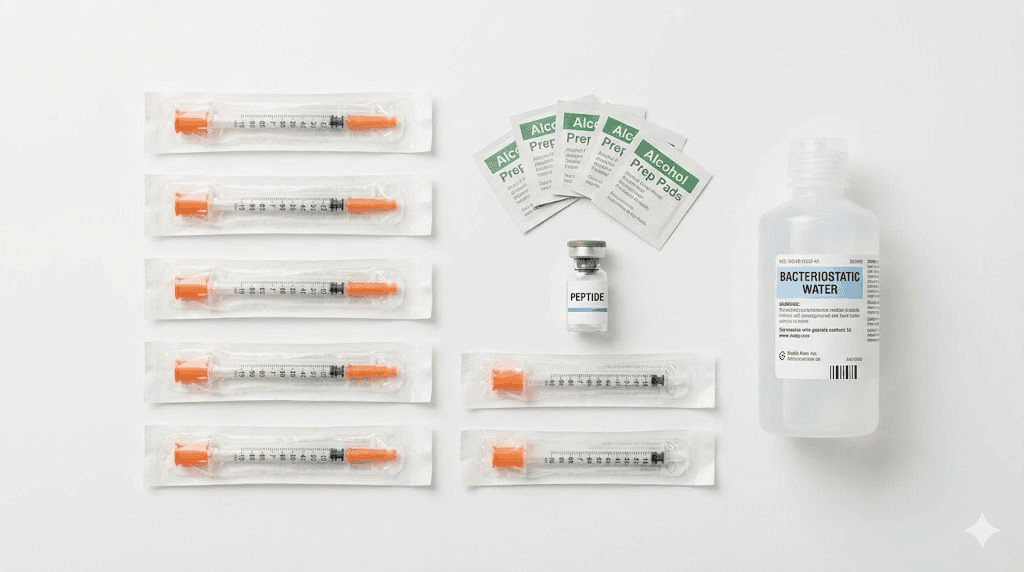
Essential supplies
You need the following items for every retatrutide injection session:
Insulin syringes. Use U-100 insulin syringes with attached needles. The standard recommendation for subcutaneous peptide injection is a 29-gauge or 30-gauge needle, 1/2 inch (12.7mm) in length. A 31-gauge needle works for leaner individuals but flows more slowly. The 29-gauge hits the sweet spot between comfort and function for most body types. Purchase 1 mL syringes for reconstitution and 0.5 mL or 1 mL syringes for injection, depending on your dose volume. The insulin syringe dosage guide covers the markings and measurements in detail.
Bacteriostatic water (BAC water). This is the solvent for reconstituting lyophilized retatrutide powder. Bacteriostatic water contains 0.9% benzyl alcohol as a preservative, which allows the reconstituted solution to remain stable for up to 28 to 30 days in the refrigerator. Do not use sterile water (which lacks preservative and must be used within 24 hours) or normal saline. The bacteriostatic water guide for retatrutide explains exact volumes for different vial sizes.
Alcohol swabs. Individually wrapped 70% isopropyl alcohol pads. You will use these to clean vial stoppers before drawing and to clean your injection site before administering. Never reuse swabs.
A sharps container. Any puncture-resistant container with a secure lid works. Commercial sharps containers are inexpensive and purpose-built. Never throw loose needles in regular trash.
Clean, flat workspace. Reconstitution and injection preparation require a clean surface. Wipe down your workspace with alcohol before laying out supplies.
Optional but recommended
A peptide dosage calculator helps you determine exactly how many units to draw for your target dose based on your reconstitution volume. The peptide reconstitution calculator on SeekPeptides simplifies the math. Without a calculator, dosing errors are one of the most common mistakes researchers make, especially when switching between different vial sizes or concentrations.
Nitrile gloves add a layer of contamination prevention. They are not strictly necessary for subcutaneous self-injection, but they reduce the chance of introducing bacteria during reconstitution. If you are handling multiple vials or working with research-grade peptides, gloves are worth the minimal cost.
A small cooler or insulated bag becomes essential if you travel with reconstituted retatrutide. The peptide travel guide covers temperature maintenance during transit, and the same principles apply to retatrutide.
How to reconstitute retatrutide step by step
If your retatrutide arrives as a lyophilized (freeze-dried) powder, you must reconstitute it before injection. This process dissolves the powder in bacteriostatic water to create an injectable solution. The process is straightforward, but precision matters. Sloppy reconstitution damages peptide bonds and reduces potency.
Step 1: Calculate your water volume
The amount of bacteriostatic water you add determines the concentration of your solution, which in turn determines how many units you draw per dose. For a 10 mg retatrutide vial:
Add 2 mL of BAC water = 5 mg/mL concentration (each 10 units on a U-100 syringe = 0.5 mg)
Add 3 mL of BAC water = 3.33 mg/mL concentration (each 10 units = 0.33 mg)
Add 1 mL of BAC water = 10 mg/mL concentration (each 10 units = 1 mg)
Most researchers prefer the 2 mL reconstitution because it provides a convenient concentration that aligns well with common titration steps. The retatrutide dosage calculator takes the guesswork out of these conversions entirely. Enter your vial size, water volume, and target dose, and it returns the exact number of units to draw.
For comparison, the reconstitution math works identically to other peptides. If you have experience with semaglutide reconstitution or tirzepatide reconstitution, the same principles apply. The only difference is the specific vial size and your target concentration.
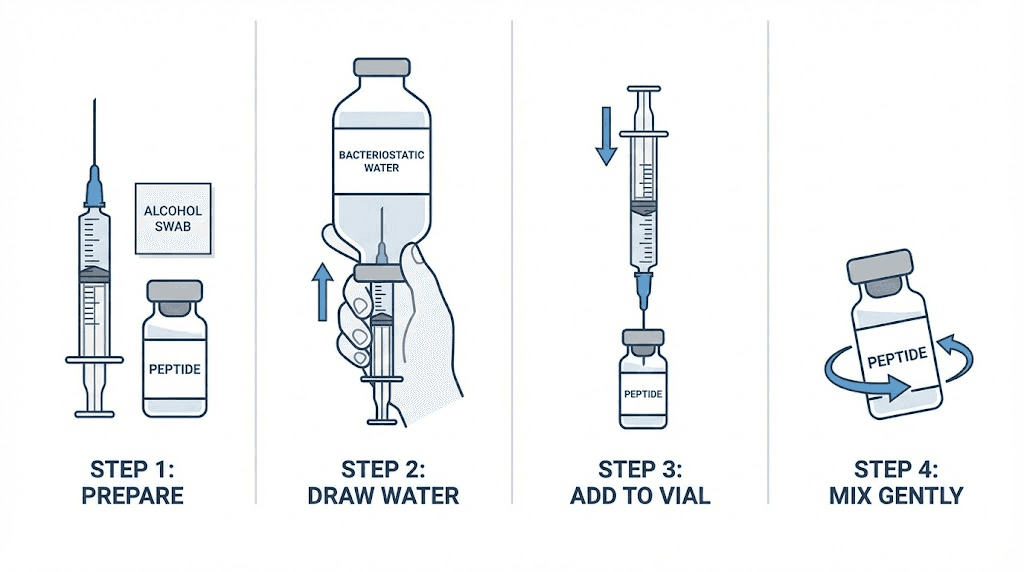
Step 2: Clean both vials
Remove the protective caps from both the retatrutide vial and the bacteriostatic water vial. Wipe each rubber stopper with a fresh alcohol swab using firm, circular motions. Let the alcohol dry completely. Do not blow on the stopper to speed drying. That introduces bacteria.
Step 3: Draw bacteriostatic water
Using a clean syringe (a 1 mL syringe works well for this step), pull back the plunger to draw air equal to the volume of water you plan to add. Insert the needle through the bacteriostatic water rubber stopper and push the air into the vial. This equalizes pressure and makes drawing water easier. Invert the vial and slowly pull the plunger back to your target volume. Remove any air bubbles by gently tapping the syringe barrel and pushing the plunger until a small drop appears at the needle tip.
Step 4: Add water to the retatrutide vial
This is where most damage happens. Insert the needle through the retatrutide vial stopper. Angle the needle so it touches the glass wall of the vial. Depress the plunger slowly, letting the water run down the inside wall of the vial and onto the powder gently. Do not spray water directly onto the powder. Do not push the plunger quickly. Rapid injection creates turbulence that can denature peptide bonds. Slow and steady, down the wall, 15 to 20 seconds for the full volume.
Step 5: Mix gently
Never shake the vial. Shaking creates foam, introduces air bubbles, and can damage the peptide structure. Instead, gently roll the vial between your palms for 30 to 60 seconds. You can also swirl the vial in small circles. The goal is complete dissolution without agitation. The solution should become clear and colorless. If particles remain after two minutes of gentle rolling, set the vial in the refrigerator and check again in 30 minutes. Some peptides dissolve slowly at lower temperatures.
Once fully dissolved, your retatrutide is ready for injection or storage. Label the vial with the date of reconstitution and the concentration. This prevents dosing errors on future injections, especially if you are managing multiple peptides. The same careful approach applies to semaglutide reconstitution and tirzepatide reconstitution, so mastering this technique benefits your entire peptide practice.
Complete step-by-step retatrutide injection guide
You have your supplies. Your retatrutide is reconstituted. Now comes the actual injection. Follow these steps exactly, in order, every time. Consistency in technique produces consistency in results.
Step 1: Wash your hands thoroughly
Use warm water and soap for at least 20 seconds. Dry with a clean towel. If using gloves, put them on after drying your hands. This is not optional. Subcutaneous infections from poor hygiene are rare but entirely preventable.
Step 2: Remove your retatrutide vial from the refrigerator
Allow the vial to sit at room temperature for 15 to 30 minutes before injection. Cold peptide solution causes more discomfort at the injection site and can lead to increased local reactions. You do not need to warm it actively, just let it come to room temperature naturally on your clean workspace. The same principle applies to timing your GLP-1 injections for optimal comfort.
Step 3: Clean the vial stopper
Wipe the rubber stopper with a fresh alcohol swab. Every single time, even if you cleaned it during reconstitution earlier. Even if you just used it ten minutes ago. Every needle puncture introduces potential contamination to the stopper surface.
Step 4: Draw the correct dose
This step requires attention to detail. Pull back the plunger to draw air equal to your injection volume. Insert the needle through the stopper and inject the air into the vial (this prevents creating a vacuum). Invert the vial with the syringe still inserted. Pull the plunger back slowly past your target line. Tap the syringe barrel to move air bubbles to the top near the needle. Push the plunger forward slowly until the bottom of the plunger seal aligns exactly with your target dose marking.
Read the syringe at eye level. The U-100 insulin syringe markings represent units, not milligrams. Use your peptide calculator to confirm the correct number of units for your dose and concentration. For example, with a 5 mg/mL concentration (2 mL BAC water in a 10 mg vial), drawing 10 units delivers 0.5 mg of retatrutide. Drawing 20 units delivers 1 mg. The retatrutide dosage chart maps these conversions across all common concentrations.
Step 5: Select and clean your injection site
Choose from one of three primary subcutaneous injection sites: the abdomen (most common), the front of the thigh, or the back of the upper arm. Our complete retatrutide injection site guide covers the specific boundaries and sweet spots for each location. For the abdomen, stay at least two inches away from the navel and avoid any areas with scars, bruises, or stretch marks. Clean the chosen site with an alcohol swab in a circular motion, starting from the center and spiraling outward. Let the alcohol dry completely before injecting.
Step 6: Pinch and insert the needle
Pinch a fold of skin between your thumb and forefinger. This lifts the subcutaneous layer away from the underlying muscle, ensuring the needle reaches the right depth. With the syringe in your dominant hand (hold it like a pencil or dart), insert the needle at a 45-degree to 90-degree angle in one smooth, quick motion.
Which angle? That depends on your body composition and needle length.
Use a 90-degree angle if you have adequate subcutaneous fat at the injection site (most people, especially at the abdomen) and are using a short needle (4 to 6 mm). Use a 45-degree angle if you are lean, using a longer needle (8 to 12.7 mm), or injecting in an area with less subcutaneous tissue like the thigh. The goal is consistent: deposit the peptide in the subcutaneous fat layer, not in the dermis above or the muscle below.
Step 7: Inject slowly
Push the plunger down steadily and slowly. Do not rush. A steady 5 to 10 second injection allows the peptide solution to distribute evenly in the subcutaneous tissue and reduces local irritation. If you feel significant resistance, the needle may have hit scar tissue or dense connective tissue. Remove the needle and try a slightly different spot nearby.
Step 8: Hold, then withdraw
After the plunger is fully depressed, hold the needle in place for 5 to 10 seconds. This allows the full dose to deposit in the tissue and prevents medication from leaking back through the needle track when you withdraw. After holding, pull the needle straight out in one smooth motion. Do not angle the needle during withdrawal.
Step 9: Apply gentle pressure
Press a clean cotton ball or alcohol swab lightly against the injection site for 10 to 15 seconds. Do not rub the site. Rubbing can push the peptide out of the subcutaneous layer and increase bruising. A small drop of blood at the puncture site is normal and nothing to worry about.
Step 10: Dispose of the syringe safely
Place the used syringe directly into your sharps container. Do not recap the needle. Recapping is the leading cause of accidental needle sticks. If your sharps container is not within arm reach, bring it to your workspace before you begin the injection process.
Best injection sites for retatrutide
Retatrutide is administered subcutaneously, which means it goes into the fat layer just beneath the skin. Three body areas provide reliable subcutaneous access for most people. The complete retatrutide injection site guide covers this topic in extensive detail, but here is a practical summary focused on technique.
The abdomen
This is the preferred injection site for most researchers and the location used in the majority of clinical trials. The abdomen has a consistent subcutaneous fat layer that allows for predictable absorption. Inject in the area between your hip bones and below your ribcage, staying at least two inches from the navel. Rotate between the left and right sides of the abdomen with each injection. The absorption rate from abdominal subcutaneous tissue tends to be the most consistent across different body compositions.
If you have experience with stomach injections for tirzepatide or semaglutide injection sites, the same abdominal zones apply to retatrutide. The technique is identical.
The front of the thigh
The upper outer quadrant of the thigh provides a large surface area with adequate subcutaneous tissue. This site works well for people who find abdominal injections uncomfortable or who have limited abdominal fat. Inject into the upper third of the thigh, on the outer front surface. Avoid the inner thigh where blood vessels are more concentrated. Thigh injections tend to absorb slightly slower than abdominal injections in some studies, but the clinical significance is minimal for weekly dosing.
The back of the upper arm
The triceps area offers a viable third option, though it requires either flexible reach or assistance from another person. The subcutaneous tissue in the upper arm is thinner than the abdomen or thigh for most individuals, so a 45-degree angle with a shorter needle often works better here. This site is less commonly used for self-injection but works well when rotating away from sites that need rest.
Site rotation is not optional
Injecting in the same spot repeatedly causes lipohypertrophy, a condition where the subcutaneous fat layer thickens and hardens at the injection site. Lipohypertrophy changes how the peptide absorbs, creating unpredictable blood levels and inconsistent results. Rotate injection sites with each administration, keeping at least one inch between injection points. A simple rotation pattern, left abdomen, right abdomen, left thigh, right thigh, provides four distinct zones before you return to the first site. For weekly retatrutide injections, that gives each site nearly a full month of recovery time.
The GLP-1 injection site guide provides additional rotation strategies and detailed anatomical maps for all three injection zones.
Retatrutide dosing and titration schedule
Retatrutide follows a titration model. You do not start at the full dose. Instead, you begin low and increase gradually over weeks, giving your body time to adjust and minimizing the gastrointestinal side effects that come with GLP-1 receptor activation. Skipping the titration or escalating too quickly is one of the most common mistakes researchers make, and it almost always results in worse side effects without better results.
Standard titration protocol from clinical trials
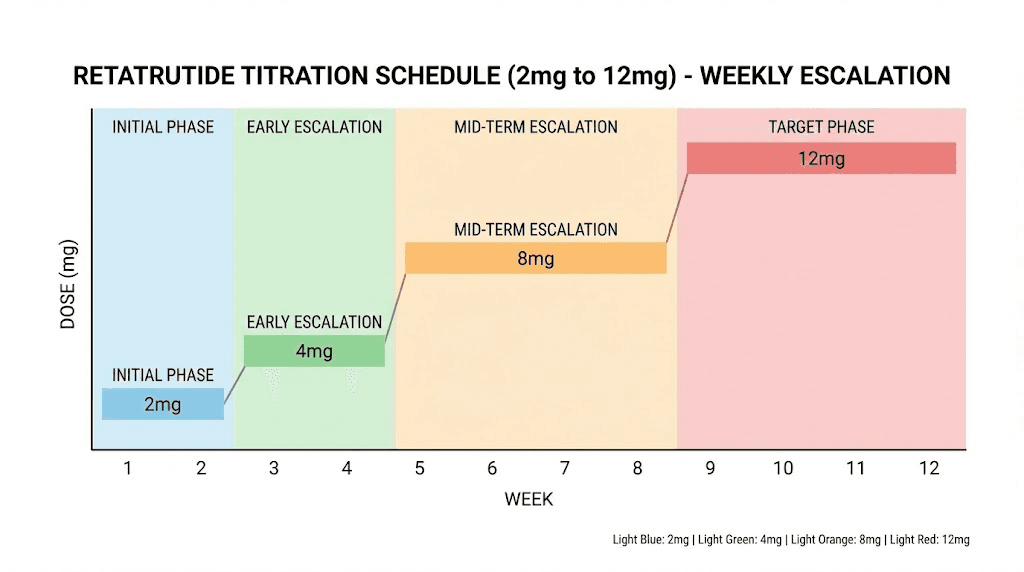
The Phase 2 NEJM trial used the following escalation schedule for the 12 mg dose group:
Weeks 1 through 4: 2 mg once weekly (subcutaneous)
Weeks 5 through 8: 4 mg once weekly
Weeks 9 through 12: 8 mg once weekly
Week 13 and beyond: 12 mg once weekly (maintenance dose)
For the 8 mg target dose, the schedule was:
Weeks 1 through 4: 2 mg once weekly
Weeks 5 through 8: 4 mg once weekly
Week 9 and beyond: 8 mg once weekly (maintenance dose)
These titration schedules are not suggestions. They are specifically designed to reduce the incidence and severity of nausea, vomiting, and diarrhea during the early weeks of treatment. In the clinical trial, participants who started at higher initial doses experienced significantly more gastrointestinal side effects than those who began at 2 mg. The complete retatrutide dose schedule breaks down each step in granular detail.
Calculating your injection volume
Once you know your target dose for the week, you need to convert milligrams to syringe units based on your reconstitution concentration. Here is a reference table for common setups:
Vial size | BAC water added | Concentration | Units for 2 mg | Units for 4 mg | Units for 8 mg | Units for 12 mg |
|---|---|---|---|---|---|---|
10 mg | 2 mL | 5 mg/mL | 40 units | 80 units | N/A (exceeds syringe) | N/A |
10 mg | 1 mL | 10 mg/mL | 20 units | 40 units | 80 units | N/A |
20 mg | 2 mL | 10 mg/mL | 20 units | 40 units | 80 units | 100 units (full syringe) |
The retatrutide dosage calculator handles these conversions automatically and accounts for different vial sizes. If you are working with a retatrutide dosage chart, cross-reference it with your specific concentration to avoid errors. Dosing mistakes are the most common, and most preventable, problem in peptide research. The retatrutide dosing guide walks through the decision-making process for choosing your target maintenance dose.
When to inject each week
Retatrutide is administered once weekly. Choose a consistent day and approximate time. Most researchers pick a day with manageable schedules because the timing of GLP-1 injections can influence when side effects peak. Injecting in the evening allows you to sleep through the initial nausea window that some people experience in the first 12 to 24 hours after administration. Others prefer morning injections to align with their appetite suppression throughout the day.
If you miss your scheduled injection day, administer the dose as soon as you remember, as long as your next scheduled dose is at least three days away. If your next dose is less than three days away, skip the missed dose and resume your normal schedule. Do not double up. The early dosing considerations for similar peptides apply to retatrutide as well.
Managing side effects after retatrutide injections
Side effects are part of the retatrutide experience, especially during titration. Understanding what to expect and how to manage each symptom turns a potentially miserable first few weeks into a manageable adjustment period. The Phase 2 trial documented these side effects across all dose groups, and the data tells a clear story: most symptoms are gastrointestinal, most are mild to moderate, and most improve as the body adapts.
Nausea
The most commonly reported side effect. Nausea typically peaks 12 to 48 hours after injection and decreases over the following days. Management strategies that work:
Eat small, frequent meals rather than large ones. Bland, low-fat foods reduce nausea triggers. Avoid greasy, spicy, or heavy meals on injection day and the day after. Stay hydrated with small sips throughout the day rather than large gulps. Ginger tea and peppermint tea have anti-nausea properties that complement the dietary approach. If nausea persists beyond the first two weeks at a given dose, consult your healthcare provider about antiemetic options like ondansetron.
The experience mirrors what semaglutide users report during appetite suppression onset. The mechanism is similar because all three peptides activate GLP-1 receptors. Your body adjusts.
Diarrhea
The second most common side effect, affecting a higher percentage of participants at higher doses. Diarrhea usually occurs in the first one to three days after dose escalation and resolves within a week. Staying hydrated is critical. Oral rehydration solutions help maintain electrolyte balance during episodes. Avoid dairy, high-fiber foods, and caffeine during acute episodes. The tirzepatide diarrhea management guide covers additional strategies that apply equally to retatrutide.
Constipation
Some researchers experience the opposite problem. GLP-1 receptor activation slows gastric emptying, which can lead to constipation in certain individuals. Increase water intake, add fiber gradually (not all at once), and consider magnesium citrate as a gentle osmotic support. The semaglutide constipation treatment guide and tirzepatide constipation treatment guide provide detailed protocols for managing GLP-1-related constipation.
Injection site reactions
Redness, mild swelling, itching, or small nodules at the injection site occurred in 5 to 15% of trial participants. These reactions are usually mild and self-limiting. Proper site rotation minimizes recurrence. If you notice persistent lumps, you may be developing lipohypertrophy from insufficient rotation. Switch to a different anatomical zone and let the affected area rest for at least four weeks.
Applying a cold compress for 5 minutes before injection numbs the area slightly and can reduce local reactions. Ensuring the solution is at room temperature before injecting also decreases the likelihood of irritation.
Fatigue
Some researchers report tiredness during the first few weeks, particularly during caloric deficit. This is not unique to retatrutide. The GLP-1 fatigue guide and semaglutide fatigue guide explain the mechanisms behind this symptom and provide evidence-based strategies for managing energy levels during peptide protocols. Adequate protein intake, hydration, and gradual caloric reduction help maintain energy while the body adjusts.
Headaches
Less common but reported by some users, particularly in the first two weeks. Dehydration and reduced food intake are the usual culprits. The GLP-1 headache guide covers prevention and management in depth.
When to seek medical attention
Most side effects are manageable at home. However, contact a healthcare provider immediately if you experience severe abdominal pain that does not resolve, persistent vomiting that prevents hydration, signs of allergic reaction (hives, difficulty breathing, swelling of face or throat), or vision changes. These are rare but require professional evaluation.
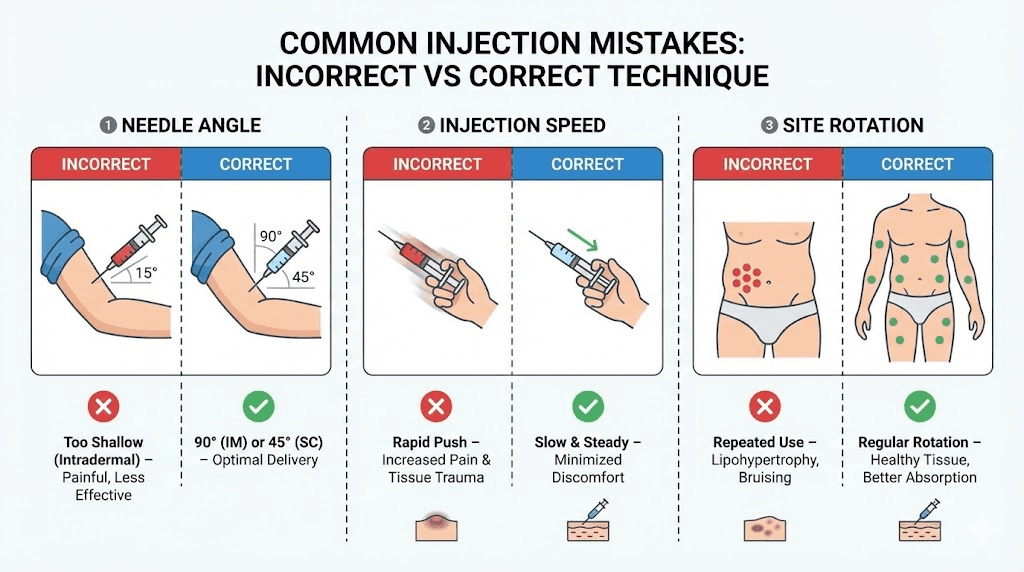
Common injection mistakes and how to avoid them
After reviewing hundreds of forum posts, community discussions, and clinical guidance documents, certain mistakes appear repeatedly. Each one is preventable with awareness and technique adjustment.
Mistake 1: Injecting too fast
Pushing the plunger rapidly forces a bolus of peptide solution into a small area of subcutaneous tissue. This creates localized pressure, increases pain, and can cause the solution to track back along the needle path and leak out. Slow down. A 5 to 10 second injection for standard volumes (under 1 mL) distributes the peptide evenly and reduces discomfort significantly.
Mistake 2: Not rotating injection sites
Sticking to one spot because it is familiar or less painful leads to tissue damage over time. Lipohypertrophy alters absorption kinetics, making your doses unpredictable. Inconsistent absorption means inconsistent results. Use a rotation log if necessary. Some researchers mark injection sites on a body diagram to track their rotation pattern.
Mistake 3: Shaking the vial during reconstitution
Shaking creates foam, introduces air bubbles into the solution, and can denature the peptide through mechanical stress. The result is reduced potency and inconsistent dosing. Always roll or swirl gently. If bubbles form despite careful handling, let the vial sit upright in the refrigerator for 30 minutes and they will rise to the surface and dissipate.
Mistake 4: Skipping the air bubble removal step
Small air bubbles in a subcutaneous injection are not medically dangerous (unlike intravenous injections). However, they do displace volume in the syringe, meaning you receive less peptide than intended. If your dose is 40 units but 2 units of air occupy the barrel, you are only injecting 38 units of solution. Over time, those small shortfalls add up. Always tap and purge bubbles before injection.
Mistake 5: Using the wrong needle gauge or length
A needle that is too long for your body composition at a given injection site may penetrate into muscle tissue, changing the absorption profile. A needle that is too short may not reach the subcutaneous layer, depositing the peptide in the dermis where absorption is poor and local reactions are more common. Match your needle to your injection site and body composition as described in the injection technique section above.
Mistake 6: Not letting alcohol dry before injecting
Injecting through wet alcohol stings and can carry alcohol into the subcutaneous tissue, causing unnecessary irritation. Wait 10 to 15 seconds after swabbing. The alcohol needs to evaporate to be effective as a disinfectant anyway. Wet alcohol on the skin is actually less effective at killing bacteria than alcohol that has been allowed to dry.
Mistake 7: Dosing errors from wrong concentration math
This is the most consequential mistake. Confusing milligrams with units, using the wrong reconstitution volume in calculations, or misreading syringe markings can result in significant over or underdosing. Always verify your math. Use the peptide reconstitution calculator to confirm your concentration, and the peptide dosage calculator to confirm your injection volume. Double-checking takes 30 seconds and prevents weeks of suboptimal results or unnecessary side effects.
SeekPeptides members have access to comprehensive protocol builders and weight-based dosing tools that eliminate calculation errors and provide step-by-step injection guidance tailored to individual body composition and goals.
Retatrutide storage and handling
Proper storage protects your investment. Peptides degrade when exposed to heat, light, or contamination. A vial of retatrutide that cost you significant money and effort to obtain becomes worthless if it sits on a warm counter for a day.
Before reconstitution
Lyophilized (powder) retatrutide is the most stable form. Store unreconstituted vials in a freezer at -20 degrees Celsius (-4 degrees Fahrenheit) for long-term storage. If you plan to reconstitute within a few weeks, refrigeration at 2 to 8 degrees Celsius (36 to 46 degrees Fahrenheit) is sufficient. Keep vials in their original packaging away from direct light. The peptide refrigeration requirements follow similar logic across all injectable peptides.
After reconstitution
Once you add bacteriostatic water, the clock starts. Reconstituted retatrutide should be stored in the refrigerator at 2 to 8 degrees Celsius and used within 28 to 30 days. The benzyl alcohol preservative in bacteriostatic water inhibits bacterial growth during this window, but potency decreases gradually over time. For optimal results, use reconstituted peptides within three to four weeks.
Never freeze reconstituted peptide solution. Freezing and thawing can damage the peptide structure and reduce potency. If your reconstituted vial accidentally freezes, discard it and reconstitute a fresh vial. The semaglutide refrigerator storage guide and tirzepatide refrigerator storage guide explain the same principles in detail.
Traveling with retatrutide
For short trips (under four weeks), reconstituted retatrutide can travel in an insulated cooler bag with ice packs. Keep the temperature below 30 degrees Celsius (86 degrees Fahrenheit) and avoid direct sunlight. Never leave peptides in a hot car, even briefly. A small travel cooler with gel packs maintains temperature for 8 to 12 hours in most conditions. For longer trips, consider bringing unreconstituted powder and a fresh vial of bacteriostatic water, reconstituting at your destination. The complete peptide travel guide covers packing strategies, TSA considerations, and temperature monitoring in comprehensive detail.
Signs of degraded peptide
Discard your vial if the solution becomes cloudy, develops particles or floaters, changes color, or develops an unusual odor. Clear, colorless solution indicates good quality. Any visual change suggests degradation or contamination. Never inject a solution that looks different from when you first reconstituted it. The peptide color and appearance guide helps you recognize normal versus abnormal solution characteristics.
Retatrutide injection compared to other GLP-1 peptides
If you are considering retatrutide or transitioning from another GLP-1 peptide, understanding the injection differences helps set expectations and adapt your technique.
Factor | Retatrutide | Semaglutide | Tirzepatide |
|---|---|---|---|
Receptor targets | GLP-1, GIP, Glucagon (triple) | GLP-1 only | GLP-1, GIP (dual) |
Injection frequency | Once weekly | Once weekly | Once weekly |
Administration route | Subcutaneous | Subcutaneous | Subcutaneous |
Needle gauge | 29-31G recommended | 29-31G recommended | 29-31G recommended |
Titration period | 12 weeks to max dose | 16 weeks to max dose | 12 weeks to max dose |
Max weight loss (trials) | 24.2% at 48 weeks | 14.9% at 68 weeks | 22.5% at 72 weeks |
The injection technique is essentially identical across all three peptides. Same needle gauge. Same subcutaneous delivery. Same site rotation principles. The differences lie in the pharmacology, not the administration. If you already know how to inject semaglutide or how to inject tirzepatide, your technique transfers directly to retatrutide.
Where the peptides differ significantly is in their side effect profiles and titration timelines. The semaglutide versus tirzepatide side effects comparison gives context for what to expect from GLP-1 class medications. Retatrutide, because it adds glucagon receptor activation, may cause additional metabolic effects that neither semaglutide nor tirzepatide produce, including greater fat oxidation and potentially different hunger pattern changes.
For researchers transitioning from tirzepatide to retatrutide, the transition timing guide covers how long retatrutide takes to reach full effect after switching. The retatrutide dosing after high-dose tirzepatide addresses the specific titration considerations when coming from an established GLP-1 protocol.
The broader comparison between retatrutide and mazdutide or survodutide and tirzepatide shows how the next generation of multi-receptor agonists is expanding the landscape. Each compound has a unique receptor binding profile, but the injection fundamentals remain consistent across all of them.
Advanced tips for optimizing your retatrutide protocol
Once you have the basics down, several strategies can improve your experience and results.
Timing your injection around meals
Many experienced researchers inject retatrutide in the evening, 2 to 3 hours after their last meal. This strategy allows the initial nausea peak (if any) to occur during sleep. By morning, the acute GI effects have typically subsided, and you wake up with the appetite suppression already active. Others prefer morning injections on an empty stomach, finding that it maximizes the appetite-suppressing effects throughout the day. There is no universally "correct" time. The best time of day for GLP-1 peptides depends on your individual response and schedule.
Dietary strategies during titration
The first few weeks of any GLP-1 peptide protocol are the hardest from a side effect standpoint. Supporting your body with the right nutrition makes a measurable difference. High-protein meals (30 to 40 grams per meal) help preserve lean mass during weight loss. The protein shake guide for GLP-1 users provides practical options for maintaining protein intake when appetite is suppressed. Knowing which foods to avoid during GLP-1 protocols helps prevent triggering or worsening nausea.
SeekPeptides provides evidence-based dietary guides specifically designed for GLP-1 peptide protocols, including meal plans, macronutrient targets, and supplement recommendations that align with your specific peptide and dosing phase.
Supplements that complement retatrutide
Certain supplements address the most common nutritional gaps that develop during weight loss protocols. Magnesium glycinate or citrate supports bowel regularity and reduces cramping. A high-quality multivitamin covers micronutrient gaps from reduced food intake. Electrolyte supplements prevent the dehydration-related symptoms (headaches, dizziness, fatigue) that overlap with peptide side effects. The supplement guide for GLP-1 peptide users covers specific products and dosages.
Tracking your progress
Data drives decisions. Track your weight weekly (same day, same time, same conditions), measure waist circumference monthly, and note energy levels, appetite, and side effects after each injection. This information helps you and your healthcare provider make informed decisions about dose adjustments. Many researchers also track body composition changes through DEXA scans or bioimpedance measurements at regular intervals. The weight loss timeline for GLP-1 peptides gives you a reference for expected progress rates.
Knowing when to adjust your dose
If side effects remain severe after two weeks at a given dose level, do not escalate further until they become manageable. Staying at the current dose for an additional two to four weeks is far better than pushing through severe nausea or vomiting. On the other hand, if you experience minimal side effects and plateau in weight loss at your target dose, discuss a potential dose increase with your healthcare provider. The GLP-1 weight loss plateau guide covers strategies for pushing past stalls, and the troubleshooting when peptides stop working addresses the most common causes and solutions.
Sourcing retatrutide for research
Finding reliable retatrutide sources requires due diligence. As an investigational peptide not yet FDA-approved, retatrutide is available through research chemical suppliers and certain compounding pharmacies. Quality varies significantly between suppliers, and the injection technique in the world cannot compensate for degraded or impure product.
The complete retatrutide purchasing guide covers supplier evaluation criteria including third-party testing, purity certificates, and shipping practices. For those considering online vendors, the retatrutide online sourcing guide compares verified suppliers and their respective quality standards.
Specific vendor reviews provide additional context. The Peptide Sciences retatrutide review and Paradigm Peptides retatrutide analysis offer detailed assessments of product quality, testing transparency, and customer experience. Bulk purchasing from international sources is an option some researchers explore, and the bulk retatrutide guide and international retatrutide sourcing guide address the unique considerations involved.
Understanding the current retatrutide pricing landscape helps you identify reasonable prices and avoid overpriced or suspiciously cheap products. The retatrutide availability guide stays updated on supply changes and market developments.
For researchers serious about optimizing their peptide protocols, SeekPeptides offers the most comprehensive resource available, with evidence-based guides, verified vendor information, and a community of thousands who have navigated these exact sourcing questions.
Frequently asked questions
How often do you inject retatrutide?
Retatrutide is administered once weekly via subcutaneous injection. Choose a consistent day each week. The retatrutide dosing schedule outlines the exact weekly protocol including titration steps and maintenance dosing.
Does retatrutide injection hurt?
Most researchers describe the injection as a brief pinch that lasts 1 to 2 seconds. Using a 29 to 31 gauge needle, allowing the solution to reach room temperature, and injecting slowly all minimize discomfort. The technique is identical to standard GLP-1 injections and most people find it tolerable within the first few administrations.
Can I inject retatrutide in my thigh instead of my stomach?
Yes. The front of the thigh, the abdomen, and the back of the upper arm are all approved subcutaneous injection sites. The retatrutide injection site guide covers the specific zones within each area and the absorption differences between sites.
What size needle should I use for retatrutide?
A 29-gauge or 30-gauge insulin needle, 1/2 inch in length, works for most people. Leaner individuals may prefer a 31-gauge, 5/16 inch needle to avoid reaching muscle tissue. The key is matching needle length to the subcutaneous depth at your chosen injection site.
How do I know if I injected into muscle instead of fat?
Intramuscular injection typically produces sharper pain during injection, faster onset of effects, and more pronounced injection site soreness that lasts 24 to 48 hours. If this happens consistently, switch to a shorter needle, use a 45-degree angle instead of 90 degrees, or choose a site with more subcutaneous tissue like the abdomen.
Can I reuse needles for retatrutide injections?
No. Reusing needles increases infection risk, causes more pain (the needle tip dulls after a single use), and can contaminate your vial when you draw the next dose. Always use a fresh, sterile needle for each injection.
What happens if I accidentally inject an air bubble?
Small air bubbles from subcutaneous injection are not dangerous. Air entering subcutaneous tissue is absorbed harmlessly by the body. The concern with air bubbles is dosing accuracy, as the air displaces peptide solution, meaning you receive slightly less than your target dose. Always tap and purge bubbles before injecting for accurate dosing.
How long does it take for retatrutide to start working?
Most researchers notice appetite suppression within the first week. Weight loss typically becomes measurable by weeks 3 to 4. The full effects build as you titrate to your target maintenance dose, with maximum efficacy reached 4 to 8 weeks after achieving your final dose. The GLP-1 onset timeline provides detailed week-by-week expectations.
Is retatrutide FDA approved?
No. As of early 2026, retatrutide is in Phase 3 clinical trials (the TRIUMPH program). It is not yet FDA approved for any indication. Eli Lilly continues to advance the clinical development program with results expected in the coming years.
Can I switch from semaglutide or tirzepatide to retatrutide?
Many researchers transition between GLP-1 peptides. The retatrutide dosing after tirzepatide guide covers the specific transition protocol. Generally, researchers restart the titration schedule with retatrutide regardless of their previous dose, though some experienced practitioners adjust based on their GLP-1 tolerance history. The retatrutide onset after tirzepatide transition sets realistic timeline expectations.
External resources
NCBI Nursing Skills - Administration of Parenteral Medications
PubMed Central - Efficacy and Safety of Retatrutide: Systematic Review and Meta-Analysis
In case I do not see you, good afternoon, good evening, and good night. May your injections stay painless, your reconstitutions stay sterile, and your protocols stay consistent.