Feb 26, 2026
You have a 30 mg vial of tirzepatide sitting on your counter. You have a vial of bacteriostatic water in the fridge. And you have no idea how much of one goes into the other. Sound familiar? You are not alone. This is the single most common question researchers ask when they get their hands on a 30 mg tirzepatide vial for the first time. Get the ratio wrong and everything downstream falls apart. Your dosage calculations become unreliable. Your weekly doses become inconsistent. And the peptide you spent good money on delivers unpredictable results that have nothing to do with the compound itself and everything to do with a math mistake made before the first injection. The answer is straightforward once you understand the logic behind it: add 3 mL of bacteriostatic water to your 30 mg vial. This creates a clean concentration of 10 mg/mL, which makes every subsequent syringe measurement simple, accurate, and impossible to mess up. But that single number only scratches the surface. This guide walks through every detail of the reconstitution process, from the math behind different concentrations to the exact technique that prevents peptide degradation during mixing. It covers what happens when you use more or less water, how your choice of concentration affects your dosing precision, storage protocols that protect potency after reconstitution, and the common mistakes that quietly sabotage results for researchers who thought they did everything right.
The quick answer: 3 mL of bac water for 30 mg tirzepatide
Three milliliters. That is the standard recommendation for reconstituting a 30 mg tirzepatide vial. The math is clean: 30 mg of peptide divided by 3 mL of water equals 10 mg per milliliter. This 10 mg/mL concentration has become the default for a reason. It makes dosing calculations almost effortless.
Consider the standard tirzepatide dose progression. The starting dose is 2.5 mg per week. At 10 mg/mL, that is exactly 25 units on an insulin syringe. No fractions. No rounding. No guesswork.
Here is how every standard dose maps out with this concentration:
Weekly dose | Volume to draw | Units on insulin syringe | Weeks per vial |
|---|---|---|---|
2.5 mg | 0.25 mL | 25 units | 12 weeks |
5 mg | 0.50 mL | 50 units | 6 weeks |
7.5 mg | 0.75 mL | 75 units | 4 weeks |
10 mg | 1.00 mL | 100 units | 3 weeks |
12.5 mg | 1.25 mL | Two draws (100 + 25 units) | 2.4 weeks |
15 mg | 1.50 mL | Two draws (100 + 50 units) | 2 weeks |
That table is worth bookmarking. It eliminates the mental arithmetic that trips people up at 6 AM with a syringe in hand. The 10 mg/mL concentration turns every dose into a simple number that lines up perfectly with the markings on a standard U-100 insulin syringe.

Understanding the concentration math
The formula behind peptide reconstitution is not complicated. But getting it wrong has consequences that compound with every injection. So let us break it down properly.
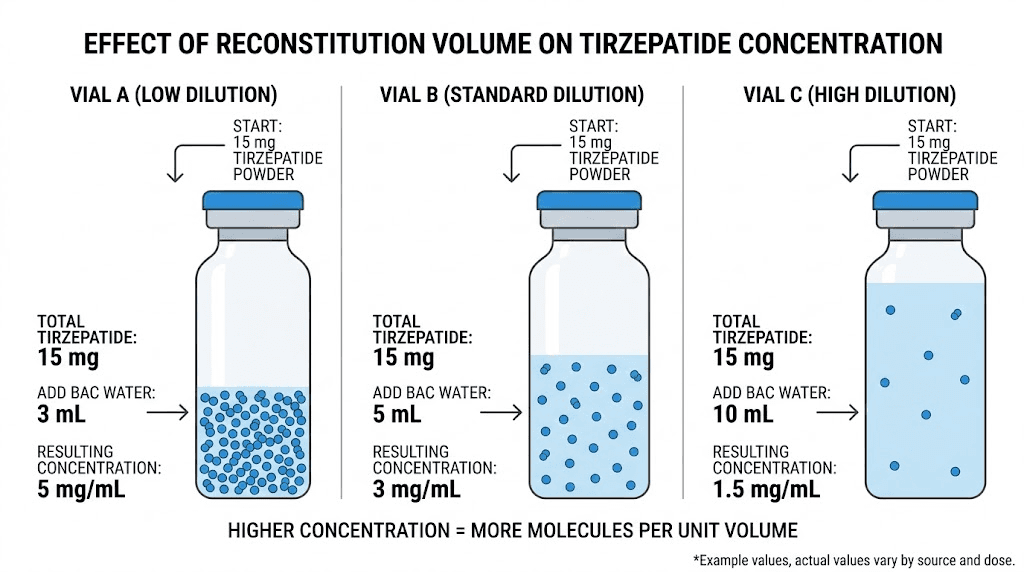
Concentration = Total peptide (mg) / Total water added (mL)
For a 30 mg vial:
Add 1 mL = 30 mg/mL (very concentrated)
Add 2 mL = 15 mg/mL (concentrated)
Add 3 mL = 10 mg/mL (standard, recommended)
Add 4 mL = 7.5 mg/mL (dilute)
Add 5 mL = 6 mg/mL (very dilute)
Add 6 mL = 5 mg/mL (most dilute practical option)
Each of these concentrations works. The peptide does not care how much water surrounds it. But your ability to measure accurate doses absolutely depends on this choice. And that is where most reconstitution guides stop, right when the important part starts.
Why 10 mg/mL is the sweet spot
Too concentrated and small dosing errors get magnified. At 30 mg/mL, a single unit on your syringe represents 0.3 mg of tirzepatide. Miss by two units and you are off by 0.6 mg. That matters when your target dose is 2.5 mg, because a 0.6 mg error represents a 24% deviation from your intended dose.
Too dilute and you need large injection volumes that cause more discomfort at the injection site. At 5 mg/mL, a 10 mg dose requires 2 mL of fluid. That is a lot of liquid going subcutaneously. It can cause lumps, irritation, and slower absorption.
At 10 mg/mL, you get the best of both worlds. Doses are large enough to measure precisely with a standard insulin syringe, and small enough that injection volumes stay comfortable. A 2.5 mg dose is 0.25 mL. A 10 mg dose is 1.0 mL. Everything falls within the easy-to-read range of a 1 mL syringe.
This is not a preference. It is practical mathematics applied to real-world conditions where precision determines outcomes.
Alternative concentrations and when to use them
The 3 mL standard works for most researchers. But specific situations call for different approaches. Understanding your options means understanding when and why you would deviate from the standard.
2 mL of bac water (15 mg/mL)
Some researchers prefer a more concentrated solution. Adding 2 mL to your 30 mg vial gives you 15 mg/mL. The advantage? Smaller injection volumes at higher doses. If you are running higher weekly doses like 10 mg or 15 mg, the concentrated solution means less fluid per injection. At this concentration, 10 mg equals approximately 67 units, and 15 mg equals 100 units.
The disadvantage is that lower doses become harder to measure accurately. A 2.5 mg dose at 15 mg/mL requires drawing only about 16.7 units. The gradation marks on most insulin syringes make this tricky to hit precisely. You are working with tiny volumes where small errors translate to meaningful dose variations.
6 mL of bac water (5 mg/mL)
Going more dilute has its place too. Six milliliters creates a 5 mg/mL solution where every unit on your syringe equals 0.05 mg. For researchers running microdose protocols or titrating doses in very small increments, this level of precision is valuable.
The tradeoff? You use up the vial faster because each dose requires more volume. And injection comfort decreases at higher doses. A 7.5 mg dose at this concentration means injecting 1.5 mL, which is at the upper limit of what most people find comfortable for a subcutaneous injection.
Choosing based on your protocol
Your situation | Best concentration | Bac water to add |
|---|---|---|
Starting at 2.5 mg, standard escalation | 10 mg/mL | 3 mL |
5 mg/mL | 6 mL | |
Higher doses (10-15 mg), minimal volume | 15 mg/mL | 2 mL |
Split dosing twice weekly | 10 mg/mL | 3 mL |
First time reconstituting | 10 mg/mL | 3 mL |
When in doubt, stick with 3 mL. The 10 mg/mL concentration has become the standard for good reason, and the peptide reconstitution calculator at SeekPeptides can verify your math regardless of which concentration you choose.
Step-by-step reconstitution process
Knowing how much water to add is only half the equation. How you add it determines whether the peptide survives the process intact. Tirzepatide is a 39-amino-acid peptide with a complex structure. Rough handling during reconstitution can denature the molecule, breaking the bonds that make it biologically active. You would never know it happened by looking at the vial. The solution looks identical whether the peptide is intact or degraded.
Follow these steps exactly.
Supplies you need
30 mg tirzepatide vial (lyophilized powder)
Bacteriostatic water (not sterile water, not saline)
3 mL syringe with 18-22 gauge needle for drawing water
1 mL insulin syringes (29-31 gauge) for dosing
Alcohol swabs
Clean, flat work surface
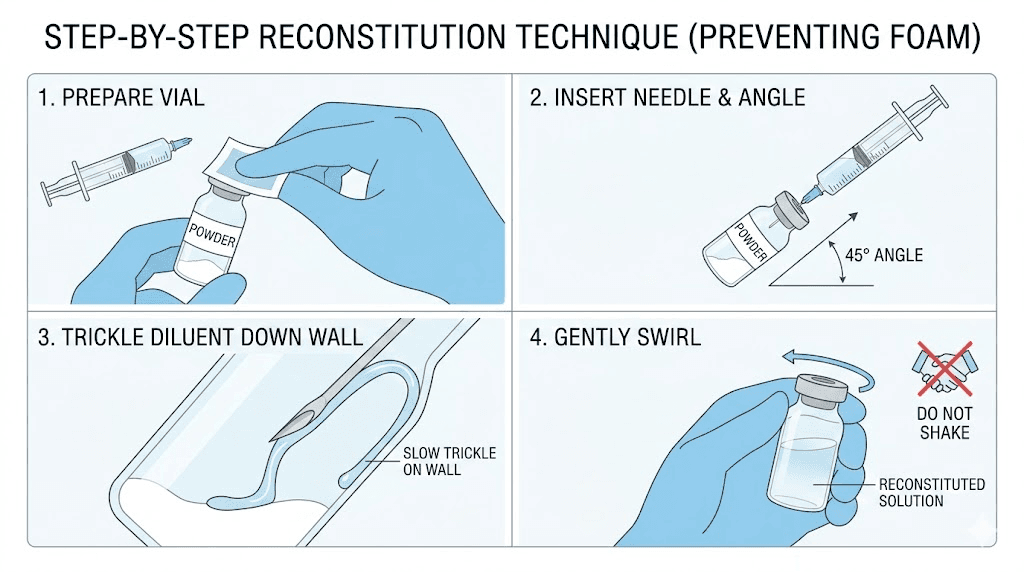
Step 1: Preparation
Wash your hands thoroughly. Remove the plastic caps from both vials. Swab the rubber stoppers of both the tirzepatide vial and the bacteriostatic water vial with alcohol. Let the alcohol dry completely. This takes about 15 seconds. Do not blow on it, do not wipe it, do not rush it. The alcohol needs contact time to do its job.
Step 2: Draw the bacteriostatic water
Using the 3 mL syringe with the larger gauge needle, draw exactly 3 mL of bacteriostatic water. Pull the plunger back slowly to avoid creating bubbles. If air bubbles form, tap the syringe gently to move them to the top and push them out before proceeding. Precision matters here. The amount of water you add directly determines your concentration. Being off by even 0.2 mL changes your concentration enough to affect dosing accuracy over the life of the vial.
Step 3: Inject water into the tirzepatide vial
This is the step where most people make their biggest mistake.
Do not inject the water directly onto the lyophilized powder. Angle the needle so it touches the inside glass wall of the vial. Depress the plunger slowly. Let the water trickle down the glass wall and pool at the bottom beneath the powder cake. This technique protects the peptide structure from the physical impact of water hitting it directly.
Spraying water onto the powder creates foam and turbulence that can damage the peptide. The gentle wall technique takes 30 seconds longer and saves you from ruining the entire vial.
Step 4: Mix gently
Never shake the vial. Shaking is the most common and most destructive mistake in tirzepatide reconstitution. The vigorous agitation creates shear forces that denature the peptide by breaking its molecular bonds. The peptide becomes biologically inactive, and you cannot tell from looking at it.
Instead, gently roll the vial between your palms. Or lay it on its side and rock it slowly back and forth. The powder should dissolve within 1 to 5 minutes. If stubborn particles remain, let the vial sit for a few minutes and roll again. Patience here protects potency.
The solution should be clear and colorless when fully dissolved. If you see particles floating, cloudiness, or discoloration, something went wrong. Do not use a solution that looks anything other than crystal clear.
Step 5: Label and store
Write on the vial or attach a label with three pieces of information: the date of reconstitution, the concentration (10 mg/mL), and the total remaining content (30 mg). This prevents confusion later when you are pulling doses at different points in the vial's life. Store immediately in the refrigerator at 2 to 8 degrees Celsius (36 to 46 degrees Fahrenheit). The clock starts now, and you have 28 days of reliable potency.
Why bacteriostatic water and not something else
This question comes up constantly. Researchers see sterile water, normal saline, and bacteriostatic water on the shelf and wonder if they are interchangeable. They are not.
Bacteriostatic water contains 0.9% benzyl alcohol. That small percentage of preservative is what makes multi-dose use safe. Every time you pierce the rubber stopper with a needle to draw a dose, you introduce a potential contamination pathway. The benzyl alcohol in bacteriostatic water inhibits bacterial growth, keeping the solution sterile through multiple needle entries over the 28-day use window.
Sterile water contains no preservative. It is meant for single-use applications. Once you pierce the vial, there is nothing preventing bacterial colonization. If you reconstitute a 30 mg vial with sterile water and plan to draw doses over several weeks, you are creating a contamination risk that increases with every injection.
Normal saline (0.9% sodium chloride) is not recommended for tirzepatide reconstitution. The salt content can interfere with peptide stability and cause precipitation in some cases. Some researchers have reported cloudiness or particle formation when using saline, which suggests peptide degradation or aggregation.
Diluent | Preservative | Multi-dose safe | Recommended for tirzepatide |
|---|---|---|---|
Bacteriostatic water | 0.9% benzyl alcohol | Yes (28 days) | Yes |
Sterile water | None | No (single use) | Only for immediate single use |
Normal saline | None | No | No, risk of precipitation |
Bacteriostatic water is the only correct choice for a 30 mg vial that you will draw from multiple times over weeks. This is not a suggestion. It is a safety requirement. If you need help understanding the differences between mixing methods and water types, the guides at SeekPeptides break down every variable.
How long does a 30 mg vial last at each dose
One of the most practical benefits of the 30 mg vial is its longevity. Depending on your dose escalation schedule, a single vial can last anywhere from 2 to 12 weeks. That makes it the most cost-effective vial size for most researchers.
Here is the breakdown:
Weekly dose | Doses per vial | Duration | Cost efficiency |
|---|---|---|---|
2.5 mg (starting dose) | 12 doses | 12 weeks (3 months) | Excellent |
5 mg | 6 doses | 6 weeks | Very good |
7.5 mg | 4 doses | 4 weeks | Good |
10 mg | 3 doses | 3 weeks | Moderate |
12.5 mg | 2.4 doses | ~2.4 weeks | Fair |
15 mg | 2 doses | 2 weeks | Lowest |
There is an important caveat. Reconstituted tirzepatide with bacteriostatic water is stable for approximately 28 days in the refrigerator. At the 2.5 mg starting dose, a 30 mg vial provides 12 weeks of doses. But the reconstituted solution should not be used beyond 28 days. This means you may need to discard remaining solution if your dose is very low and the vial outlasts its stability window.
One practical workaround: if you are at 2.5 mg per week and do not want to waste product, reconstitute only half the vial initially. Add 1.5 mL of bac water to dissolve part of the cake, draw your doses for 4 weeks, then reconstitute the remainder. Some researchers find this approach reduces waste, though it requires more careful handling and is not universally recommended.
A simpler approach is to plan your starting dose and dose escalation so you finish the vial within 28 days. At the standard escalation of 2.5 mg for 4 weeks then 5 mg, you would use 10 mg in the first month (4 doses at 2.5 mg) and then continue at 5 mg per week. That aligns nicely with the 30 mg total.
The complete dosing math at 10 mg/mL
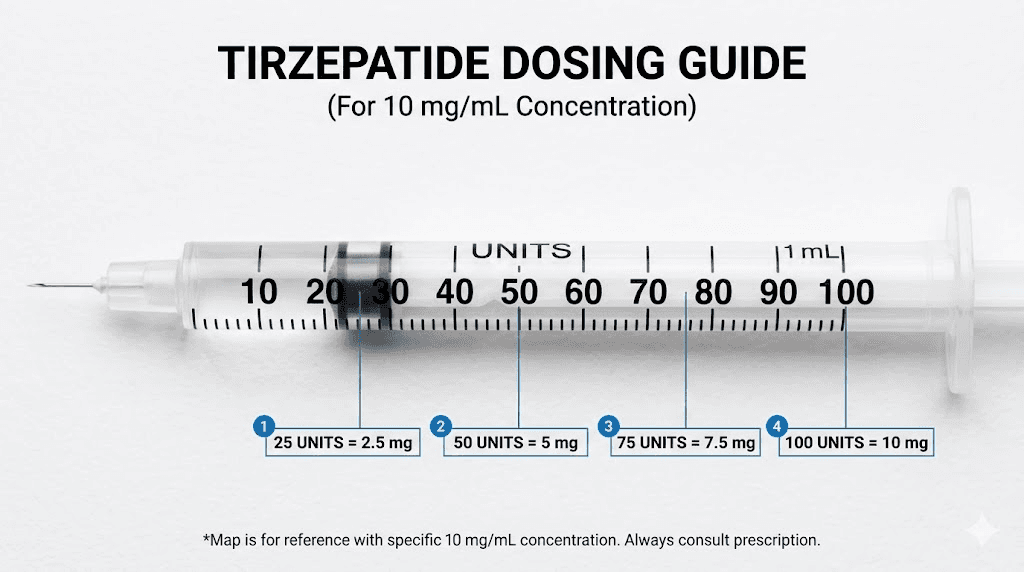
Once your 30 mg vial is reconstituted with 3 mL of bacteriostatic water, every dose becomes a simple calculation. Here is how to convert any milligram dose to syringe units using the tirzepatide dosage calculator formula.
Units to draw = Desired dose (mg) x 100 / Concentration (mg/mL)
At 10 mg/mL, this simplifies to:
Units = Desired dose (mg) x 10
That is it. Multiply your dose in milligrams by 10, and you have your syringe units. Want 2.5 mg? Draw 25 units. Want 7.5 mg? Draw 75 units. The math is that clean.
Understanding insulin syringe markings
A standard U-100 insulin syringe has 100 unit markings. Each small line represents 1 unit. Each larger line represents 5 units. At 10 mg/mL, here is what those markings translate to in tirzepatide:
1 unit = 0.1 mg tirzepatide
5 units = 0.5 mg tirzepatide
10 units = 1.0 mg tirzepatide
25 units = 2.5 mg tirzepatide
50 units = 5.0 mg tirzepatide
100 units = 10.0 mg tirzepatide
This precision is why the 10 mg/mL concentration is universally recommended. Every dose falls on a clear, readable syringe marking. No estimating between lines. No second-guessing whether you drew 23 or 27 units. If you have used our peptide calculator, you know how much easier dosing becomes when the math is this straightforward.
What about 0.5 mL and 0.3 mL syringes?
Smaller syringes offer even more precision for lower doses. A 0.5 mL (50 unit) insulin syringe has finer gradation marks, making doses below 25 units easier to measure. If you are on a microdosing protocol at 1 mg or 1.25 mg per dose, a 0.3 mL syringe gives you the most accurate draws.
For standard doses between 2.5 mg and 10 mg, the 1 mL (100 unit) syringe works perfectly.
The standard tirzepatide dose escalation schedule
Understanding dose escalation helps you plan how many vials you need and how long each will last. The standard tirzepatide protocol follows a gradual increase designed to minimize gastrointestinal side effects while reaching therapeutic doses.
Phase | Weeks | Weekly dose | Units to draw (at 10 mg/mL) | Total used from 30 mg vial |
|---|---|---|---|---|
Starting | 1-4 | 2.5 mg | 25 units | 10 mg |
First increase | 5-8 | 5 mg | 50 units | 20 mg |
Second increase | 9-12 | 7.5 mg | 75 units | 30 mg |
Third increase | 13-16 | 10 mg | 100 units | 40 mg |
Fourth increase | 17-20 | 12.5 mg | 125 units (two draws) | 50 mg |
Maximum | 21+ | 15 mg | 150 units (two draws) | 60 mg |
Looking at this schedule, a single 30 mg vial covers weeks 1 through 8 completely (10 mg at 2.5 mg/week for 4 weeks, then 20 mg at 5 mg/week for 4 weeks, totaling 30 mg). That is two full months of dosing from one vial. Remarkably efficient.
Dose increases happen every 4 weeks. This is not arbitrary. The body needs time to adjust to each dose level. Rushing increases leads to more severe gastrointestinal side effects like nausea, constipation, and diarrhea. The gradual escalation lets the GI tract adapt and dramatically improves tolerability.
Some researchers stay at a given dose longer than 4 weeks if they are still seeing results. There is no rule that says you must increase. If 5 mg per week is producing the weight loss outcomes you want, staying there is perfectly reasonable. In fact, using the lowest effective dose is the approach most researchers recommend.
Common reconstitution mistakes that destroy potency
The peptide in your vial is a precisely folded molecular structure. Mistreat it during reconstitution and it unfolds. Once unfolded, it does not refold correctly. The peptide loses its biological activity, and you are injecting expensive, inert liquid.
Here are the mistakes that cause this, ranked by how often researchers make them.
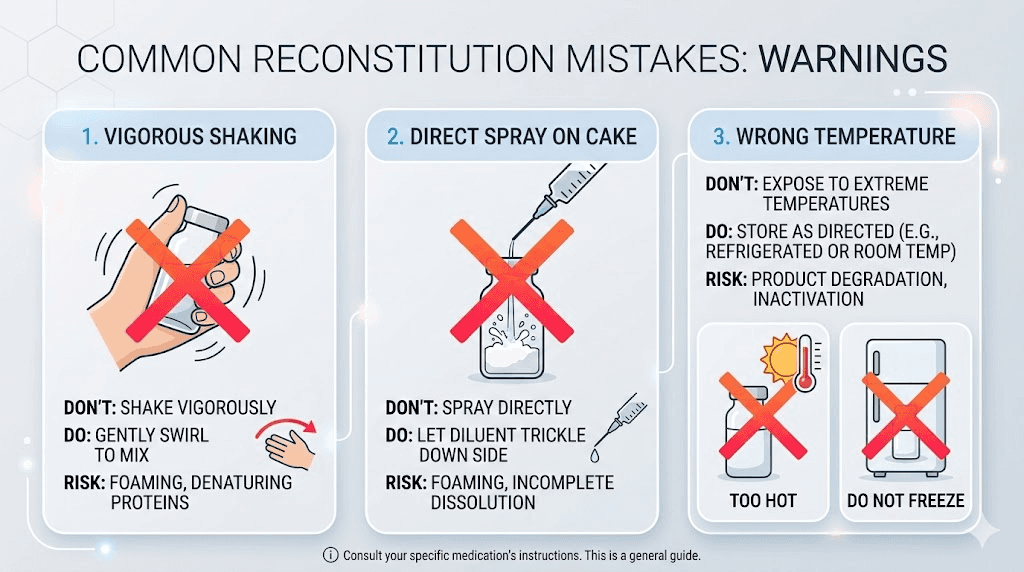
Mistake 1: Shaking the vial
This is the most common mistake and the most destructive. Shaking creates violent physical forces inside the vial that tear apart the peptide structure. The agitation introduces air bubbles that create foam, and the foam-liquid interfaces generate shear stress that denatures the protein. Studies on protein therapeutics consistently show that agitation-induced degradation is one of the primary causes of potency loss.
Always roll gently. Never shake.
Mistake 2: Spraying water directly onto the powder
When you push the plunger quickly and the water jets onto the lyophilized cake, the impact damages peptide molecules at the surface. The correct technique is to angle the needle against the glass wall and let the water run down slowly. Think of it like pouring a beer along the side of a glass to prevent foam. Same principle.
Mistake 3: Using the wrong diluent
Normal saline can cause tirzepatide to precipitate or aggregate. Sterile water works for single-use but provides no protection against contamination over multiple doses. Only bacteriostatic water provides the preservative protection needed for a multi-dose vial.
Mistake 4: Wrong volume of water
Adding too little water creates an overly concentrated solution where dosing errors are magnified. Adding too much creates unnecessarily dilute solutions that may not fit in a single syringe draw for higher doses. Measure carefully with a 3 mL syringe, not an insulin syringe which maxes out at 1 mL and would require multiple draws.
Mistake 5: Contamination from poor technique
Touching the needle tip, failing to swab the vial stopper, or reconstituting in an unclean environment all introduce bacteria. Even with bacteriostatic water, overwhelming contamination can overpower the preservative. Work on a clean surface. Swab everything. Keep the needle sterile. Basic aseptic technique is not optional.
Mistake 6: Storing at the wrong temperature
Reconstituted tirzepatide must be refrigerated at 2 to 8 degrees Celsius. Room temperature storage accelerates degradation significantly. Freezing is even worse because ice crystals physically damage the peptide structure, causing irreversible denaturation. If your vial has been left out of the fridge for an extended period, its potency may be compromised.
Storage after reconstitution
You have mixed your 30 mg vial perfectly. Now you need to keep it that way. Storage is where careful reconstitution either pays off or gets wasted.
Temperature requirements
Refrigerate at 2 to 8 degrees Celsius (36 to 46 degrees Fahrenheit). The back of the refrigerator tends to maintain the most consistent temperature. Avoid the door shelves, which experience temperature fluctuations every time the fridge opens. A small dedicated section of the fridge works best.
Some researchers use a small thermometer inside the fridge to monitor temperature. This is smart practice, especially during summer months when ambient temperatures can cause the fridge to work harder and cycle more aggressively.
Light protection
Tirzepatide degrades with light exposure. The vial should be stored in its original box or wrapped in aluminum foil if the box is not available. Placing the vial behind other items in the fridge provides additional light protection when the door opens.
28-day stability window
With bacteriostatic water, reconstituted tirzepatide maintains its potency for 28 days under proper refrigeration. This is the conservative recommendation based on preservative effectiveness and peptide stability data. Some researchers report stable results up to 45 or 60 days, but 28 days is the window within which potency is most reliably maintained.
Mark the reconstitution date on the vial. Set a phone reminder for day 28. If there is remaining solution after 28 days, discard it. The risk of reduced potency or contamination is not worth the savings from squeezing out a few extra doses.
Signs your reconstituted tirzepatide has gone bad
Cloudiness: The solution should be perfectly clear. Any haziness indicates peptide aggregation or contamination.
Particles: Floating specks or fibers mean contamination. Do not use.
Discoloration: Tirzepatide solution should be colorless. Yellow, brown, or any color change signals degradation. Note that tirzepatide compounded with B12 will have a pink or red color from the B12, which is normal for that specific formulation.
Unusual smell: Bacteriostatic water has a faint alcohol scent from the benzyl alcohol. Any other odor is a warning sign.
Reduced effectiveness: If your doses stop producing the expected appetite suppression effect, the peptide may have degraded.
Comparing 30 mg vials to other sizes
Tirzepatide comes in several vial sizes. Understanding how the 30 mg vial fits into the broader picture helps you make better purchasing decisions based on your protocol stage and dose requirements.
Vial size | Recommended bac water | Concentration | Weeks at 2.5 mg | Weeks at 5 mg | Weeks at 10 mg |
|---|---|---|---|---|---|
5 mg | 0.5 mL | 10 mg/mL | 2 | 1 | 0.5 |
10 mg | 1 mL | 10 mg/mL | 4 | 2 | 1 |
15 mg | 1.5 mL | 10 mg/mL | 6 | 3 | 1.5 |
30 mg | 3 mL | 10 mg/mL | 12 | 6 | 3 |
60 mg | 6 mL | 10 mg/mL | 24 | 12 | 6 |
The 30 mg vial sits in a practical sweet spot. It provides enough doses for meaningful protocol duration without the waste risk of larger vials at lower doses. For researchers on the starting 2.5 mg dose, a 10 mg vial is often more practical since it can be used within the 28-day window. But once you escalate to 5 mg and beyond, the 30 mg vial becomes the clear winner in terms of value and convenience.
For a deeper comparison of reconstituting 10 mg tirzepatide vials, we have a dedicated guide that covers the smaller vial in the same detail.
How reconstitution connects to your dose escalation plan
Smart reconstitution planning means never wasting product and always having fresh solution available. Here is how to map your vial purchases to your dose escalation.
Weeks 1 through 4 (2.5 mg/week)
Total needed: 10 mg. A 30 mg vial gives you 10 mg in the first 4 weeks with 20 mg remaining. The vial stays within its 28-day window if you continue at 5 mg/week immediately after. If you plan to stay at 2.5 mg for longer than 4 weeks, consider a 10 mg vial instead to avoid waste.
Weeks 5 through 8 (5 mg/week)
Total needed: 20 mg. Combined with the 10 mg used in weeks 1 through 4, your 30 mg vial is now empty. Perfect timing. The entire vial was used within 8 weeks, well within the stability window.
Beyond week 8 (7.5 mg+ per week)
At higher doses, you will go through vials faster. A 30 mg vial at 7.5 mg/week lasts 4 weeks. At 10 mg/week, it lasts 3 weeks. Both are within the 28-day stability window. The compound dosage chart helps visualize these progressions clearly.
Planning your supply
For a standard 20-week escalation from 2.5 mg to 15 mg:
Weeks 1 to 8: one 30 mg vial (10 mg + 20 mg = 30 mg used)
Weeks 9 to 12: one 30 mg vial (30 mg at 7.5 mg/week)
Weeks 13 to 16: one 30 mg vial (30 mg at 10 mg/week, used in 3 weeks)
Weeks 17 to 20: two 30 mg vials (60 mg at 12.5-15 mg/week)
Total: approximately 4 to 5 vials for a 20-week protocol. Use the peptide cost calculator to estimate total expenditure based on your specific supplier pricing.
Tirzepatide reconstitution compared to other peptides
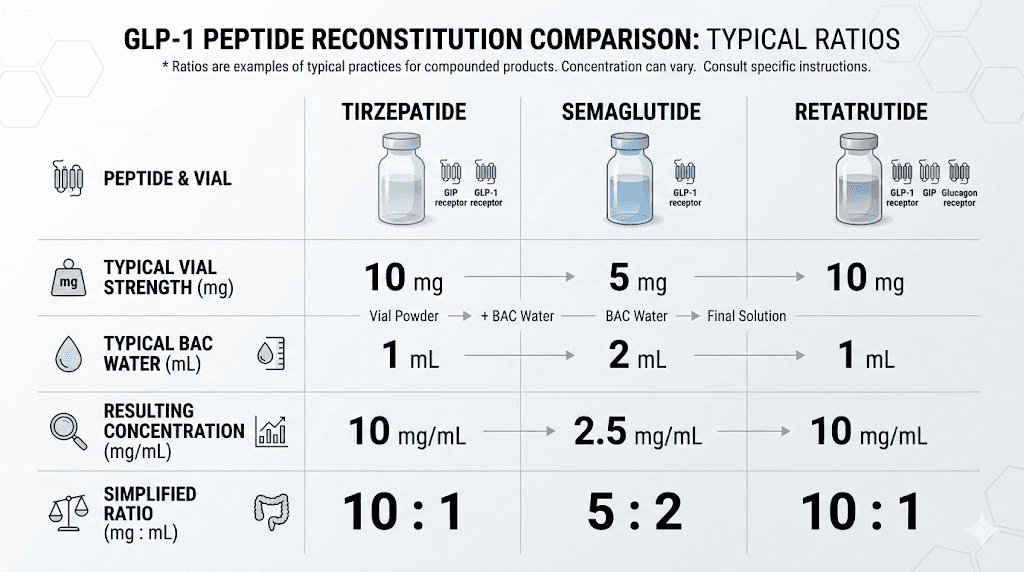
If you have experience reconstituting semaglutide or retatrutide, the process for tirzepatide is nearly identical. The same fundamental principles apply: gentle handling, correct diluent, proper storage. But there are subtle differences worth noting.
Tirzepatide vs semaglutide reconstitution
Both are GLP-1 receptor agonists with similar stability profiles. Semaglutide typically comes in 5 mg or 10 mg vials, making the 30 mg tirzepatide vial significantly larger. The 10 mg/mL concentration target is the same for both, but you are obviously using different water volumes (0.5 mL for 5 mg semaglutide, 1 mL for 10 mg semaglutide, 3 mL for 30 mg tirzepatide).
One key difference: tirzepatide is a dual GIP/GLP-1 receptor agonist, while semaglutide targets only GLP-1. This does not affect reconstitution, but it means the mechanism of action differs. If you are comparing the two for your protocol, the side effect profiles and dosage equivalencies are covered in separate guides.
Tirzepatide vs retatrutide reconstitution
Retatrutide is a triple agonist (GIP/GLP-1/glucagon), and its reconstitution follows the same general approach. The retatrutide reconstitution chart uses the same 10 mg/mL concentration target. However, retatrutide dose escalation schedules differ from tirzepatide, starting at lower doses and escalating more gradually in many research protocols.
For researchers considering switching between compounds, the reconstitution skills transfer directly. The technique, timing, and storage requirements are consistent across these GLP-1 class peptides.
Reconstitution troubleshooting
Even with perfect technique, issues can arise. Here is how to handle the most common problems researchers encounter.
The powder will not dissolve
Some tirzepatide vials have a compact lyophilized cake that takes longer to dissolve than the loose, fluffy powder found in other vials. This is normal and depends on the manufacturing process. Roll the vial gently for several minutes. If stubborn chunks remain after 5 minutes, let the vial sit upright in the fridge for 15 to 30 minutes, then roll again. Do not add more water. Do not shake. Patience solves this problem almost every time.
Bubbles in the solution
Small bubbles are normal after reconstitution, especially if the water was injected slightly too fast. Let the vial sit upright for 5 to 10 minutes, and the bubbles will rise and dissipate. Foam on the surface (large, persistent bubbles) indicates you either shook the vial or injected water too aggressively. The foam itself is not dangerous, but it may indicate some peptide denaturation at the foam-liquid interface.
Accidentally added wrong amount of water
If you added too much water, your concentration is lower than planned. This is not catastrophic. Recalculate your dose volumes based on the actual concentration. For example, if you accidentally added 4 mL instead of 3 mL, your concentration is 7.5 mg/mL instead of 10 mg/mL. A 2.5 mg dose now requires 33.3 units instead of 25. Use the peptide dosage calculation guide to recalculate.
If you added too little water, the solution is more concentrated. Again, recalculate rather than panic. The peptide is fine. Only the math changed.
Vial fell or was shaken accidentally
If a reconstituted vial was shaken vigorously (dropped, thrown in a bag, held by a toddler), some peptide degradation may have occurred. There is no way to test potency at home. The conservative approach is to continue using the vial but be aware that effectiveness may be reduced. If you notice decreased metabolic effects or appetite suppression, the shaking may have compromised potency.
Solution left out of the fridge
Short excursions at room temperature (under 2 hours) are generally tolerable. Extended periods at room temperature accelerate degradation. If the vial was left out overnight, the solution may still be usable, but potency could be reduced. For detailed guidance on temperature excursions, see our article on what happens when tirzepatide gets warm.
Frequently asked questions
Can I use 2 mL of bac water instead of 3 mL for my 30 mg tirzepatide vial?
Yes. Adding 2 mL creates a 15 mg/mL concentration. This works well for higher doses (10 to 15 mg per week) where you want smaller injection volumes. However, lower doses like 2.5 mg become harder to measure accurately because you are working with smaller syringe volumes. For most researchers, 3 mL (10 mg/mL) offers the best balance of precision and comfort. Use the reconstitution calculator to verify your specific setup.
What happens if I accidentally add 4 mL of water instead of 3 mL?
Your concentration becomes 7.5 mg/mL instead of 10 mg/mL. The peptide is not damaged, only the concentration changed. Recalculate your dose: at 7.5 mg/mL, a 2.5 mg dose requires approximately 33 units instead of 25. Update your dosage chart accordingly and label the vial with the correct concentration.
How long does reconstituted tirzepatide last in the fridge?
With bacteriostatic water, 28 days is the standard recommendation when stored at 2 to 8 degrees Celsius. Some researchers report reliable potency up to 45 days, but 28 days is the conservative window supported by stability data. Always check for clarity, particles, and signs of degradation before each dose.
Can I freeze reconstituted tirzepatide to make it last longer?
No. Freezing reconstituted tirzepatide damages the peptide structure through ice crystal formation. The physical disruption denatures the protein irreversibly. Never freeze reconstituted peptide solutions. If you need longer storage, keep the vial in its lyophilized (powder) form until you are ready to reconstitute.
Do I need to swirl the vial before each dose?
A very gentle swirl before drawing a dose can help ensure the solution is uniformly mixed, especially if the vial has been sitting undisturbed for days. Do not shake. A slow, gentle circular motion for a few seconds is sufficient. The peptide in solution is already dissolved and distributed, but a quick swirl provides confidence that you are drawing a consistent concentration.
Is the reconstitution process different for compounded tirzepatide vs research-grade?
The reconstitution technique is identical regardless of the source. The same rules apply: bacteriostatic water, gentle mixing, proper storage. The only difference may be in the vial size or the specific concentration of the lyophilized powder, which affects how much water you add. Always check the label on your specific vial for the exact peptide content before reconstituting. Compounded tirzepatide may come pre-reconstituted in some cases, in which case no mixing is required.
What if my powder looks different from what I expected?
Lyophilized tirzepatide can appear as a white to off-white powder, a compact cake, or a loose, fluffy material. All of these are normal variations from the manufacturing process. What matters is the reconstituted solution: it must be clear, colorless (unless compounded with B12 which adds color), and free of particles.
Can I use the same syringe for drawing water and for injecting my dose?
No. Use a larger gauge syringe (18-22 gauge) for drawing and injecting the bacteriostatic water into the vial. Then use a fresh insulin syringe (29-31 gauge) for each dose. The larger needle makes it easy to draw water but would be unnecessarily painful for subcutaneous injection. Each dose should use a new, sterile insulin syringe.
External resources
For researchers serious about optimizing their peptide protocols, SeekPeptides offers the most comprehensive resource available, with evidence-based guides, proven protocols, and a community of thousands who have navigated these exact questions. From reconstitution calculators to complete dosing guides, every tool is designed to eliminate the guesswork and keep your research on track.
In case I do not see you, good afternoon, good evening, and good night. May your reconstitutions stay precise, your peptides stay potent, and your results stay consistent.