Feb 12, 2026

Experienced researchers know something beginners rarely figure out on their own. The amount of bacteriostatic water you add to a 10mg retatrutide vial changes everything about your dosing accuracy, your injection volume, and ultimately your results. Get it wrong and you are either injecting too much liquid per dose or struggling to measure tiny fractions of a milliliter on a standard insulin syringe. Get it right and every dose becomes simple math that takes seconds to calculate.
This matters more than most people realize. Retatrutide is not cheap. A single 10mg vial represents a significant investment in your research, and wasting even a fraction of it through poor reconstitution technique means throwing money away. The difference between adding 1mL and 2mL of bacteriostatic water does not change the total amount of peptide in the vial, but it dramatically changes how precisely you can measure each dose and how many weeks that vial will last in your refrigerator.
This guide covers everything you need to know about reconstituting a 10mg retatrutide vial. You will learn the exact water volumes for different concentration targets, step-by-step mixing instructions that protect peptide integrity, complete dosing charts for every common weekly dose, syringe measurement techniques, and proper storage protocols that maximize shelf life.
Whether you are reconstituting retatrutide for the first time or looking to optimize your current approach, every calculation and technique you need is right here.
Why the amount of bacteriostatic water matters
Adding bacteriostatic water to a lyophilized peptide vial is called reconstitution. The process dissolves the freeze-dried powder into a liquid solution that can be drawn into a syringe and administered. Simple concept. But the volume of water you choose creates a specific concentration, and that concentration determines how much liquid you need to draw for each dose.
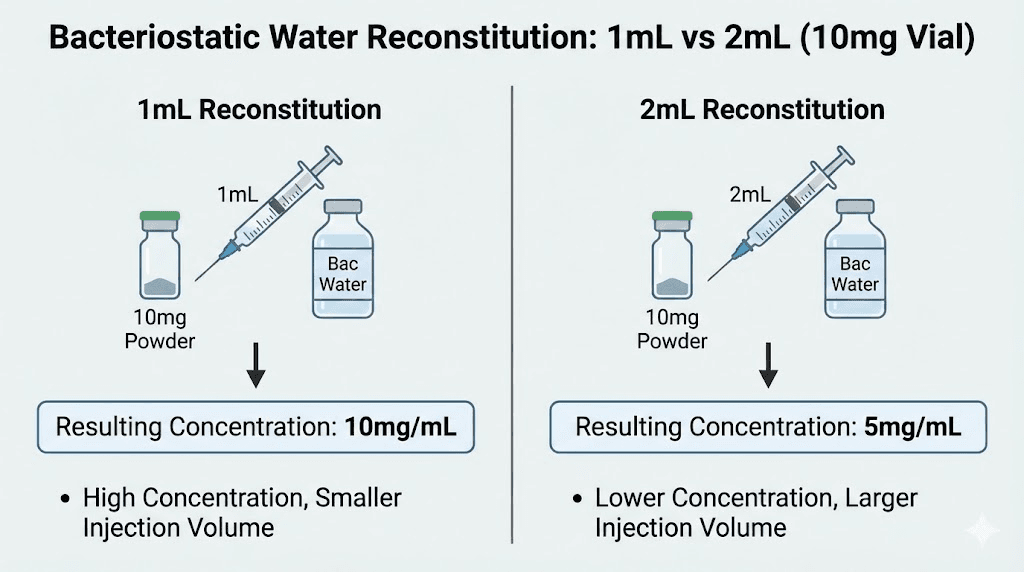
Here is the core principle. A 10mg retatrutide vial contains exactly 10mg of peptide regardless of how much water you add. Adding 1mL of water creates a 10mg/mL solution. Adding 2mL creates a 5mg/mL solution. Adding 3mL creates a 3.33mg/mL solution. The peptide amount stays constant. Only the concentration changes.
Why does this matter practically?
Consider a researcher who needs a 4mg weekly dose. With a 10mg/mL concentration (1mL of water added), that 4mg dose requires drawing 0.4mL, which equals 40 units on a standard U-100 insulin syringe. Perfectly measurable. But with a 2mg/mL concentration (5mL of water added), that same 4mg dose requires 2.0mL of liquid, which is an entire insulin syringe worth and creates a large, uncomfortable injection volume.
On the other end, if someone adds only 0.5mL of water to create a 20mg/mL solution, a 2mg starting dose would require just 0.1mL or 10 units on a syringe. At that scale, even a one-unit measurement error represents a 10% dosing mistake. That level of precision is difficult to achieve consistently, especially for researchers still developing their technique.
The goal is finding the concentration sweet spot where doses fall in a range that is both easy to measure accurately and comfortable to inject. For most researchers working with retatrutide dosing protocols, that sweet spot means adding either 1mL or 2mL of bacteriostatic water to a 10mg vial.
The two best water volumes for a 10mg retatrutide vial
After analyzing common retatrutide dose schedules and the practical limitations of insulin syringes, two reconstitution volumes stand out as optimal for a 10mg vial.
Option 1: Add 2mL of bacteriostatic water (recommended for most researchers)
This creates a 5mg/mL concentration. It is the most commonly recommended option and works best for the majority of dosing scenarios. At this concentration, a standard U-100 insulin syringe gives you excellent measurement precision across the full range of retatrutide dosages used in clinical research.
Here is what each dose looks like at 5mg/mL:
Weekly dose | Volume to draw | Insulin syringe units (U-100) | Weeks per vial |
|---|---|---|---|
1mg | 0.20mL | 20 units | 10 weeks |
2mg | 0.40mL | 40 units | 5 weeks |
3mg | 0.60mL | 60 units | 3.3 weeks |
4mg | 0.80mL | 80 units | 2.5 weeks |
5mg | 1.00mL | 100 units | 2 weeks |
8mg | 1.60mL | N/A (too large) | 1.25 weeks |
12mg | 2.40mL | N/A (too large) | 0.83 weeks |
Notice how doses from 1mg through 5mg all fall neatly within the range of a single 1mL insulin syringe. The measurements land on clean, easy-to-read markings. No squinting at tiny graduation lines. No guessing between marks. This is why 2mL is the recommended volume for most researchers following a standard retatrutide dosage protocol.
The limitation shows up at higher doses. At 8mg or 12mg weekly, the injection volume exceeds what a standard 1mL insulin syringe can hold. Researchers at those dose levels either need to split the dose into two injections or use a different reconstitution volume.
Option 2: Add 1mL of bacteriostatic water (for higher doses or experienced researchers)
This creates a 10mg/mL concentration. It is more concentrated, meaning you draw less liquid per dose. This works well for researchers who have reached higher maintenance doses or who prefer smaller injection volumes.
Here is what each dose looks like at 10mg/mL:
Weekly dose | Volume to draw | Insulin syringe units (U-100) | Weeks per vial |
|---|---|---|---|
1mg | 0.10mL | 10 units | 10 weeks |
2mg | 0.20mL | 20 units | 5 weeks |
3mg | 0.30mL | 30 units | 3.3 weeks |
4mg | 0.40mL | 40 units | 2.5 weeks |
5mg | 0.50mL | 50 units | 2 weeks |
8mg | 0.80mL | 80 units | 1.25 weeks |
12mg | 1.20mL | N/A (split into 2) | 0.83 weeks |
The advantage here is clear for higher doses. An 8mg dose only requires 80 units, which fits easily in a single syringe. Even at 12mg, you only need 1.2mL, which can be split into two comfortable injections.
The tradeoff? Lower doses become harder to measure precisely. A 1mg dose at this concentration is only 10 units on a syringe. A one-unit measurement error at that scale means you are off by 10%. For researchers just starting their retatrutide dose escalation at 1-2mg weekly, this margin of error can be significant.
Which option should you choose?
The decision comes down to where you are in your dosing protocol.
Choose 2mL (5mg/mL) if:
You are starting retatrutide for the first time
Your current dose is 5mg per week or lower
You want maximum measurement accuracy
You prefer straightforward math
Choose 1mL (10mg/mL) if:
Your dose is 6mg per week or higher
You want smaller injection volumes
You are comfortable with precise syringe measurements
You have experience reconstituting peptides
Some researchers start with 2mL during their initial escalation phase and switch to 1mL once they reach maintenance doses above 4mg. This approach maximizes accuracy during the critical early weeks when your body is still adapting to the peptide and precise dosing matters most.
Step-by-step reconstitution instructions
Reconstituting retatrutide is straightforward once you understand the process. Rushing through it or skipping steps is where problems happen. Take your time. The entire process should take about five minutes, and those five minutes protect the potency of a vial that cost real money.
What you need before starting
One 10mg retatrutide vial (lyophilized powder)
One vial of bacteriostatic water (BAC water)
One sterile syringe with needle (3mL syringe works well for mixing)
Alcohol swabs
Clean, flat work surface
A quick note on water type. Always use bacteriostatic water, not sterile water, for reconstitution when you plan to draw multiple doses from the vial over several weeks. Bacteriostatic water contains 0.9% benzyl alcohol, a preservative that inhibits bacterial growth. Sterile water lacks this preservative, making multi-dose vials susceptible to contamination after the first needle insertion. For single-use applications, sterile water works. For everything else, bacteriostatic water is the standard. You can learn more about proper peptide preparation in our peptide reconstitution calculator guide.
Step 1: Clean everything
Wipe the rubber stoppers on both vials (retatrutide and bacteriostatic water) with separate alcohol swabs. Let them air dry for about 10 seconds. Do not blow on them to speed drying. Your breath carries bacteria. This step takes 30 seconds and prevents contamination that could ruin your entire vial.
Step 2: Draw the bacteriostatic water
Using your sterile syringe, draw the amount of bacteriostatic water you have chosen. For the recommended 2mL reconstitution, pull the plunger back to the 2mL mark. For a 1mL reconstitution, draw to the 1mL mark. Double-check the volume before proceeding.
Inject an equal volume of air into the BAC water vial first. This equalizes pressure and makes drawing the water much smoother.
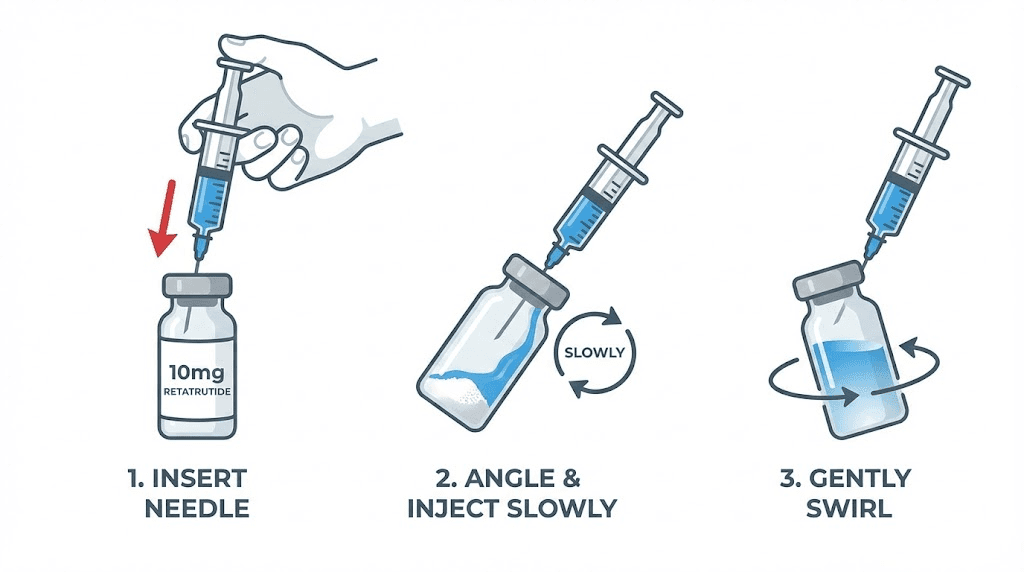
Step 3: Add water to the retatrutide vial (slowly)
This is the most critical step, and it is where most mistakes happen.
Insert the syringe needle into the retatrutide vial through the rubber stopper. Then, angle the needle so it touches the inside glass wall of the vial. Depress the plunger slowly, letting the water trickle down the inside wall of the vial rather than hitting the lyophilized powder directly.
Why? Direct force from a stream of water can damage the peptide structure. Retatrutide is a relatively large molecule, and aggressive reconstitution can denature portions of it, reducing potency. Letting the water run gently down the glass wall preserves the molecular integrity that makes the peptide effective. The same principle applies to all peptide reconstitution, whether you are mixing tirzepatide, semaglutide, or any other research peptide.
Step 4: Swirl gently (never shake)
Once all the water is in the vial, remove the syringe. Then gently swirl the vial in small circles. Think of it like swirling wine in a glass. The motion should be smooth and controlled. Tilt the vial slightly as you rotate it.
Never shake the vial. Shaking creates air bubbles and can cause physical damage to the peptide through shearing forces. If you shake hard enough, you can actually see the solution become cloudy or foamy, which is a visible sign of peptide degradation.
Swirl for 30-60 seconds and then set the vial down on a flat surface.
Step 5: Wait and inspect
Let the vial sit upright for 2-5 minutes. Check back periodically. The solution should become completely clear with no visible particles, chunks, or cloudiness. If you still see undissolved powder, gently swirl again. Do not rush this process. Some peptides take a few minutes to fully dissolve, and that is completely normal.
A properly reconstituted retatrutide solution should be:
Clear (not cloudy or hazy)
Colorless to very slightly yellow
Free of visible particles or floating material
Uniform throughout (no layers or separation)
If the solution remains cloudy after 10 minutes of gentle swirling, something may be wrong with the vial. Do not use a solution that will not clarify.
Step 6: Label and store
Write the date of reconstitution, the concentration (5mg/mL or 10mg/mL), and the vial contents on a small label or directly on the vial with a marker. Then immediately place the vial in the refrigerator. Reconstituted retatrutide should be stored at 2-8 degrees Celsius (35.6-46.4 degrees Fahrenheit) and kept away from light.
The reconstitution math explained
Understanding the math behind reconstitution removes all guesswork from the process. Once you grasp the formula, you can calculate the correct draw volume for any dose at any concentration instantly.
The basic formula
Concentration (mg/mL) = Total peptide (mg) divided by Total water volume (mL)
For a 10mg vial:
10mg divided by 1mL = 10mg/mL
10mg divided by 2mL = 5mg/mL
10mg divided by 3mL = 3.33mg/mL
10mg divided by 5mL = 2mg/mL
Calculating your draw volume
Draw volume (mL) = Desired dose (mg) divided by Concentration (mg/mL)
Example: You want a 4mg dose from a vial reconstituted at 5mg/mL.
4mg divided by 5mg/mL = 0.80mL = 80 units on a U-100 insulin syringe.
Converting mL to insulin syringe units
This is where confusion often strikes researchers new to peptide work. Here is the simple conversion.
On a U-100 insulin syringe, 1mL = 100 units.
So 0.1mL = 10 units. And 0.5mL = 50 units. And 0.8mL = 80 units. Multiply the mL value by 100 to get units. That is the entire conversion.
This same math applies whether you are working with retatrutide, semaglutide dosage charts in mL, or tirzepatide dosage in units. The principle is universal across all injectable peptides. Resources like the SeekPeptides peptide calculator can handle these calculations automatically if you prefer not to do the math yourself.
Quick reference conversion table
mL | Insulin syringe units (U-100) |
|---|---|
0.05mL | 5 units |
0.10mL | 10 units |
0.15mL | 15 units |
0.20mL | 20 units |
0.25mL | 25 units |
0.30mL | 30 units |
0.40mL | 40 units |
0.50mL | 50 units |
0.60mL | 60 units |
0.80mL | 80 units |
1.00mL | 100 units |
Bookmark this table. It eliminates the most common dosing errors that researchers make when working with any reconstituted peptide solution. If you want a tool that calculates all of this for you, the retatrutide dosage calculator handles every vial size and concentration automatically.
Retatrutide dose escalation and how it affects vial usage
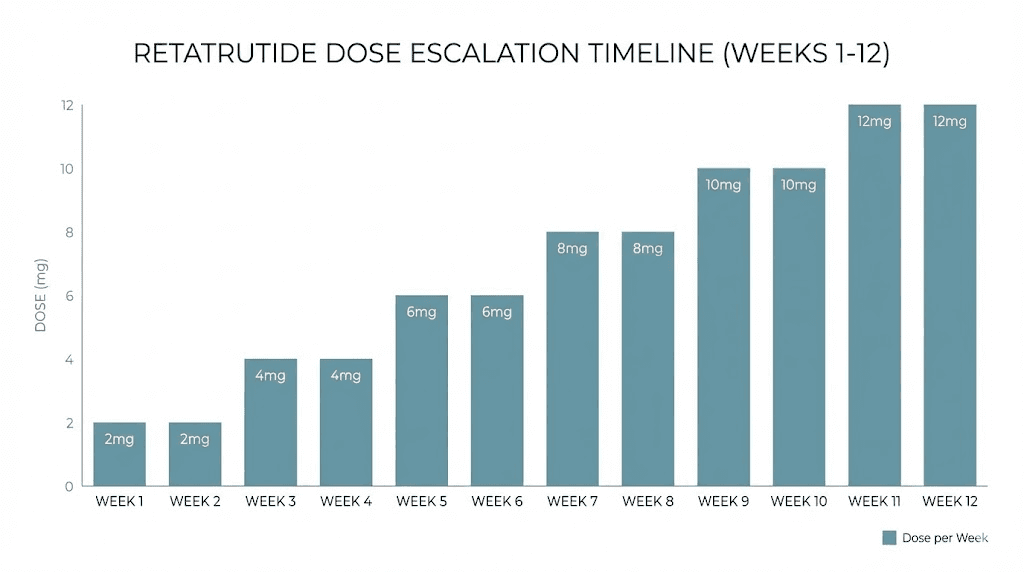
Retatrutide is not a peptide where you start at your target dose. Clinical trial protocols from the Phase 2 NEJM study used a gradual escalation approach, starting at low doses and increasing every four weeks. This escalation period directly affects how many vials you need and how long each one lasts.
The standard dose escalation protocol
Based on the Phase 2 clinical trial data published in the New England Journal of Medicine, the typical retatrutide dose schedule follows a pattern like this:
Phase | Weekly dose | Duration | Draw volume at 5mg/mL | Vial usage (10mg vial) |
|---|---|---|---|---|
Starting | 1-2mg | 4 weeks | 20-40 units | ~40% of one vial |
Escalation 1 | 2-4mg | 4 weeks | 40-80 units | ~60-80% of one vial |
Escalation 2 | 4-8mg | 4 weeks | 80-160 units | 1-2 vials |
Maintenance | 8-12mg | Ongoing | 160-240 units | 1-1.5 vials per week |
During the starting phase, a single 10mg vial reconstituted with 2mL of bacteriostatic water can last up to 10 weeks at a 1mg weekly dose. That is exceptionally cost-effective and one of the reasons 2mL reconstitution is recommended for beginners. You get maximum measurement accuracy during the critical phase when your body is adjusting to this triple-agonist peptide.
As you escalate, vial consumption increases proportionally. At the 8mg maintenance dose, you are using 80% of a 10mg vial per week, meaning you need roughly one vial per week. At 12mg, you need more than one vial per week. This is an important consideration when planning your retatrutide cost and supply budget.
Why starting low matters
The escalation protocol is not arbitrary. Retatrutide activates three receptor systems simultaneously: GLP-1, GIP, and glucagon receptors. This triple-agonist mechanism is what makes it potentially more effective than single-agonist peptides like semaglutide, but it also means the gastrointestinal side effects can be more intense if you start too high.
Phase 2 trial data shows that nausea occurred in 14% of participants at the 1mg dose but jumped to 45% at the 12mg dose. Vomiting followed a similar pattern. Starting low and escalating every four weeks gives your GI system time to adapt. Researchers who rush the escalation tend to experience more severe nausea, which can lead to skipped doses, inconsistent protocols, and ultimately worse outcomes.
The patience required during dose escalation is actually one of the most valuable aspects of the protocol. It lets you identify your optimal retatrutide dose while minimizing side effects that could derail your research timeline.
Common reconstitution mistakes and how to avoid them
Even experienced researchers make errors that reduce the effectiveness of their reconstituted peptide. Here are the mistakes that come up most frequently, along with the specific fixes for each one.
Mistake 1: Spraying water directly onto the powder
This is the single most common reconstitution error. Researchers insert the syringe and press the plunger quickly, creating a jet of water that blasts into the lyophilized powder cake.
The fix is simple. Angle the needle against the inside wall of the vial and depress the plunger slowly. The water should trickle down the glass, not shoot across the vial. Think drip, not spray.
Mistake 2: Shaking the vial to dissolve the powder faster
Shaking introduces air bubbles and creates shearing forces that can break apart the peptide structure. You might see the powder dissolve faster, but you could be degrading a portion of the active compound in the process.
Always swirl gently. If the powder is taking a long time to dissolve (more than 5 minutes of gentle swirling), set it down and come back in 10 minutes. Most peptides dissolve fully within 15 minutes with minimal agitation.
Mistake 3: Using sterile water instead of bacteriostatic water
Sterile water is fine for single-use applications. But a 10mg retatrutide vial at a 1-2mg starting dose will need multiple needle insertions over several weeks. Each insertion introduces a small contamination risk. The benzyl alcohol preservative in bacteriostatic water provides ongoing protection against bacterial growth. Sterile water does not.
If you have already reconstituted with sterile water, use the entire vial within 24-48 hours or accept a higher contamination risk. For future reconstitutions, switch to bacteriostatic water.
Mistake 4: Adding too much or too little water
Adding 5mL to a 10mg vial creates a 2mg/mL solution. At this concentration, a 4mg dose requires a full 2mL injection, which is uncomfortably large and will likely hurt at the injection site. On the other end, adding only 0.5mL creates a 20mg/mL solution where tiny measurement errors translate to significant dosing inaccuracies.
Stick to 1mL or 2mL for a 10mg vial. These are the proven volumes that balance measurement accuracy with practical injection volumes.
Mistake 5: Not labeling the vial after reconstitution
This sounds trivial until you have three reconstituted vials in your refrigerator and cannot remember when you mixed each one, what concentration each contains, or which one you should be drawing from next. Label every vial with the date, concentration, and contents. A fine-point permanent marker works directly on the glass.
Mistake 6: Leaving reconstituted peptide at room temperature
Reconstituted retatrutide degrades rapidly outside of refrigeration. Even a few hours at room temperature can reduce potency. After reconstitution, the vial goes straight into the refrigerator. When drawing doses, remove the vial, draw your dose, and return it immediately. Do not leave it sitting on your desk while you prepare other things.
The same principle applies to compounded semaglutide storage, tirzepatide refrigeration requirements, and virtually all reconstituted peptides. Cold storage is non-negotiable.
Storage after reconstitution: how long does it last?
Proper storage directly determines how long your reconstituted retatrutide remains potent and safe to use. Cut corners here and you risk injecting degraded peptide that will not produce the results your dosing schedule was designed to achieve.
Refrigerator storage (2-8 degrees Celsius)
When reconstituted with bacteriostatic water and stored properly in the refrigerator, a retatrutide vial typically remains stable for 2-4 weeks. Some researchers report using vials up to 28-30 days after reconstitution without noticeable potency loss, but the general consensus leans toward using the vial within 3 weeks for optimal results.
The 2-4 week window is not a hard cutoff. Degradation is a gradual process, not a sudden event. A vial at day 21 has not suddenly become useless. But potency decreases incrementally each day after reconstitution, and by week 4 or 5, the degradation may become meaningful enough to affect your results.
Room temperature storage
Do not store reconstituted retatrutide at room temperature for any extended period. At 20-25 degrees Celsius, degradation accelerates significantly. If the vial sits out for a few hours while you are drawing doses, that is fine. But overnight or longer at room temperature can compromise the peptide.
Freezing reconstituted solution
This is a topic with conflicting opinions. Some sources suggest that freezing reconstituted peptide solution can damage the molecular structure through ice crystal formation. Others argue that rapid freezing at very low temperatures (below negative 20 degrees Celsius) preserves stability.
The safest approach? Do not freeze reconstituted solutions. If you need long-term storage, keep the peptide in its original lyophilized (powder) form and reconstitute only when you are ready to begin using it. Unreconstituted retatrutide stored properly can maintain stability for months or even years, far longer than any reconstituted solution.
Signs your reconstituted peptide has degraded
Watch for these warning signs:
Cloudiness that was not present immediately after reconstitution
Visible particles floating in the solution
Color change from clear to yellow, brown, or any other tint
Reduced effectiveness at doses that previously produced noticeable effects
If you observe any visual changes, do not use the solution. The risk of injecting degraded or contaminated peptide is not worth the cost savings of squeezing a few more doses from an old vial. Similar storage principles apply to tirzepatide shelf life and compounded semaglutide storage duration as well.
How retatrutide compares to other peptide reconstitution
If you have experience reconstituting other GLP-1 receptor agonists, the process for retatrutide is nearly identical. The main differences come down to typical vial sizes, common concentrations, and dosing ranges. Understanding these comparisons helps researchers who are switching between peptides or running protocols that involve multiple compounds.
Retatrutide vs semaglutide reconstitution
Semaglutide vials commonly come in 5mg or 10mg sizes. The semaglutide 10mg reconstitution process is essentially identical to retatrutide. The key difference is dosing range. Semaglutide doses typically range from 0.25mg to 2.4mg per week, while retatrutide can escalate up to 12mg per week. This means semaglutide users often add more water (2-3mL) to keep lower doses measurable, while retatrutide users at higher doses may prefer less water (1mL) to keep injection volumes manageable.
The semaglutide 5mg/mL dosage chart follows the same mathematical principles as the retatrutide charts above. Same formula, different dose ranges. The semaglutide dosage calculator on SeekPeptides can help with those specific calculations.
Retatrutide vs tirzepatide reconstitution
Tirzepatide vials also commonly come in 5mg, 10mg, or larger sizes. The reconstitution process is the same, but tirzepatide doses typically range from 2.5mg to 15mg per week, which is closer to the retatrutide range. Researchers who have experience with tirzepatide compound dosage charts will find the retatrutide math very familiar.
One notable difference is that tirzepatide is a dual-agonist (GLP-1 and GIP) while retatrutide is a triple-agonist (GLP-1, GIP, and glucagon). This does not change the reconstitution process, but it does mean the side effect profiles during dose escalation can differ. Researchers switching from tirzepatide to retatrutide should still start at a low dose regardless of their previous tolerance.
Universal reconstitution principles
Regardless of which peptide you are working with, these principles remain constant:
Use bacteriostatic water for multi-dose vials
Add water slowly down the vial wall
Never shake, always swirl
Refrigerate immediately after reconstitution
Use within 2-4 weeks
Label everything
The peptide reconstitution calculator on SeekPeptides works for any peptide, not just retatrutide. Enter your vial size, water volume, and desired dose, and it handles all the math instantly.
Understanding retatrutide: why researchers are paying attention
Retatrutide represents a significant advancement in GLP-1 receptor agonist research because it activates three metabolic pathways simultaneously rather than one or two. This triple-agonist approach, targeting GLP-1, GIP, and glucagon receptors, produced the most dramatic weight loss results seen in any Phase 2 obesity trial.
The Phase 2 trial results
Published in the New England Journal of Medicine, the Phase 2 trial showed that participants receiving the highest dose of retatrutide (12mg weekly) achieved a mean weight reduction of 24.2% at 48 weeks. To put that in perspective, the best semaglutide clinical trials showed approximately 15-17% weight reduction, and tirzepatide results peaked around 20-22%.
Those numbers got the entire peptide research community paying attention. A nearly 25% average weight reduction in less than a year is unprecedented in the published literature.
How three receptors work together
Each receptor contributes something different to the overall effect:
GLP-1 receptor activation: Reduces appetite, slows gastric emptying, and enhances insulin secretion. This is the same mechanism that makes GLP-1 agonists like semaglutide effective for weight management.
GIP receptor activation: Works synergistically with GLP-1 to improve glucose metabolism and enhance the satiety signal. This is the dual-agonist component that tirzepatide shares with retatrutide.
Glucagon receptor activation: Increases energy expenditure by promoting fat oxidation and thermogenesis. This is the unique third mechanism that only retatrutide activates. It means retatrutide does not just reduce calorie intake through appetite suppression, it also increases calorie burning. That dual approach to energy balance is what researchers believe drives the superior weight loss outcomes.
The combination of reduced appetite, improved metabolic signaling, and increased energy expenditure makes retatrutide fundamentally different from single-agonist peptides. The reconstitution and dosing process may be identical, but what the peptide does once administered is distinctly more comprehensive.
Current research status
Retatrutide is currently in Phase 3 clinical trials, with Eli Lilly conducting multiple large-scale studies. It has not yet received FDA approval, so it is classified as a research compound. Retatrutide availability is primarily through research chemical suppliers, and the market is growing as more researchers begin exploring this triple-agonist peptide. For those considering the investment, understanding the full cost landscape is essential before committing to a long-term protocol.
Injection technique after reconstitution
Reconstituting the peptide correctly is only half the equation. How you draw and inject the solution matters just as much for consistent results. Sloppy injection technique introduces air bubbles, inaccurate doses, and unnecessary discomfort.
Drawing the dose from the vial
Before drawing, visually inspect the solution. It should be clear. If it is cloudy or contains particles, do not use it.
Insert the needle through the rubber stopper at a slight angle. Invert the vial and pull the plunger back to slightly past your target volume. Then push the plunger forward to exactly the right mark, expelling any air bubble that entered the syringe. This technique is called overshoot-and-adjust, and it consistently delivers more accurate doses than trying to draw precisely to the mark on the first pull.
Choosing an injection site
The most common subcutaneous injection sites for retatrutide are:
Abdomen: 2 inches away from the navel, left or right side. The preferred site for most researchers due to consistent absorption and easy access.
Thigh: Front or outer area, middle third of the thigh. Good alternative if the abdomen is sensitive.
Upper arm: Back of the arm, midway between shoulder and elbow. Harder to self-administer but viable.
Rotate injection sites with each dose to prevent lipodystrophy (lumps or pits at the injection site). If you injected into the left side of your abdomen this week, use the right side next week. For more detailed guidance on injection site selection and rotation, see our guide on where to inject retatrutide.
The injection process
Clean the injection site with an alcohol swab. Let it dry completely, which takes about 10 seconds. Pinch a fold of skin at the site. Insert the needle at a 45-90 degree angle (45 degrees if you have less subcutaneous fat, 90 degrees if you have more). Depress the plunger slowly and steadily. Do not rush. After the plunger is fully depressed, wait 5-10 seconds before withdrawing the needle. This ensures all the liquid has been deposited into the tissue.
Withdraw the needle and apply light pressure with a cotton ball or clean tissue if there is any bleeding. Do not massage the injection site, as this can alter the absorption rate.
Injection tips that improve comfort
Use the thinnest needle available. 29-gauge or 31-gauge insulin syringes produce less pain than thicker needles. Let the alcohol dry completely before injecting, as wet alcohol stings. Inject slowly. The faster you push the plunger, the more pressure builds in the tissue, and the more it hurts. Room temperature solution is more comfortable than cold solution, so let the syringe warm in your hand for 30 seconds after drawing the dose (but do not leave the vial out of the fridge).
These same techniques apply to all subcutaneous peptide injections, including GLP-1 injections of any type. Once you have mastered the technique with one peptide, it transfers directly to every other injectable in your protocol.
Managing side effects during dose escalation
Gastrointestinal side effects are the most commonly reported adverse events with retatrutide, and they peak during the dose escalation period. Understanding what to expect and how to manage symptoms keeps your protocol on track.
What the clinical data shows
From the Phase 2 trial:
Side effect | 1mg dose | 4mg dose | 8mg dose | 12mg dose | Placebo |
|---|---|---|---|---|---|
Nausea | 14% | 18-36% | 17-60% | 45% | 11% |
Diarrhea | 9% | 15-21% | 12-26% | 18% | 9% |
Vomiting | 2% | 9-12% | 10-21% | 9% | 2% |
Constipation | 9% | 6-9% | 5-15% | 18% | 4% |
Two patterns stand out. First, side effects are clearly dose-dependent, increasing as the dose goes up. Second, they are most common during escalation periods and tend to decrease as the body adapts. Researchers who rush the escalation experience the worst of both factors simultaneously.
Practical management strategies
For nausea:
Eat smaller, more frequent meals (5-6 small meals instead of 3 large ones)
Avoid fatty, greasy, and spicy foods, especially during the first week after each dose increase
Ginger tea or ginger chews can provide natural relief
Take the injection on a day when you can rest if the nausea is severe
Stay hydrated. Dehydration makes nausea significantly worse
For diarrhea:
Increase fiber intake gradually, not suddenly
Stay hydrated with electrolyte solutions, not just plain water
Avoid sugar alcohols and artificial sweeteners, which can worsen GI symptoms
For constipation:
Increase water intake to at least 2-3 liters daily
Add magnesium citrate if needed (a gentle, effective option)
Include high-fiber vegetables and fruits in your diet
When to slow the escalation
If you experience side effects that significantly impact your daily function, extend the current dose phase by 2-4 additional weeks before escalating. The goal is to find the highest dose you can tolerate comfortably, not to reach the maximum dose as quickly as possible. Some researchers find their optimal balance at 4mg or 8mg rather than pushing to 12mg. The complete retatrutide dosing guide discusses how to identify your personal optimal dose in detail.
Researchers transitioning from other GLP-1 agonists sometimes assume they can start retatrutide at a higher dose because they tolerated semaglutide or tirzepatide well. This is a mistake. The glucagon receptor activation in retatrutide creates a different side effect profile. Even experienced users should start at the beginning of the escalation protocol and let their body adapt to this specific triple-agonist mechanism.
Cost considerations for 10mg vial protocols
Understanding how reconstitution and dosing affect your budget helps with long-term planning. The cost of retatrutide research depends primarily on two factors: your weekly dose and how efficiently you use each vial.
Vial efficiency at different doses
Weekly dose | Doses per 10mg vial | Weeks per vial | Vials per month |
|---|---|---|---|
1mg | 10 | 10 | 0.4 |
2mg | 5 | 5 | 0.8 |
4mg | 2.5 | 2.5 | 1.6 |
8mg | 1.25 | 1.25 | 3.2 |
12mg | 0.83 | 0.83 | 4.8 |
At the starting 1mg dose, a single 10mg vial lasts over two months. At the 12mg maintenance dose, you need nearly 5 vials per month. This 12x increase in consumption is the primary driver of retatrutide cost escalation over a protocol. Our peptide cost calculator can help you estimate total expenses based on your planned dose escalation timeline. For a deeper dive into pricing across different suppliers, the complete retatrutide cost guide breaks down current market pricing.
Minimizing waste
Every milligram of peptide that degrades before you can use it is wasted money. The three biggest sources of waste are:
Poor storage: Leaving reconstituted vials at room temperature accelerates degradation. Always refrigerate immediately.
Reconstituting too early: Only reconstitute a vial when you are ready to start using it. Unreconstituted powder lasts much longer than reconstituted solution.
Syringe dead space: Standard syringes leave a small amount of solution in the needle hub after each injection. Over 10 draws from a vial, this dead space waste can add up to 0.3-0.5mL, which represents a meaningful amount of peptide. Low dead space syringes reduce this waste significantly.
Other vial sizes: 5mg and 20mg reconstitution
While this guide focuses on 10mg vials, retatrutide also comes in other sizes. The math works the same way, just with different numbers.
5mg vial reconstitution
The most practical volume for a 5mg vial is 1mL of bacteriostatic water, creating a 5mg/mL concentration. This matches the recommended concentration for 10mg vials reconstituted with 2mL, so the dosing charts above apply directly. The only difference is that a 5mg vial lasts half as many weeks.
20mg vial reconstitution
For 20mg vials, adding 2mL of bacteriostatic water creates a 10mg/mL concentration. Adding 4mL creates a 5mg/mL concentration. Researchers at higher maintenance doses often prefer 20mg vials because they last longer and reduce the frequency of reconstitution.
The reconstitution process, storage requirements, and injection techniques remain identical regardless of vial size. Only the math changes.
Frequently asked questions
Can I use regular sterile water instead of bacteriostatic water?
Technically yes, but it is not recommended for multi-dose vials. Sterile water lacks the preservative (benzyl alcohol) that prevents bacterial growth. If you must use sterile water, plan to use the entire vial within 24-48 hours. For any protocol requiring multiple draws over weeks, bacteriostatic water is the standard and the safe choice.
What happens if I add the wrong amount of water?
Adding the wrong amount does not ruin the peptide. It changes the concentration, which changes how much liquid you need to draw per dose. If you added 3mL instead of 2mL, your concentration is 3.33mg/mL instead of 5mg/mL. Simply recalculate your draw volumes using the formula above. The peptide calculator can help you figure out the new volumes instantly.
How do I know if my retatrutide has gone bad after reconstitution?
Visual inspection is your first line of defense. A degraded solution may appear cloudy, contain floating particles, or change color from clear to yellowish. If the solution looks the same as it did on day one, it is likely still good. Additionally, if you notice reduced effects at a dose that previously worked well, degradation is a possible cause.
Can I travel with reconstituted retatrutide?
Yes, but it requires a cold chain. Use an insulated travel case with ice packs to maintain 2-8 degrees Celsius during transport. Never check reconstituted peptides in airline luggage where temperature is not controlled. Keep it in your carry-on with the ice packs. For short trips (a few hours), a simple insulated lunch bag with a frozen ice pack works well.
Is 10mg the best vial size for beginners?
For most researchers, 10mg is an excellent starting vial size. It provides enough peptide for 5-10 weeks at starting doses of 1-2mg, which covers the entire initial escalation phase. The 5mg vial works too but runs out faster. Larger vials (20mg+) make more sense once you have reached maintenance doses and confirmed retatrutide works well for your research goals.
Should I reconstitute the entire vial at once or split it?
Always reconstitute the entire vial. Adding water to half the powder creates an inconsistent solution where some portions are more concentrated than others. Once the lyophilized cake is partially dissolved, there is no way to accurately divide the remaining powder. One vial, one reconstitution, full dissolution.
How many weeks will a reconstituted vial last before it expires?
With bacteriostatic water and proper refrigerator storage, most researchers use reconstituted retatrutide within 2-4 weeks. The peptide does not suddenly become useless at day 28, but potency gradually decreases after reconstitution. For the best results, plan your reconstitution timing so you use the full vial within 3 weeks.
What syringe size should I use for drawing and injecting?
Use a standard U-100 insulin syringe for injecting. A 1mL (100 unit) syringe handles all doses reconstituted at 5mg/mL up to 5mg per injection. For the initial reconstitution process (adding the water), a larger 3mL syringe with a separate needle is more practical. The syringe dosage guide covers measurement techniques in greater detail.
External resources
For researchers serious about optimizing their peptide protocols, SeekPeptides offers the most comprehensive resource available, with evidence-based guides, proven protocols, dosing calculators, and a community of thousands who have navigated these exact questions. Whether you are reconstituting your first vial or fine-tuning an advanced multi-peptide protocol, the tools and guidance you need are all in one place.
In case I do not see you, good afternoon, good evening, and good night. May your reconstitutions stay sterile, your concentrations stay accurate, and your protocols stay consistent.