Feb 27, 2026

What if the real reason your tirzepatide injections hurt, bruise, or leave lumps has nothing to do with the medication itself? What if it comes down to where exactly on the thigh you are placing that needle? Most guides tell you to inject in the thigh. They stop there. No anatomy. No landmarks. No explanation of what separates a smooth, painless injection from one that leaves a bruise the size of a quarter. That gap in guidance is why so many people dread their weekly tirzepatide dose when, in reality, thigh injections can be the most comfortable option available. The front and outer thigh offer a generous area of subcutaneous tissue, easy access without contortion, and absorption rates that clinical research confirms are comparable to the abdomen. For people who rotate between multiple injection sites, the thigh is often the most practical starting point. SeekPeptides members consistently report that once they learn proper thigh technique, including the right zone, angle, and depth, their injection site reactions drop dramatically. This guide covers every detail you need, from the exact anatomical landmarks to step-by-step technique, troubleshooting common problems, and building a rotation schedule that keeps your skin healthy for the long term.
Why the thigh is one of the best injection sites for tirzepatide
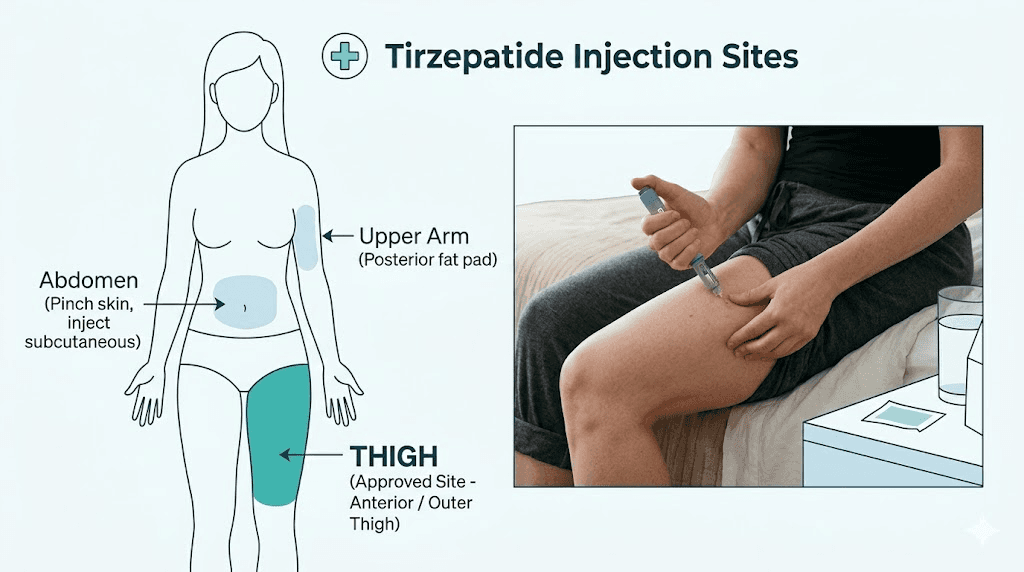
Three sites are approved for subcutaneous tirzepatide injections: the abdomen, the front of the thigh, and the back of the upper arm. All three deliver the medication effectively. But the thigh has characteristics that make it uniquely suited for self-injection, especially for people just starting their tirzepatide protocol.
First, visibility. You can see exactly what you are doing when injecting into the thigh. The abdomen works well too, but the upper arm requires a second person or awkward angles. The thigh sits right there in front of you while seated, fully visible, fully accessible.
Second, surface area. The anterior and lateral thigh provide a large zone of injectable tissue stretching from above the knee to below the hip. That generous space matters because proper GLP-1 injection technique requires rotating within the same general region, and the thigh gives you plenty of room to move around without reusing the same spot twice.
Third, comfort. Clinical trial NCT04050670 examined tirzepatide absorption at different sites and found something interesting. Thigh injections nearly halved the rate of nausea compared to abdominal injections. While the total drug exposure remained comparable across all three sites, the thigh produced fewer acute gastrointestinal side effects in the study participants. That finding alone makes it worth considering for anyone struggling with GI-related side effects.
The thigh also tends to have a consistent subcutaneous fat layer in most body types, making it easier to achieve the correct injection depth. People who are leaner sometimes struggle with abdominal injections because the fat layer there can be thin, increasing the risk of accidental intramuscular injection. The thigh, particularly the outer and front portions, typically maintains a reliable subcutaneous layer even at lower body fat percentages.
Understanding thigh anatomy for safe injection
Knowing exactly where to place the needle separates a confident injector from a nervous one. The thigh is not one uniform zone. Different areas have different tissue depths, nerve densities, and proximity to blood vessels. Getting the anatomy right means less pain, fewer bruises, and better absorption of your tirzepatide dose.
The target zone: anterior and lateral thigh
The ideal injection zone is the front (anterior) and outer (lateral) surface of the thigh. Imagine dividing your thigh into thirds from hip to knee. The middle third is the sweet spot. This region overlies the vastus lateralis muscle and has a consistent layer of subcutaneous fat between the skin and the muscle beneath.
Stay away from the inner thigh entirely. The medial surface contains major blood vessels and nerves that run close to the surface. Injecting there increases the risk of hitting a blood vessel, which causes bruising, or irritating a nerve, which causes sharp pain that radiates down the leg.
The top third of the thigh sits too close to the hip joint and the bony prominence of the greater trochanter. The bottom third gets too close to the knee, where the tissue thins out and the kneecap creates an uneven surface. Stay in the middle.
How deep is the subcutaneous layer?
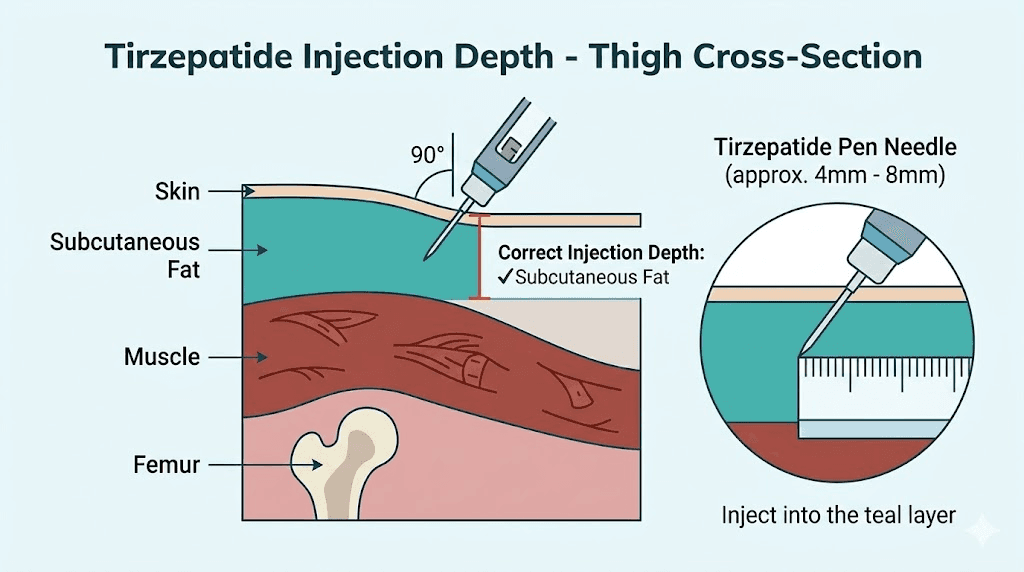
Subcutaneous injections target the fatty tissue layer between the skin and the muscle. In the middle third of the anterior thigh, this layer typically ranges from 5mm to 15mm in most adults. That depth varies based on body composition, which is why injection technique adjustments matter.
For people with more subcutaneous fat, the layer may be 15-20mm or deeper, making it nearly impossible to accidentally inject into muscle even at a 90-degree angle. For leaner individuals, the subcutaneous layer may only be 5-8mm, which means a 45-degree angle and skin pinching become essential to avoid hitting the muscle.
Injecting into muscle instead of subcutaneous fat changes the absorption rate. Intramuscular injection leads to faster absorption, which can increase the intensity of side effects like headaches and gastrointestinal issues. It can also cause more pain at the injection site because muscle tissue has more nerve endings than fat.
Blood vessels and nerves to avoid
The lateral circumflex femoral artery runs between the rectus femoris and the vastus lateralis in the upper portion of the thigh. This is one reason the middle third is safer than the upper third. By staying in the middle zone and targeting the outer surface, you minimize the chance of encountering significant blood vessels.
Small capillaries exist everywhere, and occasionally hitting one is unavoidable. That causes minor bruising that resolves within a few days. But hitting a larger vessel can produce a hematoma, a raised, tender collection of blood under the skin that takes longer to heal. Proper landmarking prevents this.
The femoral nerve runs along the anterior medial thigh. Avoiding the inner thigh keeps you well clear of this nerve and its branches. If you ever feel a sharp, electric-like pain during injection, stop immediately. That sensation usually indicates needle contact with a nerve. Remove the needle, choose a different spot at least 2-3 centimeters away, and try again.
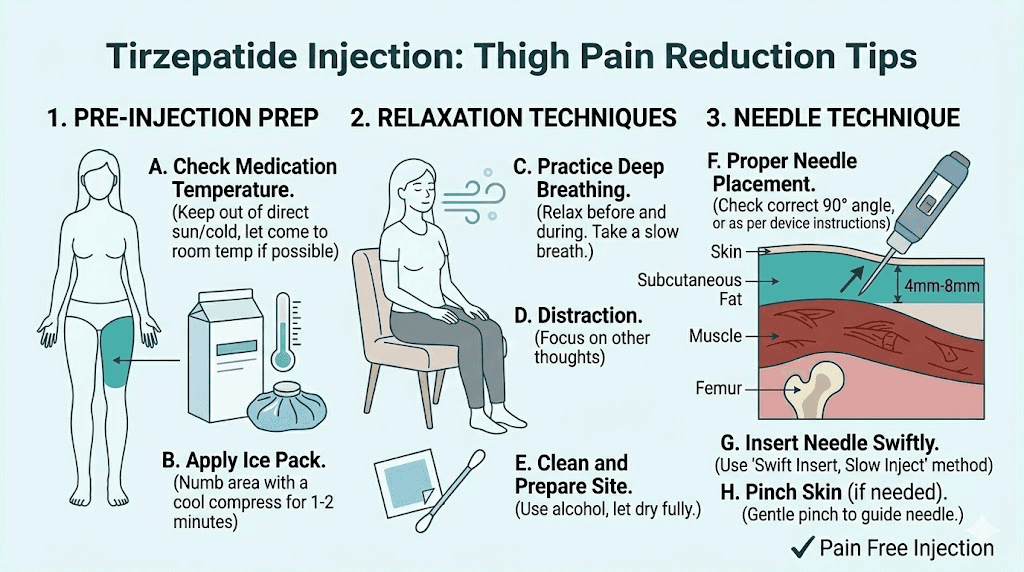
Step-by-step thigh injection technique
Good technique is the difference between an injection you barely feel and one that leaves a bruise, a lump, or a sting that lasts for hours. Follow these steps exactly. They apply whether you are using a pre-filled pen or drawing from a reconstituted vial with a syringe.
Step 1: Gather your supplies
Before you begin, have everything within reach. Nothing ruins injection confidence like scrambling for an alcohol swab with a loaded syringe in your other hand.
You will need your tirzepatide (either a pre-filled pen or a drawn syringe), an alcohol prep pad, a cotton ball or small gauze pad, and a sharps disposal container. If you are using a vial, you will also need your bacteriostatic water and appropriate syringe with needle (typically 27-30 gauge, 1/2 inch for most adults).
Let the medication reach room temperature if it has been refrigerated. Cold medication stings more going in. Remove it from the refrigerator about 15-30 minutes before injection. Do not microwave it, run it under hot water, or use any rapid warming method. Just let it sit on the counter. Check the color and clarity of the solution. It should be clear and colorless to slightly yellow. If it looks cloudy, has particles, or has changed color significantly, do not use it.
Step 2: Choose your injection spot
Sit down in a comfortable position. A chair, couch, or bed edge all work. The key is having your thigh relaxed, not tensed. A relaxed muscle beneath the injection site makes everything more comfortable.
Look at the front and outer surface of your thigh. Find the midpoint between your hip bone and your kneecap. This is the center of your target zone. You can inject anywhere within about a hand-width above or below that midpoint, staying on the front or outer surface.
Check your injection log. Where did you inject last time? Site rotation is critical, so choose a spot at least 2-3 centimeters away from your last injection site. If you injected in the right thigh last week, consider the left thigh this week. Or move to a different spot on the same thigh.
Inspect the skin. Do not inject into areas that are bruised, red, irritated, scarred, or have hard lumps beneath them. Choose clean, smooth, healthy skin.
Step 3: Clean the site
Tear open the alcohol prep pad. Starting at the center of your chosen injection spot, wipe outward in a circular motion, covering an area about 2 inches in diameter. This cleans bacteria from the injection site and reduces infection risk.
Let the alcohol dry completely. This takes about 30 seconds. Do not blow on it or wave your hand over it. Injecting into wet alcohol stings because the alcohol gets carried under the skin by the needle. Waiting those 30 seconds makes a meaningful difference in comfort.
Do not touch the cleaned area again before injecting.
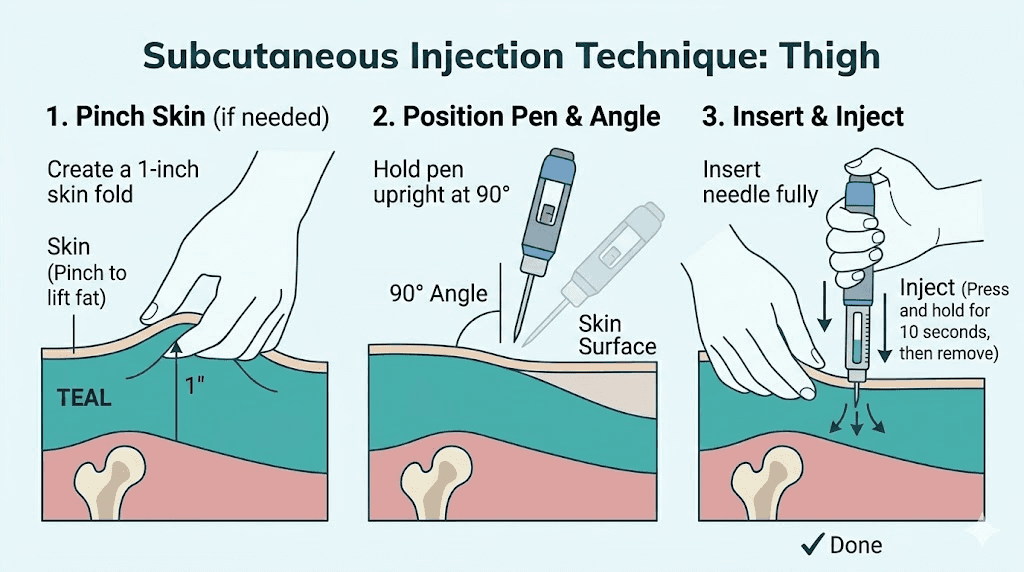
Step 4: Pinch and inject
With your non-dominant hand, gently pinch about 1-2 inches of skin and subcutaneous tissue at the injection site. Lift it away from the underlying muscle. This creates a tent of tissue that ensures the needle enters the subcutaneous layer rather than going too deep.
Hold the syringe or pen in your dominant hand. If you have a moderate to high amount of subcutaneous fat on the thigh, insert the needle at a 90-degree angle (straight in). If you are lean with less subcutaneous tissue, use a 45-degree angle to reduce the chance of hitting muscle.
Insert the needle with a smooth, confident motion. Hesitation causes more pain because slow needle entry stimulates more nerve endings. Think of it like removing a bandage. Quick is better.
Once the needle is fully inserted, inject the medication slowly and steadily. Pushing the plunger too fast forces the fluid into the tissue rapidly, creating pressure that causes stinging and can lead to lump formation. Aim for about 5-10 seconds per injection. Some people count slowly to ten.
Step 5: Remove and apply pressure
After injecting the full dose, wait 5-10 seconds before removing the needle. This allows the medication to disperse slightly and reduces the chance of it leaking back out through the needle track.
Remove the needle at the same angle you inserted it. Do not twist or jiggle the needle during removal.
If you see a small drop of blood or medication at the injection site, press gently with the cotton ball or gauze. Do not rub. Rubbing can push medication out of the subcutaneous layer and increase bruising. Just hold gentle pressure for 10-15 seconds.
Dispose of the needle immediately in your sharps container. Never recap used needles.
Thigh vs abdomen vs upper arm: which site is best?
This question comes up constantly, and the honest answer depends on individual factors. Clinical data shows all three sites deliver equivalent total drug exposure over the course of a week. The differences lie in convenience, comfort, and side effect profiles.
What the clinical research shows
Eli Lilly conducted a randomized, three-period crossover study (NCT04050670) with approximately 54 participants receiving a single 5mg tirzepatide dose at each of the three injection sites. The results showed broadly comparable systemic exposure across abdomen, thigh, and upper arm.
Peak concentration (Cmax) was modestly higher with abdominal injection, meaning the medication reaches its highest blood level slightly faster when injected in the stomach. However, the total area under the curve (AUC), which represents overall drug exposure, remained comparable regardless of site.
The most clinically interesting finding was the difference in tolerability. Thigh injections produced roughly half the rate of nausea compared to abdominal injections. For anyone dealing with GLP-1 medication side effects, that difference is significant.
Practical comparison
Factor | Thigh | Abdomen | Upper arm |
|---|---|---|---|
Self-injection ease | Excellent (full visibility) | Good (accessible) | Difficult (need help) |
Surface area for rotation | Large (both thighs) | Large (wide area) | Small (limited zone) |
Pain level | Low to moderate | Low | Moderate |
Bruising tendency | Moderate | Low to moderate | Moderate to high |
Absorption speed | Slightly slower peak | Fastest peak | Slightly slower peak |
Nausea incidence | Lower | Higher | Moderate |
Best for beginners | Yes | Yes | No |
Many people find their preferred site after trying all three over several weeks. The abdomen is the most popular choice overall because of easy access and typically lower pain. But the thigh is the best option for people who experience significant nausea, prefer clear visibility of the injection, or have limited subcutaneous fat in the abdominal area.
For those comparing different GLP-1 medications, the injection site principles are similar. The best injection site for semaglutide follows the same general guidelines, and retatrutide injection site selection uses the same three approved locations.
If you are considering switching between medications, understanding injection technique at each site gives you flexibility. Guides on switching from tirzepatide to semaglutide or switching to retatrutide cover the dosing transitions, but the injection technique itself stays consistent regardless of the medication.
Common thigh injection problems and how to fix them
Even with good technique, things occasionally go wrong. Most thigh injection problems are minor and resolve on their own. But knowing what to expect, and what to do when something unexpected happens, takes the anxiety out of the process.
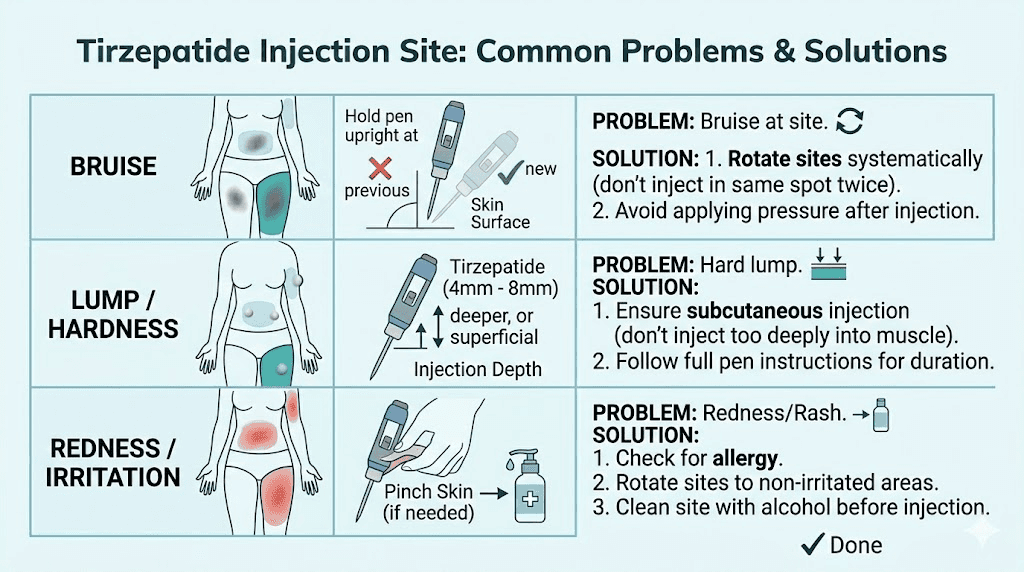
Bruising at the injection site
Bruises happen when the needle nicks a small blood vessel beneath the skin. This can occur even with perfect technique because the capillary network is invisible from the surface. A small bruise (dime-sized or smaller) after a thigh injection is normal and resolves within 3-7 days.
To minimize bruising, do not rub the injection site after removing the needle. Apply gentle, steady pressure with gauze for 10-15 seconds instead. Ice the area for 5-10 minutes after injection if you tend to bruise easily. Blood thinners, aspirin, fish oil, and vitamin E supplements all increase bruising tendency, so be aware of what you are taking.
If bruising is large (larger than a quarter), painful beyond tenderness, or does not fade within two weeks, consult a healthcare provider. While rare, a larger hematoma may need evaluation.
Lumps or hard spots under the skin
Firm lumps, nodules, or hardened areas near injection sites can develop for several reasons. The most common is injecting too quickly, which creates a pocket of medication that absorbs slowly and forms a temporary nodule. Injecting slowly over 5-10 seconds largely prevents this.
Repeated injection in the same exact spot causes lipohypertrophy, a thickening of the subcutaneous fat tissue that creates permanent or semi-permanent bumps. This is the number one reason injection site rotation matters. Lipohypertrophy does not just look and feel bad. It actually reduces medication absorption by up to 25%, meaning you may not be getting the full benefit of your prescribed dose.
If you notice a hard spot developing, avoid that area entirely for at least 4-6 weeks. The tissue usually recovers, but continued injection into affected areas makes it worse.
Pain during or after injection
Some discomfort is normal, but injection should not be significantly painful. If your thigh injections consistently hurt, consider these factors.
Cold medication stings more. Let it warm to room temperature before injecting. A tensed thigh muscle creates resistance. Sit down, relax the leg, and let the muscle go soft before inserting the needle. A dull needle (common with thinner gauges that bend easily) drags through tissue instead of cutting cleanly. Never reuse needles.
Hitting the muscle beneath the subcutaneous layer causes deeper pain. If your injection hurts more than a surface sting, you may need to adjust your angle to 45 degrees or ensure you are pinching enough tissue. This is especially important for leaner individuals who may not have a thick fat layer over the thigh.
Certain tirzepatide compound formulations can cause more injection site irritation than others. The B12 combination, the glycine blend, and the methylcobalamin variant each have slightly different pH levels that can affect comfort at the injection site.
Bleeding after needle removal
A drop or two of blood at the injection site is completely normal. It means the needle passed through a small capillary. Apply gentle pressure with gauze and do not rub. The bleeding stops within seconds to a minute.
If blood pools or continues beyond a minute, you may have hit a slightly larger vessel. Apply firm pressure for 2-3 minutes. This happens more often in the thigh than the abdomen because the thigh has a denser vascular network in some areas. Staying in the middle third of the outer thigh minimizes this risk.
Medication leaking back out
Sometimes after removing the needle, a small amount of clear fluid appears at the injection site. This is medication tracking back along the needle path. It represents a minimal loss that does not significantly affect your dose.
To prevent it, wait a full 10 seconds after injecting before removing the needle. Some people find that applying gentle pressure with a cotton ball immediately after needle removal also helps. If this happens consistently, try injecting at a slightly different angle so the entry track is not straight.
Building a thigh injection rotation schedule
Rotation is not optional. It is the single most important habit for long-term injection site health. Using the same spot repeatedly leads to tissue changes that affect how well the medication works and how comfortable the injections feel.
Why rotation matters more than most people realize
Lipohypertrophy, the thickened, lumpy tissue that forms from repeated injection in the same spot, is more than a cosmetic issue. Research on insulin users (who inject daily and provide the most extensive data on injection site complications) shows that medication absorption from lipohypertrophic tissue can be reduced by 25% or more. The tissue becomes less vascularized, meaning less blood flow reaches the area to carry the medication into systemic circulation.
For a weekly tirzepatide injection, the risk is lower than daily injections. But over months and years of treatment, even weekly injections in the same spot accumulate. People who plan to stay on tirzepatide long-term, which includes most users seeking sustained weight loss results, need a rotation strategy from the beginning.
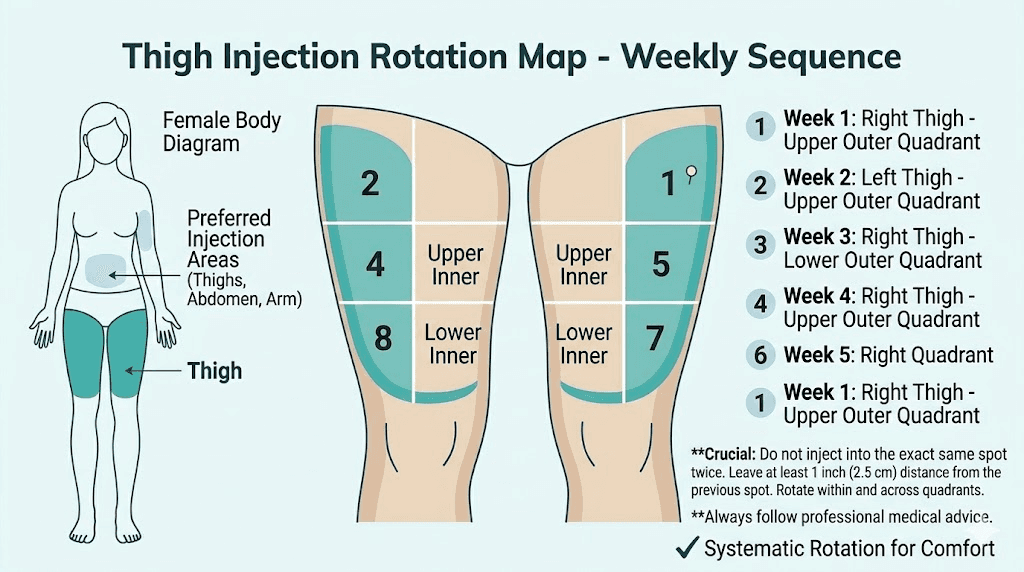
The four-zone thigh rotation system
Divide each thigh into four quadrants based on two lines. One line runs horizontally at the midpoint between hip and knee, dividing the injection zone into upper and lower halves. The other line runs vertically down the middle of the front/outer surface, dividing it into front and outer sections.
This gives you four zones per thigh and eight zones total across both legs.
Week 1: Right thigh, upper-outer quadrant
Week 2: Left thigh, upper-outer quadrant
Week 3: Right thigh, lower-front quadrant
Week 4: Left thigh, lower-front quadrant
Week 5: Right thigh, upper-front quadrant
Week 6: Left thigh, upper-front quadrant
Week 7: Right thigh, lower-outer quadrant
Week 8: Left thigh, lower-outer quadrant
After eight weeks, the cycle restarts. Each spot has had seven weeks to rest before the next injection. That recovery time is more than sufficient to prevent tissue changes.
Adding abdomen and arm for maximum rotation
For even better rotation, alternate between all three approved sites. A common pattern is thigh, abdomen, thigh, abdomen, rotating left and right within each region. This provides twelve or more unique injection zones and virtually eliminates the risk of overusing any single spot.
Some people avoid the upper arm because it requires assistance. That is fine. A two-site rotation between thigh and abdomen, switching left and right, provides eight distinct zones. That is more than enough for a weekly injection.
Tracking your rotation
Keep a simple log. It does not need to be complicated. A note on your phone, a small notebook, or even a calendar marking "RT" (right thigh), "LT" (left thigh), "RA" (right abdomen), etc. works perfectly. The goal is consistency, not complexity.
If you are using SeekPeptides tracking tools, you can log your injection site along with your dose, timing, and any side effects. Over time, this data reveals patterns. Maybe your right thigh consistently bruises more than your left. Maybe abdominal injections cause more anxiety-related symptoms. That information helps you optimize your rotation for comfort.
Tips to reduce pain and discomfort with thigh injections
Nobody looks forward to sticking a needle in their leg. But with the right approach, thigh injections can be nearly painless. These tips come from clinical guidance, nursing best practices, and the collective experience of thousands of self-injectors.
Temperature management
Cold medication causes more discomfort than room temperature medication. The temperature difference between refrigerated solution and body tissue creates a localized reaction that manifests as stinging or burning. Remove your tirzepatide from the refrigerator 15-30 minutes before injection. Do not exceed 30 minutes for stability reasons, but that window is enough to bring the solution closer to room temperature.
Conversely, numbing the injection site with ice for 30-60 seconds before injecting reduces pain perception. The ice temporarily dulls the nerve endings in the skin. Apply an ice cube wrapped in a thin cloth, remove it, quickly clean with alcohol, let the alcohol dry, and inject. The numbing effect lasts about a minute, which is plenty of time for the injection itself.
Needle selection matters
If you are drawing from a vial, you have control over needle selection. Thinner needles (higher gauge numbers) cause less pain. A 30-gauge needle is noticeably more comfortable than a 25-gauge needle. The trade-off is that thinner needles are slower to draw up medication and slightly more fragile.
For most compounded tirzepatide injections, a 27-30 gauge needle with 1/2 inch length works well for the thigh. Use one needle to draw up the medication and a fresh needle to inject. Drawing through the rubber stopper of a vial dulls the tip, and a dull needle hurts more going through skin.
Relaxation technique
A tense thigh muscle creates resistance that the needle must push through. The muscle also presses against the subcutaneous tissue from below, reducing the available fat layer and increasing the chance of intramuscular injection.
Sit down. Let your leg hang naturally or rest it flat. Take a breath. Wiggle your toes to confirm the quadriceps is not clenched. Then inject. People who inject while standing or with a bent, tensed leg consistently report more discomfort.
Speed and pressure
Insert the needle quickly. A fast, decisive insertion passes through the pain-sensitive skin layer in a fraction of a second. Slow insertion drags the needle through nerve-rich tissue, stimulating more pain receptors along the way.
Push the medication in slowly. Fast injection creates a sudden bolus of fluid in the subcutaneous tissue, which causes pressure, stinging, and sometimes lump formation. Count to 10 as you depress the plunger. This distributes the medication more evenly through the tissue.
Quick needle in, slow medication delivery. That combination produces the least discomfort.
Distraction techniques
This one sounds simplistic, but it works. Watch television, listen to a podcast, or have a conversation while injecting. Pain perception is partially attention-dependent. People who focus intently on the needle report more discomfort than those who minimize their attention to it.
Some people also find that pressing firmly near (but not at) the injection site with a finger for a few seconds before inserting the needle provides competing sensory input that reduces pain perception. This is called the gate control theory of pain, and it has solid scientific backing.
When to avoid injecting in the thigh
The thigh is excellent for most people most of the time. But certain situations call for choosing a different site.
Skin conditions at the injection site
Never inject into skin that shows signs of damage or disease. This includes eczema patches, psoriasis plaques, sunburned skin, open wounds, infected areas, or skin with significant scarring. These conditions alter the subcutaneous tissue architecture and can affect medication absorption. They also increase infection risk.
If you have a temporary skin issue on one thigh (a rash, scrape, or bruise from exercise), simply switch to the other thigh or use the abdomen as an alternative site.
Very low body fat
People with very low body fat percentages (typically below 10-12% for men or 18-20% for women) may not have sufficient subcutaneous tissue on the thigh for reliable subcutaneous injection. In this population, the abdomen often retains more subcutaneous fat than the thigh and may be the better choice.
If you are lean and must use the thigh, always pinch the skin, use a 45-degree angle, and consider a shorter needle (3/8 inch instead of 1/2 inch) to reduce intramuscular injection risk.
Post-exercise timing
Avoid injecting into a thigh muscle that has just been exercised. Physical activity increases blood flow to the working muscles, which can accelerate absorption of subcutaneously injected medication in ways that are unpredictable. If you have just completed a leg workout, either wait 2-3 hours for blood flow to normalize or choose a different injection site like the abdomen.
This applies to tirzepatide users focused on body composition changes who train legs frequently. Planning injection timing around your workout schedule ensures consistent absorption.
Certain medical conditions
People with peripheral neuropathy in the legs may have reduced sensation that makes it difficult to judge injection depth and placement correctly. Those with poor circulation in the lower extremities (peripheral vascular disease) may experience altered absorption rates. And anyone with lymphedema affecting the legs should avoid thigh injections on the affected side.
If you have any of these conditions, discuss injection site selection with your healthcare provider before establishing a routine.
Needle gauge, length, and syringe selection for thigh injections
The hardware matters almost as much as the technique. Using the wrong needle gauge, length, or syringe type can cause unnecessary pain, poor absorption, and wasted medication.
Needle gauge: finding the sweet spot
Gauge measures needle thickness, and the numbering is counterintuitive. Higher gauge numbers mean thinner needles. For subcutaneous tirzepatide injections in the thigh, the optimal range is 27-30 gauge.
A 27-gauge needle is the most commonly recommended. It balances comfort (thin enough to be relatively painless) with practicality (wide enough to draw medication without excessive time). This is the standard for most GLP-1 self-injections.
A 29-30 gauge needle is thinner and causes less sensation during insertion. However, drawing up medication takes longer, and these needles bend more easily. They work best for people who are needle-sensitive and are willing to accept slower preparation time for less insertion pain.
A 25-gauge needle is thicker than ideal for subcutaneous injection. It was historically common but has been largely replaced by thinner options. If 25-gauge is all you have, it works, but expect slightly more discomfort.
Needle length for the thigh
The goal is reaching the subcutaneous layer without going through it into muscle. For the thigh specifically:
1/2 inch (12.7mm): The most versatile length for thigh injections. Works well for most adults with average to above-average subcutaneous fat. At a 90-degree angle with a skin pinch, this length reliably reaches the subcutaneous layer without penetrating muscle in most body types.
5/8 inch (15.9mm): Can be used safely by people with more subcutaneous tissue, but at 90 degrees in leaner individuals, this length may reach muscle. If using a 5/8-inch needle on the thigh, always inject at 45 degrees unless you have substantial subcutaneous fat.
3/8 inch (9.5mm): Ideal for very lean individuals or for those who want extra assurance they are staying in the subcutaneous layer. The shorter length means less tissue penetration but may not reach deep enough for people with thick subcutaneous layers.
Syringe volume
Match your syringe volume to your dose. A 1mL (100 unit) insulin syringe works for most tirzepatide dosing ranges. The smaller the syringe relative to the dose volume, the more accurate your measurement will be. If your dose is 0.25mL, using a 0.5mL syringe gives you better resolution on the markings than a 1mL syringe.
Some people prefer a 0.3mL (30 unit) syringe for very small doses during the microdosing phase. The finer graduation marks make it easier to measure precise amounts, which matters more at lower doses where small errors represent a larger percentage of the total dose.
Understanding absorption rates from the thigh
How quickly and completely your body absorbs tirzepatide from the thigh affects everything from appetite suppression timing to overall effectiveness. Understanding these pharmacokinetics helps you set realistic expectations.
Peak concentration timing
After subcutaneous injection in the thigh, tirzepatide typically reaches peak blood concentration (Cmax) within 24-72 hours. The exact timing varies based on individual factors including blood flow to the injection site, subcutaneous tissue thickness, and metabolic rate.
Thigh injections may produce a slightly lower and later peak compared to abdominal injections. This is because the abdomen generally has higher blood flow to the subcutaneous tissue, pulling medication into systemic circulation faster. The practical impact is minimal. Over the full week between doses, total exposure is comparable.
This slightly gentler absorption curve from the thigh may actually explain the lower nausea rate found in clinical research. A more gradual rise in blood levels could reduce the sharp peak that triggers GI side effects in sensitive individuals. If you have been struggling with nausea from side effects, switching from abdomen to thigh is worth trying.
Factors that affect thigh absorption
Subcutaneous fat thickness: Thicker fat layers generally mean slower absorption because the medication has more tissue to diffuse through before reaching blood vessels. This is not necessarily bad. Slower absorption means a more gradual, sustained release.
Exercise: Physical activity involving the legs increases blood flow to the thigh, which can temporarily accelerate absorption. Timing your injection away from leg workouts maintains consistency.
Temperature: Warm conditions (hot bath, heating pad on the thigh) increase local blood flow and absorption speed. Cold conditions decrease it. Maintaining normal conditions at the injection site keeps absorption predictable.
Injection depth: Medication injected into muscle absorbs faster than subcutaneous medication. This is why hitting the correct layer matters. Inconsistent depth means inconsistent absorption, which means inconsistent results week to week.
Does injection site affect weight loss outcomes?
The short answer is no. Over the course of treatment, total drug exposure drives weight loss outcomes, not peak levels or absorption speed from individual injections. Whether you inject in the thigh, abdomen, or arm, your weight loss trajectory should be comparable.
However, site consistency matters. If you constantly switch sites, the absorption pattern changes weekly, which can create variable appetite suppression and inconsistent side effect profiles. This inconsistency sometimes leads people to think the medication has stopped working when the issue is actually variable absorption from inconsistent technique.
Find a site that works for you. Use it consistently. Rotate within that region. That approach produces the most predictable results.
Special considerations for compounded tirzepatide and the thigh
Compounded tirzepatide often comes in different concentrations and formulations compared to branded products. These differences can affect the thigh injection experience.
Injection volume differences
Compounded tirzepatide concentrations vary between compounding pharmacies. Some supply 5mg/mL, others 10mg/mL, and some provide even higher concentrations. This means the volume you inject for the same dose can differ significantly.
Lower concentration formulations require injecting more fluid. A 5mg dose at 5mg/mL concentration is 1mL. The same dose at 10mg/mL is 0.5mL. Larger injection volumes create more pressure in the subcutaneous tissue, which can cause more discomfort and a higher chance of lumps or the medication leaking back out.
For the thigh specifically, injection volumes above 0.5mL benefit from an even slower injection speed. Count to 15 or 20 instead of 10. This gives the tissue time to accommodate the fluid without excessive pressure buildup. If your dose volume is over 1mL, consider splitting the injection into two sites.
Formulation additives
Many compounded tirzepatide formulations include additional ingredients like vitamin B12, glycine, vitamin B6, or niacinamide. These additives can affect the pH and osmolality of the solution, which influences injection site comfort.
B12-containing formulations tend to have a slightly different color (often pinkish or reddish) and can cause a mild stinging sensation at the injection site that pure tirzepatide does not produce. If you experience this, the thigh may actually be a better choice than the abdomen because the thigh tends to have less sensory sensitivity to the pH-related stinging.
Storage and handling impact on injection comfort
Improperly stored compounded tirzepatide can develop particulates, pH changes, or degradation products that irritate injection sites. Always check that your vial has been stored correctly, within its expiration date, and properly refrigerated.
If a previously comfortable injection suddenly causes burning, redness, or significant irritation at the thigh injection site, the medication itself may be the issue rather than your technique. Check the temperature exposure history and shelf life status of your current vial.
Thigh injection technique for different body types
One size does not fit all when it comes to injection technique. Body composition directly affects how you should approach thigh injections for optimal results and comfort.
For people with more subcutaneous tissue
If you carry more body fat, particularly in the thighs, you have several advantages. The subcutaneous layer is thicker, making it nearly impossible to accidentally inject into muscle. You have more surface area for rotation. And the extra cushioning typically means less pain.
Use a 90-degree angle. A half-inch needle will land comfortably in the subcutaneous layer. You may not even need to pinch the skin, though doing so is still good practice. Inject with confidence knowing the anatomy is working in your favor.
One consideration for people with a larger thigh circumference is needle length. Ensure the needle you are using is long enough to fully penetrate the skin and reach the subcutaneous layer. Very short needles (3/8 inch) may not deposit medication deep enough if the skin is thick.
For lean or athletic individuals
Lower body fat means a thinner subcutaneous layer. For lean individuals, particularly those with muscular thighs from training, the margin between subcutaneous and intramuscular injection narrows.
Always pinch the skin to lift the subcutaneous tissue away from the muscle. Use a 45-degree angle instead of 90 degrees. Choose a shorter needle (3/8 to 1/2 inch). Target the outer thigh rather than the front, as the outer surface typically maintains more subcutaneous fat even in lean individuals.
If you are actively working on body composition with tirzepatide and tracking your results, be aware that as you lose weight, your subcutaneous fat layer changes. Technique adjustments may be needed as your body composition shifts over the course of treatment.
For older adults
Aging affects skin thickness, subcutaneous tissue distribution, and healing capacity. Older adults may have thinner skin that is more prone to bruising. The subcutaneous layer may be less uniform, with areas of tissue thinning alternating with areas of normal thickness.
Use gentle skin pinching. Choose a thinner gauge needle (29-30 gauge) for less skin trauma. Apply light pressure after injection for 15-20 seconds to minimize bruising. Rotate sites meticulously because older skin takes longer to recover from repeated injection trauma.
Injection timing and your thigh: when is the best time?
The time of day you inject does not change how effectively tirzepatide works, but it can affect your comfort and your experience with side effects.
Morning vs evening injections
Morning injections mean any initial side effects (nausea, headache, fatigue) peak during the day when you are awake and can manage them. Evening injections shift those peaks to overnight, which some people prefer because they sleep through the worst of it.
The timing principles that apply to semaglutide also apply to tirzepatide. Consistency matters more than the specific time. Pick a day and approximate time and stick with it.
Relationship to meals
Injecting on a full stomach vs an empty stomach does not affect subcutaneous absorption. However, if tirzepatide causes nausea for you, injecting after a light meal may reduce that effect because the nausea stacks on top of any existing stomach emptiness. People who follow a specific tirzepatide diet plan often find that timing their injection after their largest meal minimizes GI discomfort.
Consistency of injection day
Tirzepatide is a once-weekly medication. The prescribing information allows flexibility. You can inject on the same day each week or adjust by up to 3 days if needed. If you take your injection a day early occasionally, the impact is minimal.
What you want to avoid is significant inconsistency. Going 5 days one week and 10 days the next creates fluctuating blood levels that can worsen side effects and reduce effectiveness. If you are concerned about whether your medication is working optimally, read our guide on why some people do not lose weight on tirzepatide for a comprehensive troubleshooting approach.
Thigh injection technique for different tirzepatide delivery methods
How you inject in the thigh depends partly on what delivery device you are using. Pre-filled pens, vials with syringes, and newer delivery formats each have nuances.
Pre-filled pen (Mounjaro KwikPen)
The pen simplifies the process considerably. The needle is integrated, the dose is pre-set, and you do not need to draw up medication. For thigh injection with a pen, uncap the pen, place it against the cleaned injection site at a 90-degree angle, press and hold the injection button, and wait for the click that indicates delivery is complete. Hold for an additional 10 seconds before removing.
The pen needle is typically 29-31 gauge and designed for subcutaneous delivery across all body types. The main consideration with the pen and the thigh is ensuring you are placing it on the correct zone (front or outer, middle third) and not pressing too hard. Excessive pressure pushes the needle deeper, potentially into muscle.
Vial and syringe (compounded tirzepatide)
Drawing from a vial gives you more control but requires more skill. You choose the needle gauge and length, control the injection speed, and manage the injection angle yourself. For the thigh, follow the step-by-step technique outlined earlier in this guide.
The additional step with vials is proper reconstitution if using lyophilized (freeze-dried) tirzepatide. Incorrect reconstitution can result in particle formation, incorrect concentration, or pH changes that all affect injection comfort. Always follow the proper mixing ratios for your specific vial.
Oral and alternative forms
For people who find injections difficult despite best technique, it is worth knowing that oral tirzepatide is in development and some formulations already exist. Tirzepatide drops and tablet formulations may eventually provide needle-free alternatives, though subcutaneous injection remains the standard with the most clinical data behind it.
Long-term thigh injection site health
If you plan to use tirzepatide for months or years (and most protocols are designed for extended use to maintain sustained weight loss), long-term site health becomes a priority. The thigh is resilient, but it needs care.
Monthly skin assessment
Once a month, examine your thigh injection zones closely. Look for:
Texture changes: Thickened, rubbery, or spongy areas indicate early lipohypertrophy. Stop injecting in these zones and give them 8-12 weeks to recover.
Color changes: Persistent redness or darkening of the skin at injection sites suggests chronic irritation. Expand your rotation to give affected areas more rest time.
Lumps or nodules: Firm bumps that do not resolve within 2-3 weeks after injection may indicate scar tissue formation. Avoid these areas and consult a healthcare provider if they persist or grow.
Sensitivity changes: Areas that have become either numb or excessively tender compared to surrounding skin may have nerve irritation. Rotate away from these zones.
Preventing tissue damage
Strict rotation is the foundation of prevention. Beyond that, using the thinnest needle that works for your situation, injecting slowly, and never forcing medication into tissue that feels resistant all protect long-term tissue health.
Some people apply a thin layer of vitamin E oil or moisturizer to injection sites between doses (not at the time of injection) to maintain skin health. While there is no clinical data specifically supporting this practice for injection sites, general dermatological principles suggest that well-moisturized skin recovers faster from minor trauma.
When the thigh stops working as well
After extended use, some people notice that a particular thigh zone seems to absorb medication less effectively. Their appetite suppression does not kick in as reliably, or they feel like they are not getting the same effect from the same dose. This can be a sign of subcutaneous tissue changes even if visible signs are minimal.
The solution is simple. Give that zone an extended rest (8-12 weeks minimum) and use other sites during the break. When you return to it, the tissue has usually recovered enough to provide normal absorption again. If it does not, that zone may need to be permanently removed from your rotation.
SeekPeptides provides comprehensive protocol guidance including injection site management strategies for members on long-term GLP-1 therapy. Access to detailed tracking tools and expert guidance helps members maintain optimal injection technique throughout their entire treatment course.
Traveling with tirzepatide: thigh injection on the go
Maintaining your injection schedule while traveling adds logistical challenges. The thigh is often the easiest site to use while away from home because it requires no special positioning or assistance.
Practical travel tips for thigh injections
Wear shorts or loose-fitting pants on injection day for easy thigh access. In a hotel room, sit on the bed or a chair and follow your normal thigh injection routine. The thigh does not require you to lift your shirt (like the abdomen) or find a mirror (like the arm), making it the most private and convenient option in shared spaces.
Pack your supplies in a travel-appropriate kit that includes alcohol swabs, your medication with proper cold storage, fresh needles, and a portable sharps container. If flying, carry your medication in your carry-on bag with a prescription label visible.
Time zone changes can shift your injection schedule. If traveling across multiple time zones, it is acceptable to adjust your injection timing by up to a day to accommodate the new schedule. Just return to your regular day once you are settled.
Comparing thigh injection experience across GLP-1 medications
If you have experience with other GLP-1 receptor agonists, the thigh injection technique is largely the same. But there are subtle differences worth noting.
Tirzepatide vs semaglutide thigh injections
Both medications are subcutaneous injections targeting the same tissue layer. The side effect profiles differ, but the injection technique does not. Semaglutide pens may have different needle gauges than tirzepatide pens, and compounded formulations of each may have different volumes for equivalent doses. But the site selection, skin preparation, angle, and rotation strategies are identical.
If you are switching between the two (covered in detail in our conversion guide), you do not need to change your injection site habits. What worked for semaglutide thigh injections works for tirzepatide and vice versa.
Tirzepatide vs retatrutide thigh injections
Retatrutide, the newer triple-agonist in development, follows the same subcutaneous injection protocols. Retatrutide injection technique mirrors tirzepatide injection technique. The thigh remains an excellent site for retatrutide, and the same rotation strategies apply.
For people considering retatrutide vs tirzepatide, the injection experience itself is comparable. The major differences lie in mechanism and efficacy, not in how you administer the medication.
Frequently asked questions
Where exactly on the thigh should I inject tirzepatide?
Inject into the front or outer surface of the thigh, in the middle third between hip and knee. Avoid the inner thigh (contains major blood vessels and nerves), the area too close to the knee, and the area near the hip bone. The middle third of the anterior and lateral thigh provides the safest zone with the most consistent subcutaneous tissue depth.
Is it better to inject tirzepatide in the thigh or stomach?
Both sites are equally effective for drug delivery. Clinical research shows comparable total drug exposure regardless of site. The thigh may produce less nausea based on one clinical study, while the abdomen may provide slightly faster peak absorption. Choose whichever site is most comfortable and convenient for you, and rotate between both for optimal long-term tissue health.
Why does my thigh bruise after tirzepatide injection?
Bruising occurs when the needle passes through a small blood vessel under the skin. This is normal and happens even with perfect technique. To reduce bruising, apply gentle pressure (do not rub) for 10-15 seconds after injection, ice the site if needed, and be aware that blood thinners and supplements like fish oil increase bruising tendency. Most bruises resolve within 3-7 days.
Can I inject tirzepatide in the same thigh every week?
You can use the same thigh weekly, but you must rotate the exact injection spot within that thigh. Each injection should be at least 2-3 centimeters away from the previous one. Better practice is alternating between right and left thigh, or rotating between all three approved sites (thigh, abdomen, upper arm) to maximize tissue recovery time.
What angle should I inject tirzepatide in the thigh?
For most adults with average subcutaneous fat, inject at a 90-degree angle (straight in) while pinching the skin. If you are lean with less subcutaneous tissue on the thigh, use a 45-degree angle to avoid reaching the muscle layer. The correct angle depends on your body composition and needle length.
Why does my tirzepatide thigh injection hurt more than my stomach injection?
The thigh has slightly denser nerve distribution in some areas compared to the abdomen. Ensure your thigh muscle is fully relaxed (sit down, do not tense the leg), use room-temperature medication, and insert the needle quickly. If pain is consistent, try different spots within the thigh zone. The outer thigh is generally less sensitive than the front. Also check your needle gauge, as thinner needles (29-30 gauge) reduce discomfort significantly.
How do I know if I accidentally injected tirzepatide into the muscle instead of fat?
Signs of intramuscular injection include deeper, more intense pain during injection, increased bruising, faster onset of side effects (nausea, headache appearing within hours instead of the typical timeline), and a sore, tender feeling in the thigh muscle for a day or more after injection. If this happens consistently, switch to a 45-degree angle, use a shorter needle, and always pinch the skin when injecting in the thigh.
Should I avoid thigh injections if I exercise my legs regularly?
You do not need to avoid the thigh entirely. Just do not inject into a thigh muscle immediately after a leg workout. Wait 2-3 hours for blood flow to normalize. Alternatively, schedule your injection on a non-leg-training day. Many people who follow a comprehensive protocol find that injecting in the morning on a rest day works best.
Can I use numbing cream before injecting tirzepatide in the thigh?
Yes. Over-the-counter lidocaine cream (4-5%) applied to the injection site 30-60 minutes before injection effectively numbs the skin. Cover it with plastic wrap to improve absorption. Wipe it off completely before cleaning with alcohol and injecting. While most people find this unnecessary once they develop good technique, it can be helpful for people who are especially needle-sensitive or just starting out.
How long should I wait between injecting in the same spot on my thigh?
Give each specific spot at least 4-6 weeks before reusing it. With the eight-zone rotation system described in this guide (four zones per thigh, alternating legs), each spot gets 7 weeks of rest between injections. That is more than sufficient for complete tissue recovery.
External resources
For researchers serious about optimizing their peptide protocols, SeekPeptides offers the most comprehensive resource available, with evidence-based guides, proven protocols, and a community of thousands who have navigated these exact questions.
In case I do not see you, good afternoon, good evening, and good night. May your injections stay painless, your rotation stay consistent, and your thigh tissue stay healthy.