Dec 24, 2025

Peptide injections are simple, nearly painless, and safe when done properly.
Millions of people inject themselves daily - diabetics with insulin, fertility patients with hormones, athletes with peptides.
Within a week, you'll wonder why you were ever nervous.
This guide covers everything you need to know about peptide injections. You'll learn where to inject, what needles to use, proper sterile technique, how to avoid common mistakes, and how to make injections as painless as possible. By the end, you'll be confident enough to do your first injection.
Let's start with understanding the type of injection used for peptides.
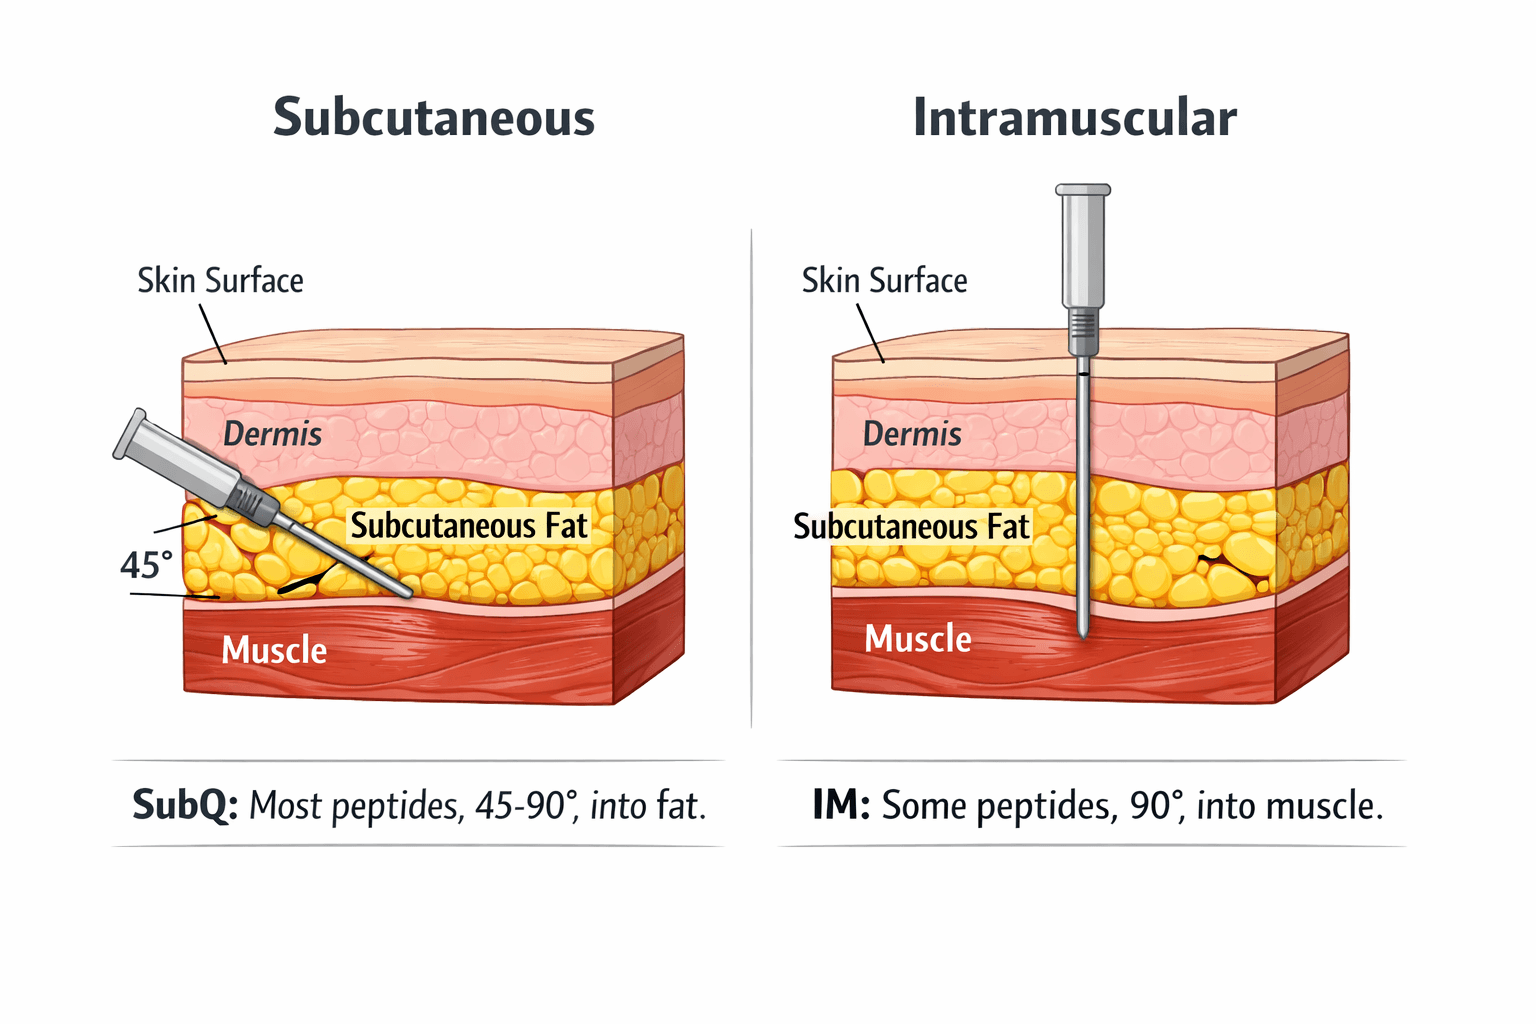
Subcutaneous vs intramuscular: which peptides use which
Most peptides are injected subcutaneously (under the skin, into fat layer). Some can be injected intramuscularly (into muscle). The type matters.
Subcutaneous (SubQ) injections
What it is: Injecting into the fat layer between skin and muscle. This is what you'll do for 95% of peptides.
Why subcutaneous:
Slower absorption (good for most peptides)
Less painful than intramuscular
Easier to do yourself
More injection site options
Lower risk of hitting blood vessels or nerves
Peptides typically used SubQ:
BPC-157
TB-500
CJC-1295
Ipamorelin
Semaglutide, Tirzepatide
AOD 9604
Most growth hormone peptides
Healing and recovery peptides
Needle angle: 45-90 degrees depending on body fat
Intramuscular (IM) injections
What it is: Injecting directly into muscle tissue. Deeper injection than SubQ.
Why intramuscular:
Faster absorption
Can handle larger volumes
Some peptides work better IM
Peptides sometimes used IM:
TB-500 (can be either SubQ or IM)
BPC-157 near injury sites (sometimes IM)
Certain reconstituted peptides at higher volumes
Needle angle: 90 degrees, needle goes deeper
Which should you use?
For beginners: Start with subcutaneous. It's easier, less painful, and works for almost all peptides.
Follow peptide-specific guidance: Some peptides have research supporting one method over the other. Check our peptide-specific guides.
When in doubt: Subcutaneous is safer and works for virtually everything.
Supplies you need for peptide injections
Get the right equipment before your first injection.
Insulin syringes (all-in-one)
Best for peptide injections:
1ml (100 unit) insulin syringes
29-31 gauge needle (thinner = less pain)
1/2 inch length (perfect for SubQ)
Fixed needle (needle and syringe together)
Why insulin syringes:
Small, thin needles (nearly painless)
Precise measurement for small doses
Designed for SubQ injection
Disposable and sterile
Cheap ($15-25 for 100)
Where to buy:
Amazon (search "insulin syringes 31 gauge")
Walmart, CVS, Walgreens (pharmacy section)
Medical supply stores online
No prescription needed in most states
What to avoid:
Larger needles (22-25 gauge) - unnecessarily painful
Long needles (1+ inch) - too long for SubQ
Reusing needles - dull and dangerous
Alcohol swabs
Purpose: Sanitize injection site and vial tops
What to get:
70% isopropyl alcohol prep pads
Individually wrapped
Box of 100-200
Cost: $5-10 for large box
Sharps container
Purpose: Safe disposal of used needles
Options:
Purpose-built sharps container ($10-15, best option)
Heavy-duty plastic bottle with screw cap (laundry detergent bottle works)
Never dispose in regular trash (safety hazard)
When full: Check local regulations for sharps disposal. Many pharmacies accept sealed sharps containers.
Bacteriostatic water
Purpose: Reconstituting lyophilized (powder) peptides
What it is: Sterile water with 0.9% benzyl alcohol (prevents bacterial growth)
Where to get:
Research peptide suppliers
Medical supply companies
Amazon
How much: 30ml vial lasts months for most protocols
Storage: Room temperature, use within 28 days of opening
Use our peptide reconstitution calculator to determine exact amounts needed.
Optional but helpful
Insulin pen needles: If using pre-filled peptide pens (like some semaglutide options)
Band-aids: Occasionally get minor bleeding at injection site
Cotton balls: For applying pressure after injection
Cooler bag: For traveling with peptides
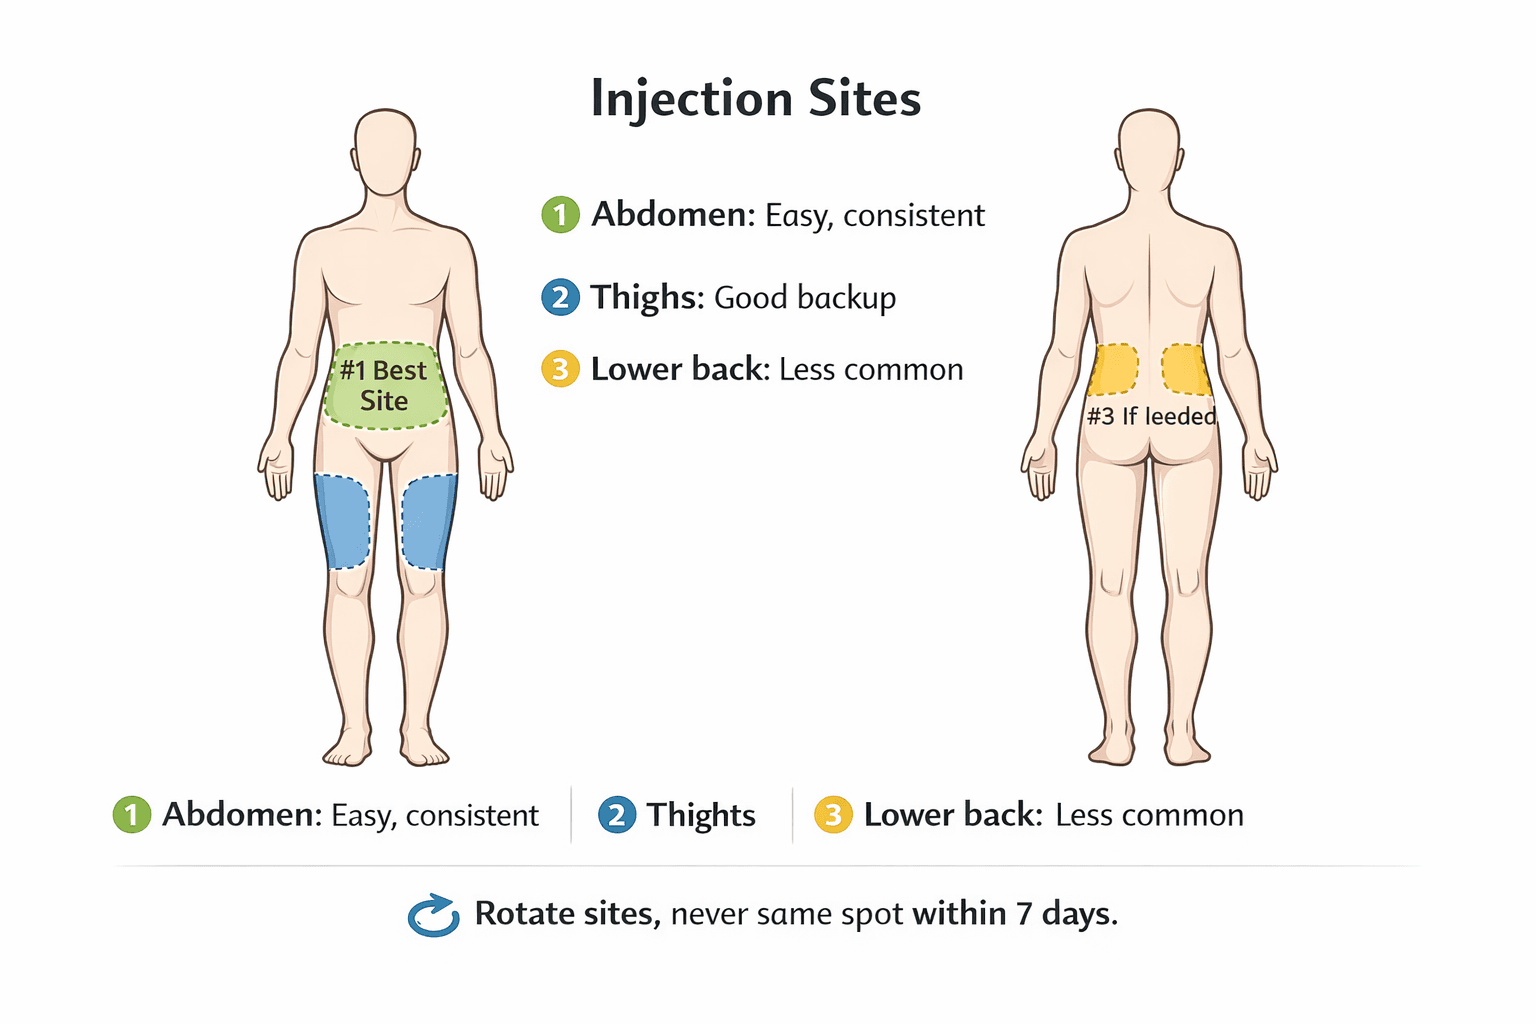
Best injection sites for subcutaneous peptides
Where you inject matters for comfort, absorption, and avoiding problems.
Abdomen (best for most people)
Location: 2+ inches away from belly button in any direction
Why it's best:
Plenty of subcutaneous fat on most people
Easy to reach yourself
Consistent absorption
Large area for rotation
Least painful for most people
How to inject:
Pinch skin to create fold
Insert needle at 45-90 degrees into fold
Inject slowly
Release pinch, remove needle
Tips:
Avoid area within 2 inches of navel (more nerves)
Rotate quadrants (upper right, upper left, lower right, lower left)
Stay away from old injection sites for 1-2 weeks
Thighs (outer)
Location: Outer middle third of thigh
Why it works:
Good subcutaneous fat layer
Easy to see what you're doing
Convenient if sitting
How to inject:
Sit down
Locate outer third of thigh (between hip and knee)
Pinch skin to create fold
Insert at 45-90 degrees
Tips:
Avoid inner thigh (more pain, blood vessels)
Stay on outer portion
Can alternate legs
Love handles / lower back
Location: Sides of lower back, where you'd pinch "love handles"
Why it works:
Usually good fat layer
Alternative if abdomen is overused
Some people find it less painful
How to inject:
Can be awkward to reach
May need to twist
Works but not first choice for most
Upper arms (back of)
Location: Back of upper arm (tricep area)
Why it works:
Good subcutaneous layer
Works if you're lean elsewhere
Challenge:
Hard to reach yourself
Difficult to pinch with one hand while injecting with other
Better for partner-assisted injections
Best sites ranked:
Abdomen (easy, consistent, lots of real estate)
Thighs (good alternative)
Love handles (if needed)
Arms (difficult solo)
Rotation strategy:
Have at least 8-10 injection sites you rotate through
Don't inject same spot more than once per week
Track sites if doing daily injections
Step-by-step: Your first peptide injection
Here's exactly how to do it, start to finish.
Preparation (before you inject)
Step 1: Gather everything
Reconstituted peptide vial (already mixed)
Alcohol swabs (2-3)
Insulin syringe (new, sterile)
Sharps container nearby
Band-aid (optional)
Step 2: Wash your hands
Soap and water, 20 seconds
Dry thoroughly
Don't skip this (infection prevention)
Step 3: Choose injection site
Abdomen recommended for first time
Locate spot 2+ inches from navel
Visually inspect (no cuts, bruises, or redness)
Drawing up the peptide
Step 4: Clean the vial
Wipe top of peptide vial with alcohol swab
Let air dry 10-15 seconds
Don't blow on it or wipe with anything else
Step 5: Draw air into syringe
Remove syringe from packaging
Pull plunger back to amount of peptide you're drawing
Example: If drawing 0.3ml peptide, pull to 30 units
This air will equalize pressure in vial
Step 6: Insert needle into vial
Remove cap from needle
Insert needle through rubber stopper on vial
Push air from syringe into vial (prevents vacuum)
Step 7: Draw peptide into syringe
Turn vial upside down (needle pointing up)
Pull plunger down to draw liquid into syringe
Draw slightly more than needed
Flick syringe to move air bubbles to top
Push plunger to expel air and get exact dose
Step 8: Remove needle from vial
Withdraw needle from vial
Set vial aside (recap and refrigerate)
Hold syringe pointing up (air at top)
Performing the injection
Step 9: Clean injection site
Wipe injection site with alcohol swab
Circular motion, starting from center
Let air dry 10-15 seconds (dry alcohol doesn't sting)
Step 10: Pinch skin
Use non-dominant hand
Pinch fold of skin at injection site
Should easily create 1-2 inch fold
Step 11: Insert needle
Hold syringe like a pencil or dart
Aim at 45-90 degree angle into pinched skin
Quick, confident insertion (hesitating hurts more)
Insert about 1/2 inch depth
Step 12: Inject peptide
Slowly push plunger down
Take 2-3 seconds to inject
Injecting too fast can cause burning sensation
Step 13: Withdraw needle
Release pinched skin
Pull needle straight out
Don't recap needle
Step 14: Apply pressure
Use clean cotton ball or finger
Apply gentle pressure to injection site
5-10 seconds
Apply band-aid if needed (usually not necessary)
Step 15: Dispose of needle
Drop syringe directly into sharps container
Never recap used needles (stick injury risk)
Don't leave needles lying around
After injection
What's normal:
Tiny pinprick mark
No bleeding or minimal drop
No pain or slight tenderness
Possible very small bump (goes away in minutes)
What's not normal (call doctor):
Significant bleeding that won't stop
Large, painful swelling
Increasing redness spreading from site
Signs of infection (heat, pus, severe pain)
First injection tip: It's completely normal to feel nervous. Take your time. You'll be comfortable by injection 3-4.
Common injection mistakes and how to avoid them
Learn from others' errors.
Mistake 1: Reusing needles
Why people do it: Save money, convenience
Why it's bad:
Needles dull after single use (more painful)
Risk of infection increases
Can introduce bacteria into peptide vial
Risk of bent needle breaking off in skin
Fix: Use new needle every time. They're cheap ($0.15-0.25 each).
Mistake 2: Injecting through clothing
Why people do it: Seems easier
Why it's bad:
Introduces bacteria from clothing into skin
Higher infection risk
Can't see injection site properly
Fibers can be pushed into skin
Fix: Always inject on clean, bare skin.
Mistake 3: Not rotating injection sites
Why people do it: Creature of habit, find one comfortable spot
Why it's bad:
Scar tissue builds up (lipohypertrophy)
Reduced absorption from scarred areas
Harder, more painful injections over time
Lumps form under skin
Fix: Rotate through at least 8-10 sites. Track in notes if needed.
Mistake 4: Injecting cold peptide
Why people do it: Peptides stored in refrigerator
Why it's uncomfortable:
Cold injection burns/stings
More painful than room temperature
Fix: Remove peptide from fridge 10-15 minutes before injection. Let warm to room temperature.
Mistake 5: Injecting too fast
Why people do it: Want to get it over with
Why it's bad:
Causes burning sensation
More painful
Can create pressure that causes leakage
Fix: Slow, steady injection over 2-3 seconds.
Mistake 6: Tense muscles during injection
Why people do it: Nervous, anticipating pain
Why it's bad:
Tense muscles make injection more painful
Harder to pinch skin properly
Fix: Take deep breath, relax area completely, exhale during insertion.
Mistake 7: Wrong needle angle
Why people do it: Confusion about technique
Why it's bad:
Too shallow: inject into skin layer (painful, poor absorption)
Too deep: hit muscle unintentionally (more painful)
Fix: 45-90 degrees for SubQ. When in doubt, 45 degrees works.
Mistake 8: Not checking for air bubbles
Why people do it: Rush, don't know it matters
Why it's bad:
Small bubbles = inaccurate dose (wasting peptide)
Large air bubbles theoretically could cause issues (extremely rare with SubQ)
Fix: Flick syringe, push air out before injection. Small tiny bubble is fine.
How to make injections painless (advanced techniques)
Go from tolerating injections to barely feeling them.
Technique 1: Ice the injection site
How: Apply ice pack to injection site for 1-2 minutes before injecting
Why it works: Numbs skin, reduces sensation
Best for: People with injection anxiety, painful sites
Technique 2: Distraction during insertion
How: Cough, pinch skin elsewhere, look away during insertion
Why it works: Nervous system can't process multiple sensations simultaneously
Best for: Nervous first-time injectors
Technique 3: Dart method (fast insertion)
How: Quick, confident insertion like throwing dart
Why it works: Hesitating and slow insertion actually hurts more
Note: This seems counterintuitive but works for most people
Technique 4: 31 gauge needles
How: Use thinnest available needles (31 gauge vs 29 gauge)
Why it works: Thinner needle = less tissue damage = less pain
Trade-off: Slightly slower injection (tiny needle)
Technique 5: Inject after shower
How: Inject after hot shower when skin is warm and relaxed
Why it works: Warm, relaxed skin is more comfortable
Technique 6: Perfect needle disposal immediately
How: Drop used syringe in sharps container without looking at it
Why it works: Psychological - you're not reminded of what you just did
Best for: People with needle anxiety
Technique 7: Room temperature peptide
How: Always let peptide warm to room temp before injection
Why it works: Cold liquid causes burning sensation
How long: 10-15 minutes out of fridge
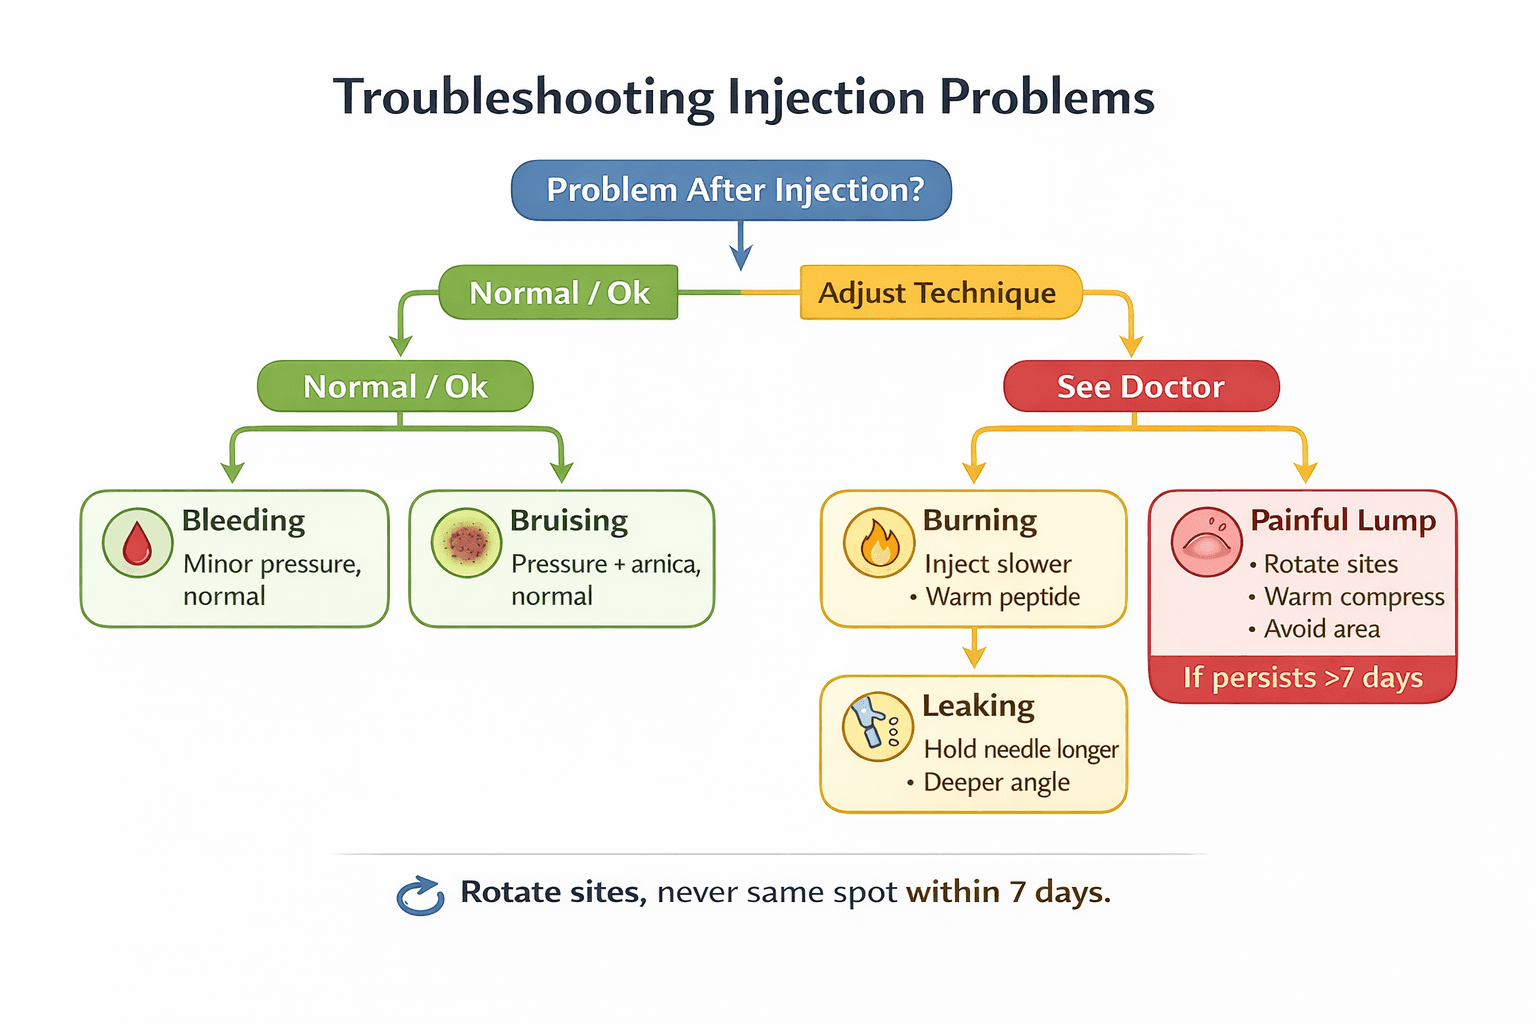
Troubleshooting injection problems
Common issues and solutions.
Problem: Bleeding after injection
Likely cause: Hit small blood vessel (normal, happens occasionally)
Solution:
Apply pressure for 30-60 seconds
Not dangerous, just annoying
Completely normal, happens to everyone sometimes
Prevention: Rotate sites (some areas more vascular)
Problem: Bruising
Likely cause: Fragile capillaries, hit small vessel
Solution:
Apply pressure immediately after injection
Use arnica gel if bruising bothers you
Will resolve on its own in days
Prevention:
Inject slowly
Don't massage area after injection
Avoid blood thinners near injection time if possible
Problem: Burning sensation during injection
Likely causes:
Injecting too fast (most common)
Cold peptide
Alcohol not fully dried
Solution:
Inject slower (2-3 seconds minimum)
Warm peptide to room temp
Let alcohol dry completely
Problem: Peptide leaking back out after injection
Likely cause:
Withdrew needle too quickly
Injected too shallow
Too much volume in one site
Solution:
Hold needle in place 2-3 seconds after injecting before withdrawing
Apply pressure immediately after withdrawal
Use deeper angle (closer to 90 degrees)
Prevention: Slow injection, pause before withdrawal
Problem: Painful lump at injection site
Likely causes:
Lipohypertrophy (scar tissue from overusing same site)
Injected too shallow (into skin instead of fat)
Reaction to peptide or bacteriostatic water
Solution:
Avoid that site for 2+ weeks
Warm compress
Massage gently if not painful
If doesn't resolve in week, consult doctor
Prevention: Rotate sites religiously
Problem: Can't get peptide into syringe
Likely cause: Vacuum in vial (no air pressure)
Solution:
Inject air into vial first (equal to amount you're drawing)
This equalizes pressure
Makes drawing smooth and easy
Problem: Needle feels dull/painful going in
Likely cause: Reused needle or defective needle
Solution:
Never reuse needles
If brand new needle feels dull, try different brand
Some batches occasionally defective
Peptide storage and handling best practices
Proper storage preserves peptide potency.
Before reconstitution (powder form)
Storage:
Refrigerator (2-8°C / 36-46°F) recommended
Freezer (-20°C / -4°F) for long-term storage
Cool, dark place minimum
Duration:
Refrigerated: 1-2 years typically
Frozen: 2+ years
Room temperature: Months (not ideal)
Handling:
Keep in original packaging (light protection)
Don't expose to heat
Don't shake vigorously
After reconstitution (liquid form)
Storage:
Refrigerator ALWAYS (2-8°C / 36-46°F)
Never freeze reconstituted peptides
Protect from light
Duration:
Most peptides: 28-30 days after reconstitution
Some stable longer (check specific peptide)
Bacteriostatic water limits bacterial growth
Handling:
Don't shake (gentle swirling if needed)
Always clean vial top before drawing
Keep refrigerated except 10-15 min before injection
Traveling with peptides
Short trips (under 6 hours):
Insulated cooler bag
Ice pack (not directly touching vials)
Totally fine for day trips
Longer travel:
Small cooler with ice packs
Check ice packs/replace as needed
Hotel mini-fridge for storage
Air travel:
Allowed in carry-on (don't check it)
TSA permits medical injections
Keep in original packaging if possible
Bring prescription or documentation (not required but helpful)
Signs peptide has gone bad
Visual indicators:
Cloudiness (should be clear)
Color change
Floating particles
Separation
Other signs:
Strange smell
Reduced effectiveness
Past expiration date
When in doubt: Discard it. Not worth risk with degraded peptide.
Special considerations for specific peptides
Different peptides have unique injection quirks.
BPC-157: Local vs systemic injection
Options:
Inject near injury site (may work better locally)
Inject systemically (abdomen, works throughout body)
Recommendation: Both work. Local injection may accelerate healing of specific injury.
Semaglutide/Tirzepatide: Larger volumes
Challenge: These often require larger volumes (0.5-1ml vs 0.1-0.3ml for other peptides)
Tips:
Use 1ml insulin syringes
May take slightly longer to inject (still 3-4 seconds)
Abdomen handles larger volumes best
TB-500: IM option
Note: TB-500 works both SubQ and IM
When to use IM:
Larger volumes
Some people prefer IM for TB-500
Not necessary, SubQ works fine
CJC-1295/Ipamorelin: Multiple daily injections
Challenge: Some protocols call for 2-3 injections daily
Strategy:
Create rotation schedule
Morning: right abdomen
Evening: left abdomen
Rotate quadrants over week
Use our BPC-157 calculator and TB-500 calculator for precise dosing.
The role of SeekPeptides in your injection journey
Proper injection technique is essential for results. Wrong doses waste peptides. Poor reconstitution reduces potency. Lack of knowledge leads to mistakes and anxiety.
SeekPeptides provides the tools you need to inject confidently and effectively.
Accurate dosing: Our peptide calculator ensures you know exactly how much to inject.
Reconstitution guidance: Our peptide reconstitution calculator tells you exactly how much bacteriostatic water to add and how to measure your doses after mixing.
Peptide-specific protocols: Our detailed guides on BPC-157, TB-500, and other peptides provide specific injection guidance for each compound.
AI-powered assistance: Get answers to your specific questions about injection technique, troubleshooting problems, and optimizing protocols.
You don't have to learn injection technique through trial and error. Use the resources that help thousands of people inject peptides safely and painlessly.
Final thoughts
Your first peptide injection is the hardest. The anticipation is worse than the reality. By your fifth injection, it'll feel routine. By your twentieth, you won't even think about it.
Start with proper supplies. Use the right technique. Rotate injection sites. Store peptides correctly. Fix mistakes early before they become habits.
Peptide injections are simple, safe, and nearly painless when done right. You're injecting into fat, not veins. The needles are tiny. Millions of people do this daily without problems.
Take your time on the first few. Follow the step-by-step guide. Don't skip preparation steps. Within a week, you'll wonder why you were ever nervous.
Your peptide results depend on consistent, proper injections. Master the technique, and everything else follows.
Related resources
In case I don’t see you, good afternoon, good evening, and good night. Take care of yourself. Use SeekPeptides