Jan 31, 2026

You have a vial of peptide powder sitting on your desk. Next to it, a bottle of bacteriostatic water. Between these two objects sits a process that will determine whether your research succeeds or fails. Get it right and every dose you draw will be precise, stable, and effective. Get it wrong and you will waste money, compromise your results, and spend weeks wondering why nothing is working.
That process is reconstitution. Mixing peptides with bacteriostatic water.
It sounds simple. And in many ways it is. But the details matter more than most guides let on. The angle of your needle, the speed of injection, the volume of water you choose, the way you dissolve the powder, even the temperature of the vials before you start. Each of these variables affects your final concentration, the stability of your solution, and the accuracy of every dose you pull from that vial for the next four weeks.
This guide covers every step of the process from start to finish. You will learn exactly how much bacteriostatic water to use for different peptides, how to calculate your concentration and dose in units, how to avoid the five mistakes that ruin most reconstitutions, and how to store your mixed peptides so they stay potent for as long as possible. Whether you are working with BPC-157, GHK-Cu, sermorelin, or any other research peptide, the fundamentals remain the same. SeekPeptides members rely on these exact protocols to get consistent, reproducible results from their research.
No guesswork. No wasted vials. Just clean technique and simple math.
What is bacteriostatic water and why does it matter
Before you touch a syringe, you need to understand what you are working with. Bacteriostatic water is sterile water that contains 0.9% benzyl alcohol. That small percentage of benzyl alcohol serves as a preservative. It inhibits the growth of bacteria inside the vial after you have punctured the rubber stopper with a needle. This preservative action is what makes bacteriostatic water the standard choice for peptide reconstitution.
Plain sterile water does not contain this preservative. Once you open a vial of sterile water and introduce a needle, bacteria can begin to multiply. That means sterile water is only appropriate for single-use applications where the entire contents are used immediately. For multi-dose peptide vials where you will be drawing doses over days or weeks, bacteriostatic water is the only responsible choice.
The 0.9% benzyl alcohol concentration keeps the solution safe for repeated use for up to 28 days after the first puncture. Some researchers push this to 30 days, but 28 is the conservative guideline supported by most pharmacological references. After that window, the preservative action may not be sufficient to prevent contamination, and you should discard any remaining solution.
There is also a third option you might encounter. Sodium chloride solution, sometimes called bacteriostatic saline or normal saline. This contains 0.9% sodium chloride plus the benzyl alcohol preservative. Some peptides reconstitute better in saline than plain water. But for the vast majority of research peptides, standard bacteriostatic water works perfectly. If you are unsure which solvent to use for a specific peptide, check the manufacturer documentation or consult the complete guide to peptide mixing water for detailed comparisons.
Why not just use sterile water
Cost is the usual answer people give when they skip bacteriostatic water. Sterile water is cheaper and more widely available. But the math does not work in your favor. A single vial of bacteriostatic water costs a few dollars and protects every dose you draw for nearly a month. If bacteria contaminate your peptide solution because you used sterile water for a multi-dose vial, you lose the entire vial of peptide. That peptide might have cost $30, $50, or $100. The savings on water become meaningless.
Beyond contamination risk, sterile water lacks the buffering effect that benzyl alcohol provides. Some researchers report that peptides reconstituted in sterile water degrade faster than those mixed with bacteriostatic water, even when stored at the same temperature. The mechanism is not fully established, but the preservative may offer a mild stabilizing effect on certain peptide bonds.
Use bacteriostatic water. Every time.
What you need before you start
Gather everything before you begin. Interrupting the process to hunt for supplies increases the chance of contamination. Here is your complete supply list.
Essential supplies:
Peptide vial (lyophilized powder)
Bacteriostatic water (multi-dose vial)
Insulin syringes (1 mL, 100-unit, 29-31 gauge) for drawing doses
Larger syringe with needle (3 mL syringe with 18-21 gauge needle) for reconstitution
Alcohol swabs or 70% isopropyl alcohol pads
Clean, flat work surface
Recommended additions:
Disposable gloves (nitrile preferred)
Sharps container for used needles
Pen and label for marking the vial with date and concentration
Calculator or the peptide reconstitution calculator
Two notes on syringes. You will use two different syringes during this process. The larger syringe with a bigger gauge needle is for transferring bacteriostatic water into the peptide vial. This makes it easier to draw the correct volume and inject it smoothly. The insulin syringe is for drawing individual doses after reconstitution. Its fine gauge and precise markings make it ideal for measuring small volumes accurately.
Never reuse syringes. Never reuse needles. A new sterile syringe costs pennies. Contaminating your peptide solution costs whatever the entire vial is worth, plus the time you have invested in your research protocol. The peptide vial research guide covers proper handling in more detail if you want additional context on best practices.
How much bacteriostatic water to add
This is the question everyone asks first. And the answer is both simple and nuanced.
You can technically add any amount of bacteriostatic water to any peptide vial. The peptide will dissolve regardless of whether you use 0.5 mL or 5 mL. What changes is the concentration of your solution. And concentration determines how many units you need to draw on your syringe to hit your target dose.
The formula is straightforward:
Concentration (mg/mL) = Peptide amount (mg) / Water volume (mL)
If you have a 5 mg vial and add 2 mL of bacteriostatic water, your concentration is 2.5 mg/mL. Every milliliter of solution contains 2.5 mg of peptide. On a 100-unit insulin syringe where 100 units equals 1 mL, each unit contains 0.025 mg (25 mcg) of peptide.
If you add 1 mL instead, the concentration doubles to 5 mg/mL. Each unit now contains 0.05 mg (50 mcg). You need fewer units per dose but each unit carries more peptide, leaving less room for error.
The peptide dosage calculator handles this math automatically. Enter your vial size, water volume, and desired dose, and it tells you exactly how many units to draw.
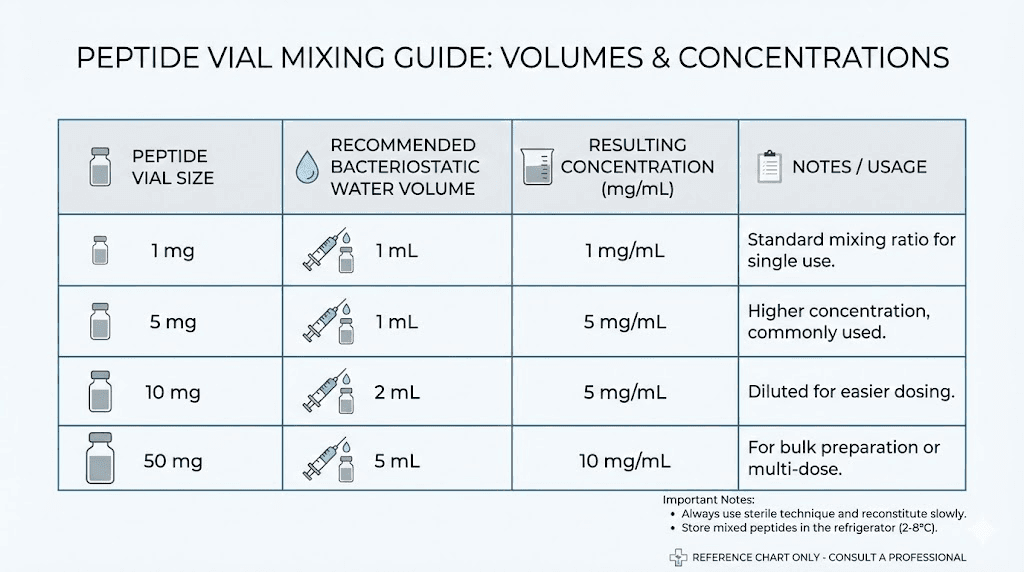
Recommended volumes by vial size
While you can use any volume, certain ranges work best for practical dosing. Here are the most common recommendations:
Vial Size | Recommended Water | Concentration | Units per 100 mcg |
|---|---|---|---|
1 mg | 1 mL | 1 mg/mL | 10 units |
2 mg | 1-2 mL | 1-2 mg/mL | 5-10 units |
5 mg | 2-3 mL | 1.67-2.5 mg/mL | 4-6 units |
10 mg | 3-5 mL | 2-3.33 mg/mL | 3-5 units |
15 mg | 3-5 mL | 3-5 mg/mL | 2-3.3 units |
50 mg | 2-5 mL | 10-25 mg/mL | 0.4-1 unit |
The sweet spot for most peptides and most protocols is a concentration that allows you to draw between 5 and 30 units per dose. Fewer than 5 units makes precision difficult because each unit represents a large percentage of your total dose. More than 30 units means larger injection volumes, which some researchers find uncomfortable or impractical.
Use the reconstitution calculator to find the volume that gives you a convenient number of units per dose for your specific protocol.
Peptide-specific reconstitution volumes
Different peptides have different typical dosing ranges, which means the ideal reconstitution volume varies. Here are guidelines for some of the most commonly researched peptides:
BPC-157 typically comes in 5 mg or 10 mg vials. For a 5 mg vial with a target dose of 250-500 mcg twice daily, adding 2 mL of bacteriostatic water creates a 2.5 mg/mL concentration. Each 250 mcg dose equals 10 units. Each 500 mcg dose equals 20 units. This is a clean, easy-to-measure setup. For 10 mg vials, 3-5 mL works well. The BPC-157 dosage calculator can run these numbers for any combination.
TB-500 vials are commonly 5 mg or 10 mg. Standard research protocols use 2-5 mg per dose, which is a much larger dose than BPC-157. For a 5 mg vial, adding 1-2 mL works because you will likely use the entire vial in one or two doses. The TB-500 dosage calculator helps with the specifics.
GHK-Cu often comes in 50 mg vials with daily doses around 1-2 mg. Adding 2 mL of water creates a 25 mg/mL concentration. Each 1 mg dose equals 4 units. Each 2 mg dose equals 8 units. That gives you 25-50 doses per vial, though you should use the reconstituted solution within 28 days. The GHK-Cu 50mg dosage guide walks through this in detail.
Ipamorelin and CJC-1295 typically come in 2-5 mg vials with doses of 100-300 mcg. For a 5 mg vial, 2 mL of water gives 2.5 mg/mL. A 200 mcg dose equals 8 units. Clean and simple. The CJC-1295 dosage calculator handles blended protocols as well.
Sermorelin vials range from 2 mg to 15 mg. Doses of 200-500 mcg are common. For a 5 mg vial, 2 mL gives a concentration of 2.5 mg/mL. A 300 mcg dose would be 12 units.
For weight loss peptides like semaglutide and tirzepatide, the dosing is very different. These are highly potent compounds used at microgram-to-milligram level doses that escalate over weeks. A 5 mg semaglutide vial reconstituted with 1.5 mL of water gives approximately 3.33 mg/mL. For a starting dose of 0.25 mg, you would draw about 7.5 units. The semaglutide dosage calculator handles the escalation math for you.
Step-by-step mixing process
Now for the actual process. Follow these steps exactly and you will have a perfectly reconstituted peptide every time.
Step 1: Let everything reach room temperature
Remove your peptide vial and bacteriostatic water from the refrigerator (if stored cold) and let them sit at room temperature for 15-30 minutes. Cold bacteriostatic water injected into a cold peptide vial can slow dissolution and may cause the peptide to clump rather than dissolve smoothly.
Do not heat either vial. Do not place them in warm water or near a heat source. Room temperature means 20-25 degrees Celsius (68-77 degrees Fahrenheit). Just let them sit on your work surface.
While you wait, this is a good time to calculate your target dosage and determine exactly how much bacteriostatic water you plan to add.
Step 2: Prepare your workspace
Wash your hands thoroughly with soap and water for at least 20 seconds. Put on nitrile gloves if you have them. Clear your work surface and wipe it down with 70% isopropyl alcohol or a disinfectant wipe.
Lay out all your supplies within easy reach. You want the peptide vial, bacteriostatic water, reconstitution syringe, alcohol swabs, and a flat surface where you can set the peptide vial upright while adding water.
Sterile technique is not optional. It is the foundation of everything that follows. Every peptide safety protocol starts with cleanliness, and cutting corners here is how people end up with contaminated solutions and ruined research.
Step 3: Remove caps and sterilize stoppers
Most peptide vials and bacteriostatic water vials come with a plastic flip-off cap covering the rubber stopper underneath. Remove these caps by popping them off gently. You will see the rubber stopper underneath.
Take an alcohol swab and firmly wipe the rubber stopper on the peptide vial. Press down and wipe across the entire surface for at least 10-15 seconds. Then do the same for the bacteriostatic water vial. Let the alcohol dry for 10-20 seconds. Do not blow on the stoppers to speed drying. Just wait.
This step eliminates surface bacteria that could be transferred into your solution when the needle punctures the rubber. It takes 30 seconds total and costs nothing. Skip it and you introduce a contamination risk that threatens every dose you draw from that vial.
Step 4: Draw bacteriostatic water into the syringe
Attach a needle to your reconstitution syringe if it is not already attached. A 21-23 gauge needle works well for this step because its larger bore allows water to flow easily without excessive force.
Here is where technique matters. Pull back the syringe plunger to fill the barrel with air equal to the amount of water you plan to draw. If you plan to draw 2 mL of water, pull back to the 2 mL mark. This air will be injected into the bacteriostatic water vial to equalize pressure.
Turn the bacteriostatic water vial upside down. Insert the needle through the rubber stopper. Inject the air into the vial. This creates positive pressure inside the vial, making it much easier to draw water out. Now, with the needle still in the inverted vial, pull back slowly on the plunger to draw the exact amount of bacteriostatic water you need.
Check for air bubbles in the syringe. If you see any, push the water back into the vial and draw again, or flick the syringe barrel gently to move bubbles to the top and push them out. Accurate volume measurement is critical. Even half a milliliter of difference changes your concentration and every dose that follows.
Remove the needle from the bacteriostatic water vial.
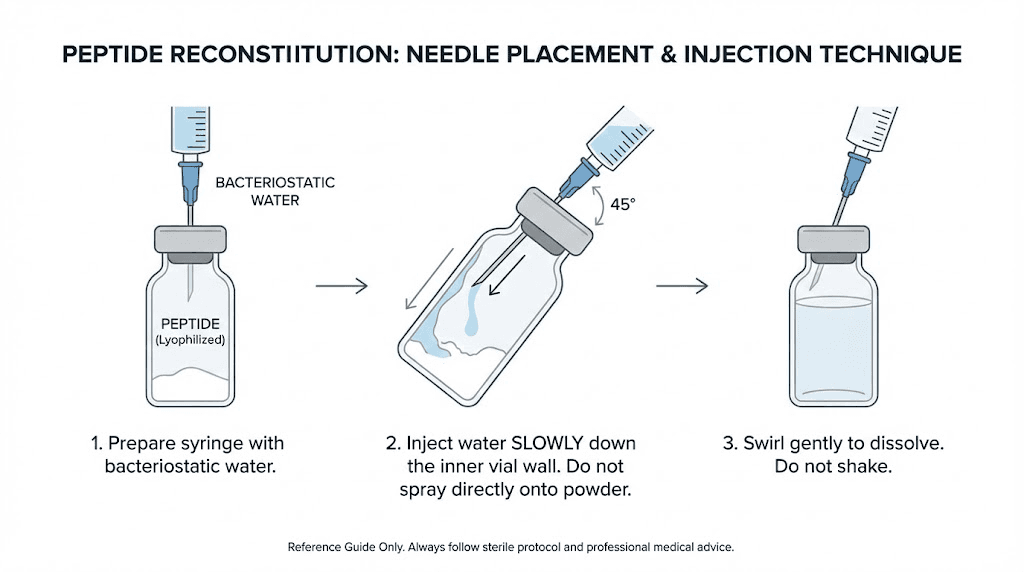
Step 5: Inject water into the peptide vial
This is the most important step. How you introduce the water to the peptide powder determines whether your peptide stays intact or gets damaged.
Do NOT squirt the water directly onto the powder.
Instead, hold the peptide vial at a slight angle, roughly 45 degrees. Insert the needle through the rubber stopper and aim the tip toward the inside wall of the glass vial. Press the plunger slowly, very slowly, letting the water trickle down the inside wall of the vial and pool at the bottom where it will gently reach the peptide powder.
This technique matters because peptides are fragile molecules. Shooting a stream of water directly onto the lyophilized cake can physically damage the peptide structure. It can also create excessive foam and bubbles that trap peptide molecules and make dissolution uneven. The slow, wall-method avoids both problems.
If you are working with a vacuum-sealed vial, you may notice the vacuum pulling the water in when you puncture the stopper. This is normal but can happen too fast. To control it, inject a small amount of air into the vial first (about 0.5 mL) through the needle before adding water. This equalizes the vacuum and gives you control over the flow rate.
Once all the water is in the vial, remove the needle. Do not remove and re-insert the needle multiple times, as each puncture creates a potential contamination pathway.
Step 6: Dissolve the peptide
With the water in the vial, you now need to dissolve the peptide powder completely. The solution should be clear, with no visible particles or clumps floating in it.
The best approach: do nothing.
Set the vial upright on your work surface and wait. Most peptides will dissolve on their own within 5-20 minutes. Some dissolve almost instantly. Others take longer. Watching the powder slowly disappear into the water is part of the process.
If after 15-20 minutes you still see undissolved powder, gently roll the vial between your palms. Do not shake it. Rolling creates a gentle swirling motion that encourages dissolution without the mechanical force that can break peptide bonds. Think of it like warming a brandy glass, a slow rotation that moves the liquid without violence.
Never shake the vial. This bears repeating because it is the single most common mistake in peptide reconstitution. Shaking creates foam, introduces air bubbles into the solution, and can physically denature the peptide molecules. A shaken peptide vial might look dissolved, but the peptide structure could be compromised, leading to reduced effectiveness. More on this in the common peptide mistakes guide.
Once the solution is completely clear, your peptide is reconstituted and ready for use. If the solution remains cloudy or has visible particles after 30 minutes of gentle rolling, something may be wrong with the peptide. Do not use a cloudy solution.
Step 7: Label and store
Before you put the vial away, label it. Write the following on a small piece of tape or label:
Peptide name
Concentration (mg/mL)
Date reconstituted
Expiration date (28 days from today)
Proper peptide storage after reconstitution means refrigeration at 2-8 degrees Celsius (36-46 degrees Fahrenheit). Place the vial upright in the refrigerator, ideally in the back where temperature is most stable. The door shelf experiences the most temperature fluctuation from opening and closing, so avoid storing peptides there.
Some light-sensitive peptides benefit from being wrapped in aluminum foil or stored in an opaque container. Epithalon and thymalin are particularly sensitive to light exposure. If you are unsure whether your peptide is light-sensitive, wrapping it costs nothing and provides an extra layer of protection. The peptide shelf life guide covers storage duration for specific compounds.
Understanding concentration and dose calculations
This section separates researchers who get consistent results from those who do not. If your concentration math is wrong, every single dose you draw will be wrong. There is no recovering from a calculation error at this stage.
Let us walk through the math step by step.
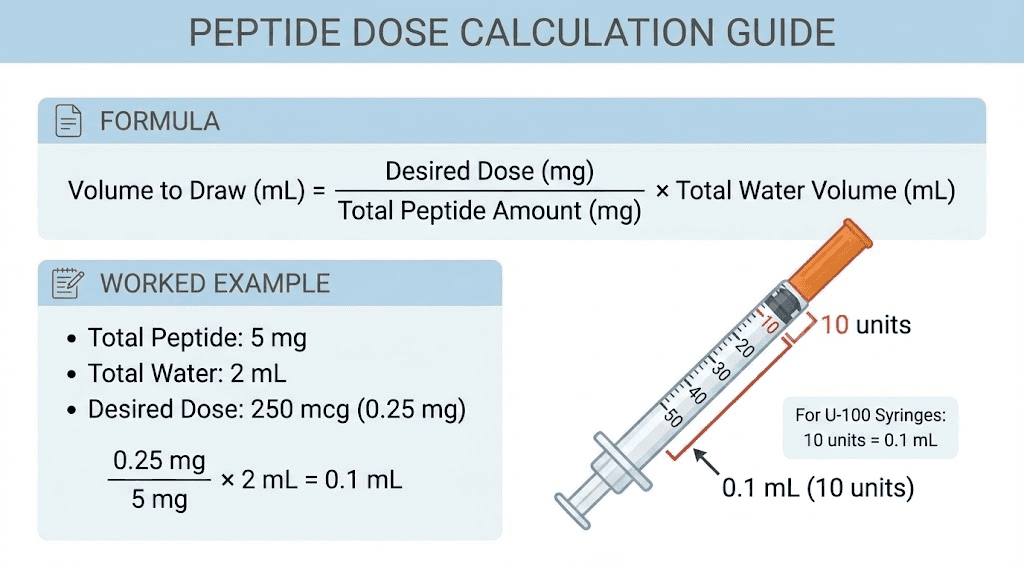
The basic formula
You already know the concentration formula:
Concentration = Peptide (mg) / Water (mL)
But what you really need to know is how many units to draw on your insulin syringe for a specific dose. Here is the complete chain of calculations:
Step 1: Calculate concentration
Concentration = Peptide amount (mg) / Water added (mL)
Step 2: Convert your desired dose to mg (if given in mcg)
Dose in mg = Dose in mcg / 1000
Step 3: Calculate the volume needed
Volume (mL) = Dose (mg) / Concentration (mg/mL)
Step 4: Convert volume to syringe units
Units = Volume (mL) x 100 (for a 100-unit/1 mL insulin syringe)
Worked example: BPC-157
Say you have a 5 mg vial of BPC-157. You add 2 mL of bacteriostatic water. You want a 250 mcg dose.
Step 1: Concentration = 5 mg / 2 mL = 2.5 mg/mL
Step 2: 250 mcg = 0.25 mg
Step 3: Volume = 0.25 mg / 2.5 mg/mL = 0.1 mL
Step 4: Units = 0.1 mL x 100 = 10 units
Draw to the 10-unit mark on your insulin syringe. That is 250 mcg of BPC-157.
Simple. But only if you do the math correctly. An error at any step cascades through the rest. If you accidentally added 3 mL of water instead of 2, your concentration is 1.67 mg/mL, not 2.5. Now 10 units gives you only 167 mcg instead of 250 mcg. That is a 33% underdose and you would never know unless you rechecked your math.
Worked example: semaglutide escalation
A 5 mg semaglutide vial reconstituted with 1.5 mL of bacteriostatic water gives a concentration of 3.33 mg/mL. The typical research protocol escalates doses:
Week | Dose | Volume | Units |
|---|---|---|---|
1-4 | 0.25 mg | 0.075 mL | 7.5 units |
5-8 | 0.5 mg | 0.15 mL | 15 units |
9-12 | 1.0 mg | 0.30 mL | 30 units |
13-16 | 1.7 mg | 0.51 mL | 51 units |
17+ | 2.4 mg | 0.72 mL | 72 units |
Notice how the units per dose climb as the dose escalates.
At the highest dose, you are drawing 72 units from a 100-unit syringe. That is still manageable but approaching the upper limit of what is practical. If you had used 2 mL of water instead of 1.5, the concentration would be lower (2.5 mg/mL) and your highest dose would require 96 units, nearly the entire syringe. At that point you are stretching the practical limits of a single draw. These are the kinds of considerations that make the initial water volume choice so important.
The semaglutide calculator accounts for escalation protocols automatically.
Worked example: GHK-Cu 50 mg vial
Large vials like the 50 mg GHK-Cu require special attention. Adding 2 mL to 50 mg gives a concentration of 25 mg/mL. For a 1 mg daily dose:
Volume = 1 mg / 25 mg/mL = 0.04 mL = 4 units
That is a very small draw. Four units on an insulin syringe is barely past the first major tick mark. Precision at this volume is challenging. Some researchers prefer to add more water (3-5 mL) to create a more dilute solution that requires a larger, easier-to-measure draw. With 5 mL of water, the same 1 mg dose equals 10 units, which is much easier to measure accurately.
The tradeoff is that more water means fewer total days per vial (you cannot exceed the 28-day reconstituted shelf life) and a higher volume per injection. But accuracy matters more than convenience. If you cannot reliably draw 4 units, use more water. The GHK-Cu injection guide walks through several reconstitution scenarios.
Unit conversion reference
Keep these conversions handy:
1 mL = 100 units (on a standard 100-unit insulin syringe)
0.1 mL = 10 units
0.01 mL = 1 unit
1 mg = 1000 mcg
0.1 mg = 100 mcg
0.01 mg = 10 mcg
Bookmark the SeekPeptides peptide calculator so you can verify your math before every dose. A 30-second calculation check prevents weeks of inaccurate dosing.
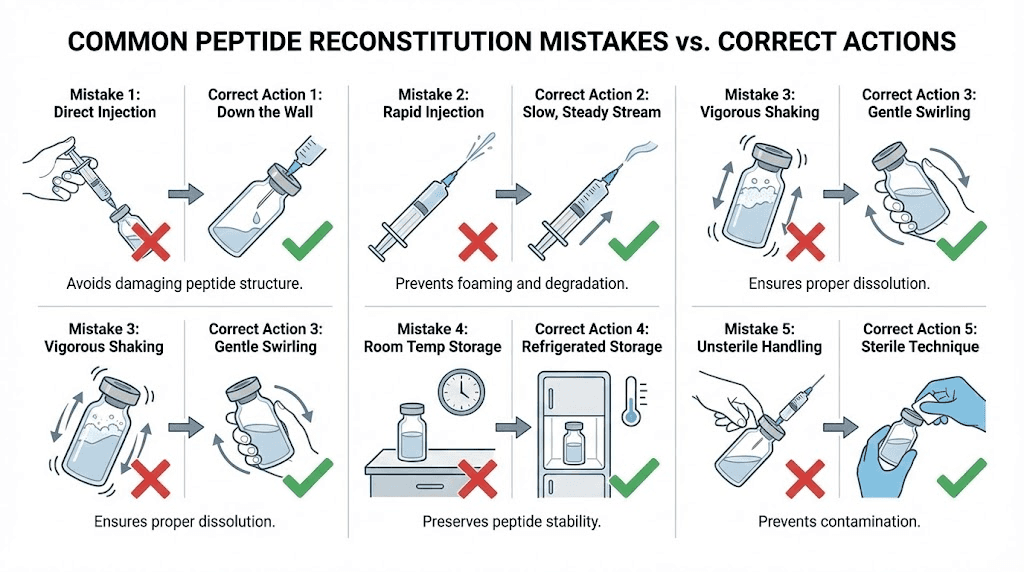
The five mistakes that ruin most reconstitutions
You have the steps. You have the math. Now learn what goes wrong when people skip the details. These five mistakes account for the vast majority of reconstitution failures, and every single one is preventable.
Mistake 1: Shaking the vial
This one deserves its own section because it happens constantly. People shake the vial like a cocktail mixer to dissolve the powder faster. It works in the sense that the powder dissolves. It fails in the sense that the agitation can denature the peptide.
Peptides are chains of amino acids held together by relatively weak bonds. Vigorous shaking creates mechanical stress, foam, and air-liquid interfaces that can break these bonds. Denatured peptide molecules lose their biological activity. The solution looks fine. It is clear. It has no particles. But the peptide inside is partially or fully inactive.
The solution: patience. Let the vial sit. Gently roll if needed. Never shake. If you are someone who struggles with patience, set a timer for 15 minutes and walk away. The peptide will dissolve on its own while you wait.
Mistake 2: Squirting water directly onto the powder
The lyophilized peptide cake is delicate. Hitting it with a stream of water can create localized areas of very high concentration that do not dissolve evenly. It also generates foam. The foam traps peptide molecules at the air-liquid interface where they are most vulnerable to degradation.
Always use the wall technique described in Step 5 above. Aim the stream of water at the glass wall of the vial and let it trickle down to the powder gently. This takes an extra 10 seconds and preserves the integrity of your peptide.
Mistake 3: Letting the vacuum suck in the water
Many peptide vials are vacuum-sealed. When you puncture the stopper with a needle, the vacuum pulls whatever is in the syringe barrel into the vial with force. If you have water in the syringe, it gets sucked in violently, hitting the peptide powder at high speed. This is essentially the same problem as squirting water directly onto the powder, except the vacuum does it for you.
The fix: inject a small amount of air (0.3-0.5 mL) into the vial first before drawing water into the syringe. This breaks the vacuum. Then draw your water, re-insert the needle, and inject the water slowly and deliberately. You control the speed, not the vacuum.
Some researchers prefer an alternative method. They draw the water first, then insert the needle into the peptide vial and wait. The vacuum will slowly pull water in. But the key word is slowly. If the vacuum is strong, this method can still introduce water too fast. The air-first approach gives you more control.
Mistake 4: Using the wrong volume of water
Too much water and your doses become impractically large. Too little and each unit on the syringe contains so much peptide that small drawing errors create large dosing errors.
A common scenario: someone reconstitutes a 5 mg peptide vial with 5 mL of water because they assume more water is always safer. The concentration is now 1 mg/mL. For a 250 mcg dose, they need 25 units. That is fine. But the vial now contains 5 mL of solution. At two 25-unit (0.25 mL) doses per day, they use 0.5 mL per day. The vial will last 10 days. No problem with shelf life.
But if they used 1 mL of water, the concentration would be 5 mg/mL and they would need only 5 units per 250 mcg dose. The total daily draw is 0.1 mL, making the vial last 10 days as well but with much smaller injection volumes and a higher margin for error on the measuring side.
The opposite problem occurs with concentrated compounds like GHK-Cu at 50 mg. Using too little water creates a solution so concentrated that a single unit on the syringe contains several milligrams. Precision becomes nearly impossible.
Always calculate your target concentration before you add water. Use the reconstitution calculator and pick a volume that puts your dose in the 5-30 unit range. The peptide dosing guide has additional tips for dialing in the right concentration for different protocols.
Mistake 5: Poor sterile technique
Everything else can be perfect but if you skip the sterilization steps, you risk contaminating the solution with bacteria. Once bacteria enter the vial, the bacteriostatic water preservative may slow their growth but cannot eliminate an active contamination. Over days of storage, bacteria multiply and produce endotoxins that could compromise your research results or cause adverse reactions.
The minimum standard:
Wash hands
Wear gloves
Swab every stopper with alcohol
Use new sterile syringes and needles for every step
Work on a clean, disinfected surface
Never touch the needle or the rubber stopper with your fingers
If you want to be thorough, the peptide injection guide covers aseptic technique in comprehensive detail. Think of sterile technique as an investment. A few minutes of preparation protects weeks of research.
Drawing doses after reconstitution
Your peptide is mixed. It is labeled. It is in the refrigerator. Now you need to draw accurate doses from it every day (or however often your protocol requires). This process has its own set of best practices.
Choosing the right syringe
Use insulin syringes for drawing doses. Specifically, 1 mL (100-unit) insulin syringes with a 29-31 gauge needle. The fine gauge minimizes the puncture hole in the rubber stopper (extending the useful life of the vial) and creates less tissue trauma during subcutaneous administration.
Some researchers prefer 0.5 mL (50-unit) insulin syringes for very small doses. These have the same 100 tick marks but cover only half the volume, effectively doubling the precision of each mark. If your dose is 5 units or fewer, a 50-unit syringe can help you measure more accurately.
Never use the large reconstitution syringe to draw doses. Its larger bore needle will enlarge the stopper hole quickly and its markings are not precise enough for small volumes.
The air replacement technique
When you draw solution out of a vial, you create a partial vacuum inside. This vacuum makes subsequent draws harder because the negative pressure resists pulling the plunger back. Over many doses, the vacuum can become strong enough to suck air into the syringe when you try to draw, giving you an inaccurate volume.
The solution is the air replacement technique. Before inserting the needle, pull back the plunger to fill the syringe with air equal to the volume of peptide you plan to draw. If you need 10 units of solution, pull back to 10 units of air. Insert the needle into the vial, inject the air, then draw your dose. The injected air replaces the volume of liquid you remove, keeping the internal pressure stable.
This technique also helps you avoid drawing air bubbles into your dose, which would reduce the actual amount of peptide in your syringe.
Checking for bubbles
After drawing your dose, hold the syringe needle-up and check for air bubbles. If you see any, flick the barrel gently with your finger to move the bubbles to the top near the needle. Then push the plunger up just enough to expel the air. You may need to adjust the volume slightly after removing bubbles.
A few tiny bubbles are cosmetically annoying but not dangerous for subcutaneous injections. However, they do reduce the actual volume of peptide in your syringe, so removing them improves dosing accuracy.
Injection considerations
Most research peptides are administered subcutaneously, meaning into the fat layer just beneath the skin. The most common injection sites are the abdomen (avoiding a 2-inch radius around the navel), the outer thigh, and the back of the upper arm.
For peptides that target specific areas, like BPC-157 for tendon injuries, some protocols suggest injecting as close to the affected area as practical. For systemic peptides like MOTS-c or SS-31, the injection site matters less because the peptide enters systemic circulation regardless of where it is administered.
Rotate injection sites to prevent lipohypertrophy (a buildup of fat tissue at the injection site from repeated use). The peptide injection basics article covers site selection and rotation patterns.
Storage after reconstitution
Reconstitution transforms a stable, shelf-stable powder into a perishable liquid. How you store this liquid determines how long it remains effective.
Temperature requirements
Store reconstituted peptides in the refrigerator at 2-8 degrees Celsius (36-46 degrees Fahrenheit). This temperature range slows chemical degradation and bacterial growth. Most reconstituted peptides maintain their potency for 21-30 days when stored within this range.
Do not freeze reconstituted peptides. The freeze-thaw cycle can damage the peptide structure. Lyophilized (freeze-dried) peptide powder can handle freezer storage because the water has been removed. But once you add water back, freezing creates ice crystals that can physically disrupt the peptide molecules.
Room temperature storage is not acceptable for reconstituted peptides. At 20-25 degrees Celsius, degradation accelerates significantly. A peptide that lasts 28 days in the refrigerator might last only 5-7 days at room temperature, sometimes less depending on the specific compound. The room temperature stability guide has compound-specific timelines.
Light protection
Some peptides degrade when exposed to light. Epithalon, thymalin, and certain nootropic peptides are particularly sensitive. Wrapping the vial in aluminum foil or storing it in an opaque container provides effective protection against photodegradation.
Even for peptides that are not specifically light-sensitive, minimizing light exposure is good practice. Refrigerators are dark most of the time, but if you open the door frequently, the internal light can expose the vial to repeated low-level light. A simple foil wrap eliminates this concern entirely.
Unreconstituted storage
For peptides you have not yet mixed, storage depends on the timeframe. Short-term (weeks to months), the refrigerator is fine. Long-term (months to years), the freezer at -20 degrees Celsius preserves potency best. Lyophilized peptides stored at -20 degrees Celsius can maintain their potency for years. The peptide powder shelf life guide covers specific compounds.
Once you open the packaging on a lyophilized peptide vial but do not reconstitute it, treat it as partially exposed. It is still far more stable than a reconstituted solution, but the seal is broken. Store it in the refrigerator and plan to reconstitute it within a few weeks.
Signs your peptide has degraded
Watch for these warning signs after reconstitution:
Cloudiness that was not present immediately after mixing
Particles floating in the solution
Color change from clear to yellow, brown, or any other color
Unusual smell (most peptide solutions are odorless or have a faint benzyl alcohol scent)
Precipitate forming at the bottom of the vial
If you notice any of these, discard the vial. Do not try to use a visually compromised peptide solution. The cost of a new vial is always less than the cost of unreliable research results. For more on recognizing degradation, check the peptide expiration guide.
Peptide-specific mixing considerations
While the basic reconstitution process is universal, certain peptides have quirks that require special attention. Here are the most commonly researched peptides and what you need to know about mixing each one.
BPC-157
BPC-157 is one of the easiest peptides to reconstitute. It dissolves quickly, typically within 2-5 minutes without any rolling or agitation needed. The lyophilized cake is usually a fine, white powder that turns clear immediately upon contact with bacteriostatic water.
Standard vial sizes: 5 mg, 10 mg. For 5 mg vials, 2 mL of water is the most popular choice, giving a 2.5 mg/mL concentration. Typical research doses of 250-500 mcg translate to 10-20 units, right in the practical sweet spot. BPC-157 is relatively stable in solution and tends to maintain potency well through the full 28-day window when refrigerated. If you are stacking BPC-157 with TB-500 for a recovery protocol, each peptide needs its own vial and reconstitution. Do not mix different peptides into the same vial unless they come as a pre-formulated blend.
TB-500
TB-500 (thymosin beta-4 fragment) dissolves well in bacteriostatic water but the doses are much larger than most peptides. Research protocols typically call for 2-5 mg per administration during loading phases. For a 5 mg vial, you might use the entire contents in a single dose or split it into two.
For single-dose use, reconstituting with 1 mL of water and drawing the full 100 units makes sense. For a loading protocol of 2.5 mg twice per week, reconstituting with 2 mL gives 2.5 mg/mL, so each 2.5 mg dose is 100 units (the full syringe). Use the TB-500 calculator to plan your volumes.
GHK-Cu
GHK-Cu (copper peptide) comes in various vial sizes, with 50 mg being common. This is a much larger quantity than most peptides and creates unique challenges. At a dose of 1-2 mg per day, a single 50 mg vial could theoretically last 25-50 days, but you need to use it within 28 days after reconstitution.
The reconstitution volume depends on how quickly you plan to use it. With 2 mL of water and a 1 mg daily dose (4 units), the vial lasts 50 days. But you must discard after 28 days, wasting about 22 mg. Adding more water (5 mL) increases the daily draw to 10 units (easier to measure) but does not solve the shelf-life problem.
Some researchers divide large vials into smaller aliquots, reconstituting only what they will use within 28 days and keeping the rest as powder. This requires additional sterile technique but preserves more of the peptide. The GHK-Cu reconstitution guide covers this aliquoting process.
GHK-Cu may have a slight blue-green tint due to the copper ion. This is normal and does not indicate degradation.
Semaglutide and tirzepatide
Weight loss peptides like semaglutide and tirzepatide require careful attention to concentration because the doses escalate over time. You need a concentration that works at both your starting dose and your eventual maintenance dose.
For semaglutide (5 mg vial), 1.5 mL of water gives 3.33 mg/mL. Starting dose of 0.25 mg = 7.5 units. Maintenance dose of 2.4 mg = 72 units. Both are measurable on a standard insulin syringe.
For tirzepatide (various vial sizes), the same principle applies. Calculate what volume gives you practical unit counts at both the lowest and highest doses in your escalation protocol. The dosing guide for GLP-1 peptides provides escalation-specific recommendations.
Nasal spray peptides
Not all peptides are injected. Nasal spray peptides like semax, selank, and PT-141 nasal spray are reconstituted the same way but transferred into a nasal spray bottle afterward. The reconstitution process is identical. Add bacteriostatic water, dissolve, and then transfer the solution to a sterile nasal spray applicator.
The key difference is concentration. Nasal spray bottles deliver a fixed volume per spray (typically 0.1 mL). Your concentration needs to be calibrated so that each spray delivers your target dose. If you want 200 mcg per spray from a 0.1 mL delivery, you need a concentration of 2 mg/mL. The nasal peptide preparation guide covers the specifics.
Peptide blends
Pre-formulated peptide blends like the wolverine stack (BPC-157 + TB-500) or glow peptide blends (TB-500 + BPC-157 + GHK-Cu) come with multiple peptides in a single vial. Reconstitution is the same as a single-peptide vial, but the total milligram content is the sum of all components.
For a 70 mg glow blend vial, adding 3 mL of bacteriostatic water is standard. The resulting concentration is approximately 23.3 mg/mL total peptide. Your dose calculation needs to account for how much of each individual peptide is in each unit of solution. This is where a peptide stack calculator becomes essential.
Troubleshooting common problems
Even with perfect technique, things sometimes go sideways. Here is how to handle the most common issues.
The peptide will not dissolve
You added the water, waited 20 minutes, gently rolled the vial, and there are still particles or chunks of undissolved powder. Several things could be happening:
The vial might be too cold. Cold peptide dissolves more slowly. Let it sit at room temperature for another 15-20 minutes and roll gently again.
You might not have added enough water. Some peptides need a minimum volume to dissolve fully. Try adding another 0.25-0.5 mL of bacteriostatic water. This changes your concentration, so recalculate your dose accordingly.
The peptide may have degraded before reconstitution. If it was exposed to heat during shipping or storage, or if it is well past its expiration date, the lyophilized powder may have undergone chemical changes that prevent proper dissolution. A peptide that has changed color in its powder form (from white to yellow or brown) is likely degraded.
If none of these apply and the peptide still has not dissolved after 30-45 minutes, contact the supplier.
The solution is cloudy or foamy
Foam is usually caused by injecting the water too quickly or shaking the vial. It will settle on its own if you leave the vial undisturbed for 30-60 minutes. The foam itself is not harmful, but it means peptide molecules are trapped at the air-liquid interface, which is a suboptimal state.
Cloudiness is more concerning. If the solution was initially clear and becomes cloudy after storage, the peptide may be aggregating or precipitating. This can happen from temperature fluctuations, expired peptide, or contamination. Do not use a solution that has become cloudy after initial reconstitution.
Pressure builds up inside the vial
After several draws, you might notice it becomes harder to pull solution out. This is because each time you remove liquid, you reduce the internal pressure. Use the air replacement technique described earlier. Inject air equal to the volume you plan to draw before every dose.
If the vial seems pressurized in the other direction (pushing the plunger back when you insert the needle), you may have injected too much air during reconstitution. Draw a small amount of air out to equalize.
You added the wrong amount of water
This happens more often than people admit. You meant to add 2 mL but accidentally added 3 mL. Or you lost track and are not sure exactly how much went in.
Here is the thing: your peptide is not ruined. The concentration is just different from what you planned. Measure the total volume in the vial (if possible, by drawing it all out with a syringe, noting the volume, and injecting it back). Then recalculate your concentration with the actual volume.
If you added too much water, you can still use the peptide. You just need to draw more units per dose. If you added too little, you will draw fewer units. The math adjusts. What does not adjust is guessing. If you are not sure how much water is in the vial, your doses will be inaccurate and your results unreliable. Better to recalculate or, if the uncertainty is too great, start over with a new vial.
The rubber stopper is crumbling
Repeated needle punctures can degrade the rubber stopper, causing tiny pieces of rubber to break off into the solution. These are called core fragments and they are a contamination risk.
To prevent this, use the smallest gauge needle practical for drawing doses (29-31 gauge insulin needles), always insert the needle straight (not at an angle), and try to puncture the same spot on the stopper each time rather than creating new holes across the surface. If you notice rubber fragments in your solution, discard the vial.
The peptide vial handling guide covers stopper management and other vial maintenance topics.
Bacteriostatic water sourcing and quality
Not all bacteriostatic water is created equal. The quality of your solvent directly affects the quality of your reconstituted peptide.
What to look for
Purchase bacteriostatic water from pharmacies, licensed medical supply companies, or established vendors with verifiable quality certifications. The product should be USP (United States Pharmacopeia) grade, which guarantees specific purity and sterility standards.
The label should clearly state:
Bacteriostatic Water for Injection, USP
0.9% Benzyl Alcohol as preservative
Expiration date
Lot number
Vial sizes range from 10 mL to 30 mL. For most researchers, a 30 mL vial provides enough water for multiple peptide reconstitutions while remaining well within its shelf life.
What to avoid
Do not use bacteriostatic water that:
Has no expiration date or lot number
Comes in non-medical packaging
Is significantly cheaper than pharmacy-grade options
Shows any cloudiness, discoloration, or particulate matter
Has a damaged seal or compromised packaging
Counterfeit or substandard bacteriostatic water is a real concern. At best, it might be plain sterile water mislabeled as bacteriostatic. At worst, it could contain contaminants. The few dollars you save on discount water could cost you hundreds in wasted peptides or compromised research.
Storage and shelf life
Unopened bacteriostatic water should be stored at room temperature (20-25 degrees Celsius) away from direct light. Check the expiration date before use. Do not use expired bacteriostatic water.
Once opened (first needle puncture), the vial is good for 28 days. Mark the opening date on the vial with a permanent marker. After 28 days, discard any remaining contents and open a new vial.
Between uses, store the opened bacteriostatic water vial at room temperature or in the refrigerator. Both are acceptable. Just keep it away from heat and light.
Advanced considerations
Once you have mastered the basics, these additional considerations can help you optimize your reconstitution process.
Combining peptides in one syringe
Some researchers draw doses from multiple peptide vials into a single syringe to reduce the number of injections. This is acceptable in many cases, but there are important caveats.
Only combine peptides that are known to be compatible in solution. Some peptide combinations can interact chemically, precipitating or degrading when mixed. BPC-157 and TB-500 are commonly combined in a single syringe without issues. But less common combinations should be researched before mixing.
When combining, draw the first peptide into the syringe, then insert into the second vial and draw the second peptide. The total volume in the syringe will be the sum of both draws. Make sure this total does not exceed the syringe capacity.
Never pre-mix reconstituted peptides into a single storage vial (unless they come as a pre-formulated blend). The individual peptide solutions should be stored in their original vials and combined only at the moment of administration. The multi-peptide protocol guide provides compatibility charts.
Traveling with reconstituted peptides
Reconstituted peptides need continuous refrigeration. For travel, use an insulated cooler bag with ice packs to maintain temperature during transit. Do not check peptides in airline luggage (cargo holds can reach extreme temperatures). Carry them on in an insulated bag.
For extended travel, consider bringing unreconstituted (lyophilized) peptide vials and bacteriostatic water separately. Lyophilized peptides are far more temperature-stable and can handle short periods outside refrigeration. Reconstitute at your destination when you have access to refrigeration again. The room temperature stability data can help you estimate safe transit times.
Record keeping
Serious researchers keep a log of their reconstitution activity. Recording the following information helps track results and troubleshoot problems:
Date of reconstitution
Peptide name and vial size
Lot number (from the vial label)
Volume of bacteriostatic water added
Resulting concentration
Storage location
Date discarded or finished
This level of documentation might seem excessive for casual use. But if you are running a multi-week protocol with specific endpoints, knowing exactly what went into each vial and when helps you identify variables that might affect your results. SeekPeptides members use built-in tracking tools to log their protocols and monitor progress over time.
Frequently asked questions
Can I use sterile water instead of bacteriostatic water?
Only if you plan to use the entire vial in a single session. Sterile water lacks the 0.9% benzyl alcohol preservative that prevents bacterial growth. For multi-dose vials where you draw from the vial over days or weeks, bacteriostatic water is the only safe choice. See the full bacteriostatic water guide for more details.
How long does reconstituted peptide last in the fridge?
Most reconstituted peptides remain stable for 21-28 days when stored at 2-8 degrees Celsius. Some compounds may degrade faster. Always label your vial with the reconstitution date and discard after 28 days regardless of remaining volume. The reconstituted peptide shelf life guide has compound-specific timelines.
What if I accidentally shake the vial?
If you shook the vial once briefly, the peptide is likely fine. Let it sit until the foam settles completely (30-60 minutes) before drawing any doses. If you shook it vigorously for an extended period, some degradation may have occurred. There is no reliable way to test potency at home, so your results will tell you whether the peptide is still effective.
Can I mix different peptides in the same vial?
Do not mix different peptides into a single vial for storage. Chemical interactions between peptides can cause degradation or precipitation. The exception is pre-formulated blends that have been designed and tested for stability. If you want to inject multiple peptides at once, draw them into the same syringe immediately before administration.
How do I know if my peptide has gone bad?
Look for cloudiness, particles, color changes, or unusual odor in the solution. A fresh reconstituted peptide should be clear and colorless (or very slightly tinted in the case of copper peptides like GHK-Cu). Any change from the initial appearance after mixing is a red flag.
Do I need to add the exact amount of water specified?
No. You can add any amount. What matters is knowing exactly how much you added so you can calculate the correct concentration and dose. There is no wrong amount of water, only wrong math. Use the peptide calculator to verify your numbers.
What does it mean when the peptide vial is vacuum sealed?
Many peptide vials are sealed under vacuum during manufacturing. When you insert a needle, the vacuum pulls the syringe contents in. This is normal. Inject a small amount of air first to break the vacuum, then add your bacteriostatic water at a controlled speed.
Can I re-freeze reconstituted peptides?
Freezing reconstituted peptides is generally not recommended. The ice crystal formation during freezing can damage peptide structures. If you have excess reconstituted peptide you cannot use within 28 days, it is better to accept the loss and reconstitute only the amount you will use next time. Some researchers report success with freezing at -20 degrees Celsius, but this introduces a variable that could compromise results.
For researchers who want deeper guidance on any of these topics, SeekPeptides provides comprehensive protocols, dosing calculators, and expert-reviewed guides covering every aspect of peptide research from reconstitution through complete multi-week protocols.
Quick reference reconstitution chart
Bookmark this chart. It covers the most commonly researched peptides with practical reconstitution recommendations:
Peptide | Common Vial | Rec. Water | Concentration | Typical Dose | Units per Dose |
|---|---|---|---|---|---|
5 mg | 2 mL | 2.5 mg/mL | 250-500 mcg | 10-20 | |
5 mg | 1-2 mL | 2.5-5 mg/mL | 2-5 mg | 40-100 | |
50 mg | 2-5 mL | 10-25 mg/mL | 1-2 mg | 4-10 | |
5 mg | 2 mL | 2.5 mg/mL | 200-300 mcg | 8-12 | |
5 mg | 2 mL | 2.5 mg/mL | 100-300 mcg | 4-12 | |
5 mg | 2 mL | 2.5 mg/mL | 200-500 mcg | 8-20 | |
5 mg | 1.5 mL | 3.33 mg/mL | 0.25-2.4 mg | 7.5-72 | |
5-15 mg | 1.5-3 mL | varies | 2.5-15 mg | varies | |
5 mg | 2 mL | 2.5 mg/mL | 200-500 mcg | 8-20 | |
2 mg | 1-2 mL | 1-2 mg/mL | 100-200 mcg | 5-20 |
For any peptide not listed here, the formula remains the same. Divide the peptide amount (mg) by the water volume (mL) to get your concentration. Then use the peptide calculator to convert your desired dose into syringe units. The comprehensive peptide dosage chart covers dozens of additional compounds.
For researchers serious about optimizing their peptide protocols, SeekPeptides offers the most comprehensive resource available, with evidence-based guides, proven protocols, and a community of thousands who have navigated these exact questions. Members get access to personalized protocol builders, weight-based dosing calculators, and expert-reviewed reconstitution guides that account for individual factors most resources ignore.
External resources
In case I do not see you, good afternoon, good evening, and good night. May your reconstitutions stay sterile, your concentrations stay accurate, and your peptides stay potent.