Feb 11, 2026
You have a vial of lyophilized tirzepatide in one hand. A syringe of bacteriostatic water in the other. And somewhere between those two objects sits a math problem that determines whether you get your prescribed dose or something dangerously wrong. The number of people searching for a tirzepatide reconstitution chart they can print, save, and tape to the inside of their medicine cabinet tells you everything about how confusing this process can be. It should not be this hard. But compounded tirzepatide comes in different vial sizes, different concentrations work better for different dose ranges, and the conversion from milligrams to insulin syringe units trips up even people who have been doing this for months.
This is the reference you have been looking for. Every vial size. Every bacteriostatic water volume. Every resulting concentration. Every syringe unit conversion laid out in charts you can bookmark, screenshot, or print. No guessing. No mental math at injection time. No second-guessing whether 25 units means 2.5mg or something else entirely. We built these charts from the actual math, cross-referenced against standard reconstitution protocols, and organized them so you can find your exact vial size and dose in seconds. Whether you are reconstituting your first vial or your fiftieth, having a reliable reference eliminates the single biggest source of dosing errors in compounded tirzepatide protocols.
SeekPeptides created this guide because reconstitution confusion is the number one question our members ask. And while an online reconstitution calculator is useful when you have your phone handy, a printed chart taped to your refrigerator door works when your phone is dead, your hands are full, and you need the answer in three seconds flat. This guide covers the complete reconstitution process from start to finish, then gives you every chart you need for the five most common tirzepatide vial sizes.
Why you need a printed tirzepatide reconstitution chart
Online calculators are great. Until they are not.
You are standing in your bathroom at 7am, syringe in hand, vial warming to room temperature. Your phone is charging in the other room. The calculator you used last week is buried somewhere in your browser history. And you cannot remember if your 10mg vial reconstituted with 1ml gives you 25 units per 2.5mg dose, or if that was the 2ml reconstitution. This is not a moment for guessing.
A printed reconstitution chart eliminates this problem entirely. Tape it inside your medicine cabinet. Pin it next to the refrigerator where you store your vials. Keep a laminated copy with your supplies. The math does not change once you have reconstituted the vial, so the chart you printed on day one works perfectly on day twenty-eight when you draw your last dose from that same vial. Every tirzepatide dosage chart in ml format confirms these same numbers because the math is universal. What changes is the concentration you create, and that depends entirely on how much bacteriostatic water you add.
Printed references also serve as a safety check. Even if you remember the numbers, glancing at a chart before drawing your dose takes two seconds and catches the kind of mistake that happens when you are tired, distracted, or simply mixing up two similar numbers. The difference between 25 units and 50 units on an insulin syringe is small visually but represents a 100% dosing error. A standard reconstitution chart on the wall prevents that error before it happens.
Understanding tirzepatide reconstitution basics
Before diving into the charts, you need to understand what reconstitution actually means and why the numbers work the way they do. Tirzepatide from compounding pharmacies typically arrives as a lyophilized powder. Lyophilized means freeze-dried. The active peptide sits in the vial as a dry cake or powder, stable at room temperature for shipping but requiring a liquid diluent before injection. This process of adding liquid to the powder is reconstitution.
The diluent matters. Bacteriostatic water is the standard choice for multi-dose vials because it contains 0.9% benzyl alcohol, which prevents bacterial growth. This is critical when you will be puncturing the rubber stopper multiple times over several weeks. Sterile water works for single-use situations but offers no antibacterial protection for repeated needle punctures. Normal saline should generally be avoided for tirzepatide reconstitution because it can cause precipitation and inactivation of the peptide. Always use bacteriostatic water unless your prescribing provider specifically instructs otherwise.
The concentration you create depends on a simple formula. Take the amount of tirzepatide in the vial (measured in milligrams) and divide it by the volume of bacteriostatic water you add (measured in milliliters). That gives you your concentration in mg/ml. A 10mg vial reconstituted with 1ml of bacteriostatic water produces a 10mg/ml concentration. The same vial reconstituted with 2ml produces 5mg/ml. Same peptide, same amount, completely different concentration, completely different number of units per dose.
The concentration formula
Here is the formula that governs every chart in this guide:
Concentration (mg/ml) = Total peptide (mg) / Volume of bacteriostatic water (ml)
And the dose calculation that follows from it:
Volume to inject (ml) = Desired dose (mg) / Concentration (mg/ml)
Since U-100 insulin syringes measure in units where 100 units equals 1ml, you multiply the volume in ml by 100 to get units:
Units on syringe = Volume to inject (ml) x 100
For example, if your concentration is 10mg/ml and you want 2.5mg, you need 0.25ml, which equals 25 units on a U-100 insulin syringe. This math is consistent across every vial size and every concentration. The charts below simply do this calculation for you across every common combination. If you want to verify any number in any chart, plug it into these three formulas and it will match. Understanding how to calculate peptide dosages helps you double-check any chart you use.
Supplies you need for tirzepatide reconstitution
Before touching a vial, gather everything. Reaching for missing supplies mid-reconstitution breaks sterile technique and introduces contamination risk. Here is your complete checklist.
Required supplies:
Tirzepatide lyophilized powder vial (your prescribed vial size)
Bacteriostatic water (standard 30ml vial is common)
Alcohol swabs (individually wrapped)
Mixing syringe with needle (1ml or 3ml syringe with an 18-25 gauge needle works well for drawing bacteriostatic water)
U-100 insulin syringes for dosing (29-31 gauge, choose 0.3ml or 0.5ml or 1ml based on your dose volumes)
Clean, flat surface
Your printed reconstitution chart
Sharps container for used needles
The mixing syringe and the dosing syringe are different. Use a larger gauge needle to draw bacteriostatic water because it flows more easily through a bigger opening. Then use your fine-gauge insulin syringe for actual subcutaneous injections. Never use the same needle you used to puncture the bacteriostatic water vial to inject yourself. A peptide injection guide walks through proper technique in detail.
Syringe selection by dose volume
Not all insulin syringes are created equal. The syringe you choose affects how accurately you can measure your dose.
A 0.3ml (30-unit) syringe has markings every half unit. This gives you the finest resolution for small doses. If your dose falls below 30 units, this syringe offers the best accuracy. A 0.5ml (50-unit) syringe has markings every unit. Good for doses between 30 and 50 units. A 1ml (100-unit) syringe has markings every 2 units. Fine for larger doses but less precise for small volumes. Choose the smallest syringe that fits your dose. Smaller syringes mean bigger markings for the same volume, which means easier, more accurate readings. Checking your tirzepatide dosage chart in units before choosing a syringe ensures you pick the right size.
Step-by-step tirzepatide reconstitution process
Follow these steps exactly. The order matters. Skipping steps or rushing introduces errors and contamination risk.
Step 1: Prepare your workspace
Wash your hands thoroughly with soap and water for at least 20 seconds. Dry with a clean paper towel. Lay out all supplies on a clean, flat surface. Open your reconstitution chart to your vial size. Keep your sharps container within reach.
Step 2: Inspect the vial
Look at the tirzepatide vial. The lyophilized powder should appear as a white to off-white cake or powder. If it looks discolored, wet, or compromised in any way, do not use it. Check the expiration date. Remove the plastic flip cap from the top of the vial if present, exposing the rubber stopper.
Step 3: Clean the vial stoppers
Wipe the rubber stopper on the tirzepatide vial with an alcohol swab using firm, circular motions. Wipe the stopper on the bacteriostatic water vial with a separate alcohol swab. Let both air dry for 10-15 seconds. Do not blow on them. Do not touch them after cleaning. This step prevents bacterial contamination during needle insertion, and learning how to mix peptides with bacteriostatic water properly starts here.
Step 4: Draw the bacteriostatic water
Using your mixing syringe, draw air equal to the volume of bacteriostatic water you plan to add. This air injection equalizes pressure inside the vial, making it easier to draw the liquid. Insert the needle through the rubber stopper of the bacteriostatic water vial. Inject the air. Invert the vial so the stopper faces down. Pull the plunger to draw the exact volume of bacteriostatic water indicated by your chart. Check for air bubbles. Tap the syringe gently to move bubbles to the top, then push them back into the vial. Confirm your volume is exact.
Step 5: Add water to the tirzepatide vial
This is the critical step where most mistakes happen.
Insert the needle through the rubber stopper of the tirzepatide vial at a slight angle. Do NOT aim the stream directly at the powder cake. Instead, angle the needle so the water runs down the inside wall of the vial. This prevents excessive foaming and protects the peptide structure. Inject the water slowly. Rushing creates bubbles and can damage the peptide through mechanical agitation. The general guidance for how much bacteriostatic water to add to peptides depends on your target concentration, which is exactly what the charts below specify.
Step 6: Mix gently
Do not shake the vial. Ever. Shaking creates foam, denatures the peptide, and reduces potency. Instead, gently swirl the vial by rolling it between your palms. Some practitioners simply set the vial on a flat surface and let it dissolve on its own over 5-10 minutes, checking periodically. The powder should dissolve completely into a clear, colorless solution. If particles remain after gentle swirling, wait. Most tirzepatide dissolves within a few minutes. If the solution remains cloudy or has visible particles after 15 minutes of gentle mixing, do not use it.
Step 7: Inspect the solution
Hold the vial up to a light source. The reconstituted tirzepatide should be clear and colorless. No particles. No cloudiness. No floating debris. If anything looks off, do not inject it. Contact your provider or pharmacy. Understanding proper peptide storage starts with proper reconstitution.
Step 8: Store properly
Immediately place the reconstituted vial in the refrigerator at 36-46 degrees Fahrenheit (2-8 degrees Celsius). Do not freeze. Do not leave at room temperature. The reconstituted solution remains stable for up to 28 days when properly refrigerated. Write the reconstitution date on the vial or on a piece of tape attached to it. Discard any remaining solution after 28 days regardless of how much is left. For detailed guidance on temperature stability, see our article on how long compounded tirzepatide can be out of the fridge.
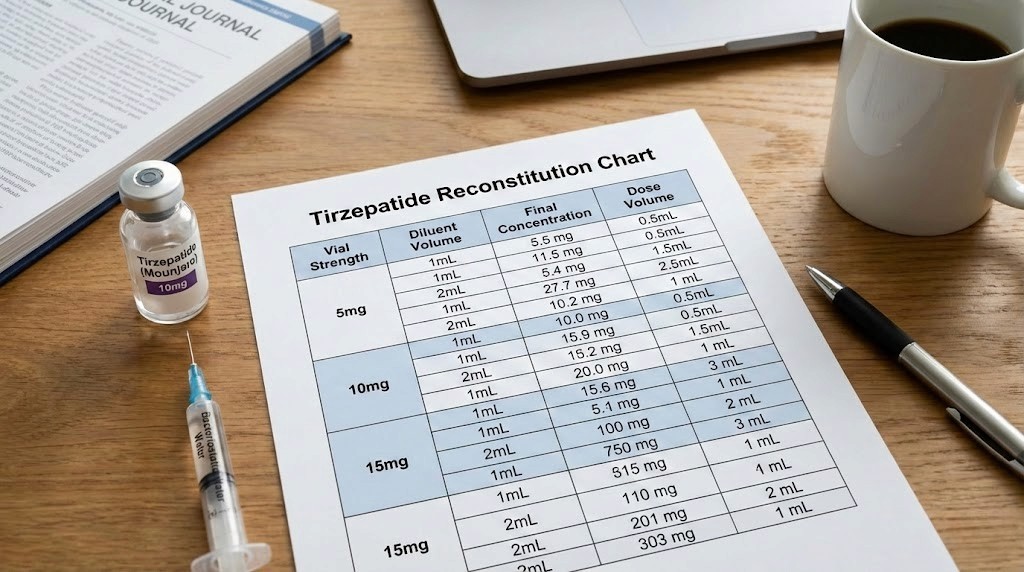
Complete reconstitution charts by vial size
Here are the complete charts for the five most common compounded tirzepatide vial sizes. Each chart shows multiple reconstitution options with different bacteriostatic water volumes, the resulting concentration, and the exact insulin syringe units for every standard dose from 2.5mg through 15mg. These are the charts you want to print.
A quick note on choosing your concentration. Higher concentrations (more mg/ml) mean smaller injection volumes, which many people prefer. But they also mean the difference between doses is measured in fewer units on the syringe, which leaves less room for error. Lower concentrations mean larger injection volumes but more units between doses, making it easier to measure precisely. Your prescribing provider may recommend a specific concentration. If they have not, consider your syringe size and typical dose range when choosing. The peptide calculator on our site can help verify these numbers for any custom concentration you need.
5mg vial reconstitution chart
The 5mg vial is common for people starting at lower doses or those who prefer fresh reconstitution more frequently.
BAC water added | Concentration | 2.5mg dose | 5mg dose |
|---|---|---|---|
0.5ml | 10mg/ml | 25 units | 50 units |
1ml | 5mg/ml | 50 units | 100 units |
2ml | 2.5mg/ml | 100 units | N/A (exceeds 1ml syringe) |
For a 5mg vial, the most practical reconstitution is 0.5ml of bacteriostatic water, creating a 10mg/ml concentration. This gives you two doses of 2.5mg at 25 units each, or one dose of 5mg at 50 units. If you need a 2.5mg weekly dose, this vial lasts two weeks. Clean and simple. The tirzepatide dose chart overview covers additional context for selecting your starting dose.
10mg vial reconstitution chart
The 10mg vial offers more flexibility and is one of the most commonly prescribed sizes.
BAC water added | Concentration | 2.5mg dose | 5mg dose | 7.5mg dose | 10mg dose |
|---|---|---|---|---|---|
0.5ml | 20mg/ml | 12.5 units | 25 units | 37.5 units | 50 units |
1ml | 10mg/ml | 25 units | 50 units | 75 units | 100 units |
2ml | 5mg/ml | 50 units | 100 units | N/A | N/A |
The 1ml reconstitution creating 10mg/ml is the most popular choice for 10mg vials. It gives clean unit numbers at every standard dose tier. At 2.5mg you draw 25 units. At 5mg you draw 50 units. At 7.5mg you draw 75 units. At 10mg you draw the full 100 units. No fractions, no half-unit calculations, no ambiguity. If you are on a 10mg tirzepatide dosage protocol, this is your go-to concentration.
The 0.5ml option creating 20mg/ml works for experienced users who want smaller injection volumes but requires careful measurement since 2.5mg equals only 12.5 units, which falls between markings on most syringes. The 2ml option creating 5mg/ml only makes sense if you are on 2.5mg or 5mg doses and want maximum measurement precision.
15mg vial reconstitution chart
BAC water added | Concentration | 2.5mg dose | 5mg dose | 7.5mg dose | 10mg dose | 12.5mg dose | 15mg dose |
|---|---|---|---|---|---|---|---|
0.75ml | 20mg/ml | 12.5 units | 25 units | 37.5 units | 50 units | 62.5 units | 75 units |
1.5ml | 10mg/ml | 25 units | 50 units | 75 units | 100 units | N/A | N/A |
3ml | 5mg/ml | 50 units | 100 units | N/A | N/A | N/A | N/A |
For a 15mg vial, the 0.75ml reconstitution creating 20mg/ml is the most versatile because it allows you to reach every dose tier up to 15mg without exceeding a standard 1ml syringe. This is the concentration that compounded tirzepatide dosage charts most frequently recommend for 15mg vials. The 1.5ml reconstitution at 10mg/ml works well if your maximum dose stays at or below 10mg and you want the easier unit calculations.
30mg vial reconstitution chart
The 30mg vial is popular for people who have titrated up to higher doses or who want a longer-lasting vial at moderate doses.
BAC water added | Concentration | 2.5mg dose | 5mg dose | 7.5mg dose | 10mg dose | 12.5mg dose | 15mg dose |
|---|---|---|---|---|---|---|---|
1.5ml | 20mg/ml | 12.5 units | 25 units | 37.5 units | 50 units | 62.5 units | 75 units |
3ml | 10mg/ml | 25 units | 50 units | 75 units | 100 units | N/A | N/A |
6ml | 5mg/ml | 50 units | 100 units | N/A | N/A | N/A | N/A |
The 3ml reconstitution at 10mg/ml is the most commonly recommended option for 30mg vials. It creates a clean concentration that works beautifully with U-100 insulin syringes, and the resulting 3ml volume fits standard vials without overfilling. At a 2.5mg weekly dose, this vial lasts 12 weeks, well beyond the 28-day stability window, so you would need to discard unused solution. At 7.5mg weekly, it lasts exactly 4 weeks, which is perfect. At 10mg weekly, you get 3 weeks of doses. For full protocols at this vial size, see the tirzepatide 30mg dosage chart.
The 1.5ml option at 20mg/ml is excellent for higher-dose users (10-15mg weekly) who prefer smaller injection volumes. At 15mg weekly, the vial lasts 2 weeks.
60mg vial reconstitution chart
The 60mg vial is for users on higher doses who want maximum convenience and fewer reconstitutions.
BAC water added | Concentration | 5mg dose | 7.5mg dose | 10mg dose | 12.5mg dose | 15mg dose |
|---|---|---|---|---|---|---|
3ml | 20mg/ml | 25 units | 37.5 units | 50 units | 62.5 units | 75 units |
6ml | 10mg/ml | 50 units | 75 units | 100 units | N/A | N/A |
A 60mg vial at 20mg/ml concentration (3ml bacteriostatic water) provides the best balance of compact injection volume and dose flexibility. At 10mg weekly, it lasts 6 weeks, but remember the 28-day stability limit after reconstitution. At 15mg weekly, you get 4 weeks of doses, which aligns perfectly with the stability window. If your provider prescribes 60mg vials, the 3ml reconstitution volume is almost always the recommended approach. Compare these numbers against the tirzepatide dosage chart in units article for additional reference.
Quick-reference unit conversion table
This is the chart to print and stick on your fridge. It works for ANY tirzepatide vial size because it is based purely on concentration.
Dose (mg) | At 5mg/ml | At 10mg/ml | At 20mg/ml | At 40mg/ml |
|---|---|---|---|---|
1.25mg | 25 units | 12.5 units | 6.25 units | 3.125 units |
2.5mg | 50 units | 25 units | 12.5 units | 6.25 units |
5mg | 100 units | 50 units | 25 units | 12.5 units |
7.5mg | N/A | 75 units | 37.5 units | 18.75 units |
10mg | N/A | 100 units | 50 units | 25 units |
12.5mg | N/A | N/A | 62.5 units | 31.25 units |
15mg | N/A | N/A | 75 units | 37.5 units |
Notice the pattern. When you double the concentration, you halve the units. Going from 10mg/ml to 20mg/ml means your 5mg dose drops from 50 units to 25 units. This is the single most important relationship to understand when working with different concentrations. If you ever switch vial sizes or reconstitution volumes, this table shows you exactly how your unit numbers change. For those using 20mg/ml tirzepatide concentrations, the middle column of this chart becomes your daily reference. And for microdosing tirzepatide protocols, the lower dose rows provide the unit calculations you need.
How to choose the right concentration
With multiple reconstitution options per vial size, picking the right concentration depends on three factors: your dose range, your syringe size, and your comfort with precision.
Choose higher concentrations (20mg/ml) when:
You are on doses of 7.5mg or above. Higher concentrations keep injection volumes small, which many people prefer for comfort. At 20mg/ml, even a 15mg dose requires only 75 units (0.75ml). That is a small, manageable injection. This concentration also works well if you are using 0.5ml (50-unit) or 1ml (100-unit) syringes and want to stay within the syringe range for all dose tiers.
The tradeoff is precision. At 20mg/ml, each unit on a U-100 syringe represents 0.2mg. A one-unit measurement error means a 0.2mg dosing error. At lower doses like 2.5mg, you are trying to draw exactly 12.5 units, which sits between syringe markings. If you are on lower doses, a lower concentration gives you more room. Users considering the switch between medications should also review the semaglutide to tirzepatide switching dosage chart for equivalent dose guidance.
Choose moderate concentrations (10mg/ml) when:
You want the cleanest unit numbers across the widest dose range. At 10mg/ml, the standard dose tiers line up perfectly: 2.5mg equals 25 units, 5mg equals 50 units, 7.5mg equals 75 units, 10mg equals 100 units. No fractions. No estimating between lines. This is the most user-friendly concentration for people new to self-injection or reconstitution.
The tradeoff is injection volume. At 10mg/ml, a 10mg dose requires a full 1ml syringe (100 units). Doses above 10mg exceed a 1ml syringe, requiring either split injections or a different concentration. The tirzepatide dosage chart in ml format helps visualize these volumes for people who think in milliliters rather than units.
Choose lower concentrations (5mg/ml) when:
You are on starting doses (2.5-5mg) and want maximum measurement accuracy. At 5mg/ml, a 2.5mg dose requires 50 units, which is easy to read on any syringe. This extra precision matters during the dose-finding phase when accurate measurement helps you and your provider evaluate your response. This is also useful if you are exploring tirzepatide microdosing at doses below 2.5mg.
The tradeoff is that higher doses require large injection volumes or become impractical entirely. A 10mg dose at 5mg/ml requires 2ml, which exceeds a standard 1ml insulin syringe. You would need either a special syringe or two separate injections.
Tirzepatide titration schedule with reconstitution
Tirzepatide follows a structured titration schedule. You start at the lowest dose and increase every four weeks if tolerated. Here is how that schedule maps to reconstitution for the two most common vial sizes.
Titration protocol at 10mg/ml concentration
Weeks | Dose | Units to draw | Injection volume | Notes |
|---|---|---|---|---|
1-4 | 2.5mg | 25 units | 0.25ml | Starting dose, assess tolerance |
5-8 | 5mg | 50 units | 0.5ml | First increase if tolerated |
9-12 | 7.5mg | 75 units | 0.75ml | Continue if responding well |
13-16 | 10mg | 100 units | 1.0ml | Common maintenance dose |
17-20 | 12.5mg | Switch to 20mg/ml | See 20mg/ml chart | Exceeds 1ml at 10mg/ml |
21+ | 15mg | Switch to 20mg/ml | See 20mg/ml chart | Maximum approved dose |
Notice that at 10mg/ml, you need to switch to a higher concentration once you pass 10mg. This is normal and expected. Many providers prescribe 10mg vials for the first 4-8 weeks of treatment, then transition to 30mg or 60mg vials at 20mg/ml for higher dose tiers. The tirzepatide dosing conversion chart for weight loss lays out these transitions in detail.
Titration protocol at 20mg/ml concentration
Weeks | Dose | Units to draw | Injection volume |
|---|---|---|---|
1-4 | 2.5mg | 12.5 units | 0.125ml |
5-8 | 5mg | 25 units | 0.25ml |
9-12 | 7.5mg | 37.5 units | 0.375ml |
13-16 | 10mg | 50 units | 0.5ml |
17-20 | 12.5mg | 62.5 units | 0.625ml |
21+ | 15mg | 75 units | 0.75ml |
At 20mg/ml, every dose tier from 2.5mg through 15mg fits within a single 1ml insulin syringe. The tradeoff is those half-unit measurements at several dose tiers (12.5, 37.5, 62.5 units), which require careful attention. Understanding how many units equal 2.5mg of tirzepatide at your specific concentration eliminates confusion during titration. And for those tracking their progress over time, our article on how fast tirzepatide works sets realistic timeline expectations at each dose tier.
How to read your reconstitution chart at injection time
Having the chart is one thing. Using it correctly under real-world conditions is another. Here is the process.
Find your vial size. Look at the label on your tirzepatide vial. It tells you the total peptide content in milligrams. Match that to the correct chart.
Find your reconstitution volume. You already added a specific volume of bacteriostatic water when you first reconstituted. If you wrote it on the vial label (which you should), look at it. If not, check which concentration you chose and match it to the chart.
Find your dose. Your provider prescribed a specific milligram dose. Find that column in the chart.
Read the units. Where your concentration row meets your dose column, that is the number of units to draw on your insulin syringe. Draw that amount. Inject it. Done.
The entire process takes about ten seconds once the chart is in front of you. Compare this to opening your phone, finding a calculator app, typing in the formula, and hoping you remember the right numbers. A printed chart wins every time. If you want the digital backup as well, the peptide reconstitution calculator performs these calculations for any peptide and any concentration.
Common reconstitution mistakes and how to avoid them
Even with a chart, mistakes happen. Here are the most common ones and exactly how to prevent them.
Mistake 1: Shaking the vial
This is the most common error. People instinctively shake vials to mix the powder faster. But tirzepatide is a peptide, and peptides are proteins. Aggressive shaking creates foam, introduces air, and can denature the protein structure, reducing potency. Always swirl gently or let the solution dissolve on its own. Patience here protects your investment. Each vial costs real money, and shaking it degrades what you paid for.
Mistake 2: Using the wrong diluent
Normal saline, sterile water without benzyl alcohol, and tap water are all wrong choices. Bacteriostatic water is the correct diluent for multi-dose tirzepatide vials. The benzyl alcohol preservative prevents bacterial growth through multiple needle punctures over 28 days. Using sterile water without preservative means bacteria can grow after the first puncture, potentially causing infection. Our complete bacteriostatic water guide explains why this specific diluent matters and how to source it.
Mistake 3: Adding the wrong volume of water
This changes your concentration, which changes your units per dose, which means every injection is wrong. Double-check the volume against your chart before injecting it into the vial. Once the water is in, you cannot take it out. If you add too much water, your concentration is lower than intended, meaning you need more units per dose. If you add too little, your concentration is higher, meaning fewer units per dose. Either way, using your chart for a different concentration produces wrong doses.
Mistake 4: Spraying water directly onto the powder
When you insert the needle into the tirzepatide vial, aim the water stream at the glass wall, not directly at the powder cake. Direct impact can cause the powder to spray up, stick to the sides above the water line, and dissolve incompletely. It also creates more foam. Let the water gently run down the wall and pool at the bottom, where it gradually dissolves the powder from below.
Mistake 5: Forgetting which concentration you created
You reconstitute a vial, put it in the fridge, and three days later cannot remember if you added 1ml or 2ml of water. Now your chart is useless because you do not know which concentration row to use. The fix is simple: always write the date, water volume, and resulting concentration on the vial label immediately after reconstitution. Use a piece of medical tape and a permanent marker. This five-second habit prevents a serious dosing uncertainty that could last the entire 28-day life of the vial. Understanding the difference between concentrations is critical, and the compound tirzepatide dosing chart provides additional reference for common pharmacy-dispensed concentrations.
Mistake 6: Reusing needles
Never reuse a needle for drawing or injecting. Each needle use dulls the tip, increasing pain and tissue damage. More importantly, a used needle introduces contamination risk into the vial. Use a fresh needle every time you puncture the rubber stopper to draw a dose. Use a fresh needle for injection. Sharps containers exist for a reason. Proper injection technique is covered in our complete peptide injection guide.
Storage after reconstitution
Proper storage directly affects how long your reconstituted tirzepatide remains potent and safe to use.
Temperature: Store at 36-46 degrees Fahrenheit (2-8 degrees Celsius). The back of the refrigerator provides the most consistent temperature. Avoid the door shelves, where temperature fluctuates every time you open the fridge. Never store on top of the freezer unit inside the fridge where temperatures drop below freezing.
Light: Protect from direct light. If your vial came in a box, keep it in the box inside the fridge. If not, wrap it in aluminum foil or store it in an opaque container. Light degrades peptides over time.
Duration: Use within 28 days of reconstitution. After 28 days, discard any remaining solution even if it looks fine. Potency declines and bacterial contamination risk increases beyond this window. Some compounding pharmacies specify shorter beyond-use dates, so always follow your pharmacy label first.
Freezing: Never freeze reconstituted tirzepatide. Freezing destroys the peptide structure permanently. Even if the solution looks normal after thawing, the molecular structure has been compromised. Discard any vial that has been frozen. For a deeper look at tirzepatide temperature stability, our article on whether tirzepatide needs refrigeration covers edge cases and travel scenarios. And for general reconstituted peptide storage, see how to store peptides after reconstitution.
Understanding tirzepatide: what makes it different
Tirzepatide is not just another GLP-1 agonist. It is a dual GIP/GLP-1 receptor agonist, meaning it activates two incretin hormone pathways simultaneously. This dual mechanism is what makes it remarkably effective for both blood sugar management and weight loss, and it is why reconstitution accuracy matters even more than with simpler peptides.
The GLP-1 component slows gastric emptying, suppresses appetite, and enhances insulin secretion in response to elevated blood sugar. The GIP component adds complementary effects on energy balance and fat metabolism that GLP-1 alone does not provide. Clinical trials from the SURMOUNT program demonstrated weight reductions of 16% to 22.5% over 72 weeks, depending on dose tier, making tirzepatide one of the most effective weight management medications studied to date.
The SURMOUNT-5 trial directly compared tirzepatide to semaglutide and found tirzepatide produced a 20.2% average weight reduction versus 13.7% for semaglutide at 72 weeks. That difference is not trivial. For a 250-pound person, it represents roughly 16 additional pounds of weight loss. Getting the full benefit of this powerful medication requires accurate dosing, which starts with proper reconstitution. If you are comparing these two medications, our detailed semaglutide vs tirzepatide comparison breaks down the differences comprehensively. And for dose equivalencies between the two, the tirzepatide vs semaglutide dosage chart provides side-by-side reference.
SeekPeptides tracks the latest research on tirzepatide and other GLP-1 receptor agonists, translating clinical trial data into practical guidance that helps our members make informed decisions about their protocols.
Special concentration scenarios
Pre-mixed liquid tirzepatide (already reconstituted)
Some compounding pharmacies ship tirzepatide in pre-mixed liquid form rather than lyophilized powder. If you received a vial that already contains liquid, do NOT add bacteriostatic water. The pharmacy has already reconstituted it to a specific concentration, which should be listed on the label (typically 5mg/ml, 10mg/ml, or 20mg/ml). Simply use the quick-reference unit conversion table above, find your concentration, and draw the corresponding units for your dose.
Compounding pharmacy concentrations (40mg/ml)
Some compounding pharmacies produce tirzepatide at 40mg/ml concentration, which is higher than what you would typically create through home reconstitution. At this concentration, dose volumes are very small. A 5mg dose requires only 12.5 units. A 10mg dose requires only 25 units. While convenient for injection volume, this concentration requires very precise measurement. A one-unit error equals 0.4mg, which becomes clinically meaningful at lower dose tiers. If your pharmacy provides this concentration, use a 0.3ml (30-unit) insulin syringe for maximum precision. Check the compound tirzepatide dosage chart for unit calculations specific to pharmacy-mixed concentrations.
Reconstituting for split doses
Some protocols call for splitting the weekly dose into two injections. For example, 10mg weekly might be split into 5mg twice per week. The reconstitution and charting process is identical. You just draw a smaller amount more frequently. Use the same charts, find the per-injection dose, and draw accordingly. Many people find that splitting doses reduces side effects, particularly nausea and GI discomfort, which tend to peak after a full weekly dose. The tirzepatide dosing guide covers split dosing strategies in detail.
Troubleshooting reconstitution problems
The powder will not dissolve
Give it time. Some tirzepatide formulations take 10-15 minutes to dissolve fully. Set the vial on a flat surface, come back in 10 minutes, and gently swirl again. If particles remain after 15 minutes of periodic gentle swirling, do not use the solution. Contact your pharmacy.
The solution looks cloudy
A properly reconstituted tirzepatide solution should be clear and colorless. Cloudiness can indicate denatured peptide, contamination, or improper reconstitution. Do not inject cloudy solution. Discard the vial and reconstitute a new one. If this happens repeatedly, contact your pharmacy about the product quality.
There are bubbles in the solution
Small bubbles are normal after reconstitution and are not harmful. They will rise to the surface and dissipate on their own. Large foam on top suggests the vial was shaken or the water was injected too forcefully. Let the foam settle before drawing a dose. Some air bubbles may be drawn into your dosing syringe. Tap the syringe with the needle pointing up and push the air out before injecting. Air bubbles in the syringe reduce your actual dose volume slightly, so removing them ensures accuracy.
You added too much or too little water
If you have not yet mixed (the water is just sitting on top of the powder), you can carefully draw some out with a syringe. But if the powder has already started dissolving, you are committed. Recalculate your concentration based on the actual volume you added, find the correct row in your chart, and use those unit numbers going forward. Write the actual concentration on the vial so you do not forget. If you suspect tirzepatide is not working for you, reconstitution errors are one of the first things to check.
How long does each vial last?
This depends on your dose and the total peptide in the vial. Here is a quick reference.
Vial size | At 2.5mg/week | At 5mg/week | At 7.5mg/week | At 10mg/week | At 15mg/week |
|---|---|---|---|---|---|
5mg | 2 weeks | 1 week | N/A | N/A | N/A |
10mg | 4 weeks | 2 weeks | 1.3 weeks | 1 week | N/A |
15mg | 6 weeks* | 3 weeks | 2 weeks | 1.5 weeks | 1 week |
30mg | 12 weeks* | 6 weeks* | 4 weeks | 3 weeks | 2 weeks |
60mg | 24 weeks* | 12 weeks* | 8 weeks* | 6 weeks* | 4 weeks |
*Exceeds 28-day stability window. Discard unused solution after 28 days regardless of remaining volume.
This chart makes the economics clear. If you are on 2.5mg weekly, a 30mg vial wastes peptide because you will discard most of it at the 28-day mark. A 5mg or 10mg vial is more appropriate for lower doses. Conversely, if you are on 15mg weekly, a 30mg vial only lasts 2 weeks, meaning frequent reconstitutions. A 60mg vial at that dose lasts 4 weeks, matching the stability window perfectly. The peptide cost calculator can help you determine the most economical vial size for your specific dose. And for those looking at long-term protocol costs, our guide on GLP-1 treatment duration provides context on how long these protocols typically run.
Comparing tirzepatide reconstitution to other peptides
If you have reconstituted other peptides before, tirzepatide follows the same basic principles with a few important differences.
Same as other peptides: The math is identical. Concentration equals milligrams divided by milliliters. Unit conversions follow the same U-100 syringe standard. Storage requirements (refrigerated, light-protected, 28-day limit) are similar. Gentle mixing rather than shaking applies to all peptides.
Different from other peptides: Tirzepatide doses are measured in milligrams, which tends to be larger than many research peptides measured in micrograms. This means reconstitution volumes are typically larger to maintain manageable concentrations. The titration schedule (increasing every 4 weeks) is more structured than many peptide protocols. And because tirzepatide is a larger, more complex peptide molecule (39 amino acids), it may be more sensitive to rough handling during reconstitution.
If you also reconstitute semaglutide, the process is nearly identical. The main difference is the dose ranges and concentrations. The semaglutide reconstitution chart provides the same type of reference for that medication. For general peptide reconstitution principles that apply to any peptide, our complete peptide reconstitution guide covers the universal fundamentals. And for those working with retatrutide, the retatrutide reconstitution chart follows the same format.
Tips for printing and using your chart
A reconstitution chart is only useful if you can access it at the moment you need it. Here are practical tips for making that happen.
Print on card stock. Regular printer paper gets wet, wrinkled, and unreadable in a bathroom environment. Card stock or laminated paper resists moisture and lasts months.
Laminate it. A few dollars at an office supply store buys a lamination pouch. A laminated chart can be wiped down with an alcohol swab, resists water damage, and lasts indefinitely.
Highlight your row. If you always use the same concentration, highlight that specific row on your printed chart. When you glance at it with a syringe in hand, your eyes go straight to the relevant numbers.
Tape it to your vial storage location. Inside the medicine cabinet, on the refrigerator door where you keep your vials, or inside the case you use to store supplies. The chart should be physically near your vials so you see it every time you reach for one.
Keep a digital backup. Screenshot the chart on your phone. Save it to your home screen. Email it to yourself. If the printed copy gets damaged, you have a backup ready to print again. The SeekPeptides reconstitution calculator is always available as a digital reference when charts are not accessible.
Update when you change vial sizes or concentrations. If your provider changes your protocol, print a new chart for your new vial size. Do not try to use a chart designed for one concentration with a different concentration. That single mistake has caused more dosing errors than almost anything else.
Insulin syringe reading guide
Since all the charts in this guide reference insulin syringe units, here is a quick primer on reading them accurately.
U-100 insulin syringes come in three sizes: 0.3ml (30-unit), 0.5ml (50-unit), and 1ml (100-unit). The markings differ by size.
30-unit syringe: Each small line equals 0.5 units. Numbered markings at 5, 10, 15, 20, 25, 30. This is the most precise syringe available and ideal for doses requiring half-unit accuracy. If your chart says 12.5 units, this syringe has the markings to measure it exactly.
50-unit syringe: Each small line equals 1 unit. Numbered markings at 5, 10, 15, 20, 25, 30, 35, 40, 45, 50. Good for doses that fall on whole-unit numbers. Half-unit doses require estimating between lines.
100-unit syringe: Each small line equals 2 units. Numbered markings at 10, 20, 30, 40, 50, 60, 70, 80, 90, 100. Best for larger doses. Single-unit precision is not possible with this syringe, as you are always estimating between the 2-unit markings.
When reading the syringe, hold it at eye level with the numbers facing you. The plunger edge (the black rubber stopper, not the rounded tip) should align with the marking for your desired dose. If the plunger sits between two lines, you are between those two unit values. For information on converting between 20 units of tirzepatide to milligrams or 40 units to milligrams, those articles provide concentration-specific conversion tables.
When to reconstitute a new vial
Knowing when to start a new vial is straightforward but important to get right.
Reconstitute a new vial when:
Your current vial is empty (obvious, but check by holding it up to light)
28 days have passed since reconstitution, regardless of remaining volume
The solution has become cloudy, discolored, or contains visible particles
The vial was accidentally frozen
The vial was left at room temperature for more than 48 hours
You suspect contamination (dropped vial, unclean needle entry, etc.)
When transitioning to a new vial, you have an opportunity to adjust your concentration if needed. Maybe your dose changed and a different concentration works better. Maybe you switched to a different vial size. Check your chart, choose the appropriate reconstitution volume, and label the new vial clearly. Keeping a log of your vial changes helps track your tirzepatide results over time and provides useful information for your provider.
Reconstitution for travel
Traveling with reconstituted tirzepatide requires some planning, but it is entirely manageable.
Keep it cold. A small insulated cooler bag with an ice pack maintains refrigerator temperatures for several hours. For flights, TSA allows medications through security. Carry a copy of your prescription and the original pharmacy label. Compounded tirzepatide in its labeled vial with a prescription typically passes through security without issues.
Pre-measure if possible. If you are traveling for just a few days and your dose falls within the trip, consider drawing your dose into a syringe before leaving home. A pre-filled insulin syringe takes up less space than a vial, water, and mixing supplies. However, drawn syringes should be used within a few hours for maximum accuracy and sterility.
Bring your chart. Keep a printed or digital copy of your reconstitution chart with your travel supplies. If you need to reconstitute a new vial while traveling, having the chart ensures accuracy even in unfamiliar surroundings. The temperature stability guide for tirzepatide provides detailed information on how long the medication remains viable outside refrigeration.
Switching vial sizes during treatment
As your dose changes during titration, you may switch to a different vial size. This is normal and usually driven by economics (less waste) and convenience (fewer reconstitutions at higher doses).
When switching, the critical thing to remember is that your chart changes. A 10mg vial reconstituted with 1ml gives you 10mg/ml. A 30mg vial reconstituted with 3ml also gives you 10mg/ml. Same concentration, same unit numbers. But if you switch vial sizes and also change your reconstitution volume (say, going from 10mg/ml with the old vial to 20mg/ml with the new vial), every number changes. Print the chart for your new concentration and replace the old one on your refrigerator. Do not have both charts posted simultaneously if possible, because reaching for the wrong one at injection time creates dosing errors.
For people switching between tirzepatide and semaglutide entirely, the semaglutide to tirzepatide dose conversion chart provides equivalent dose guidance, and the complete switching guide covers the transition protocol step by step. If you are exploring whether to switch, the conversion chart gives you a clear starting point for the discussion with your provider.
Tirzepatide side effects and dose accuracy
Accurate reconstitution and dosing directly affect side effects. The most common tirzepatide side effects are gastrointestinal: nausea, reduced appetite, and occasional GI discomfort. These effects are dose-dependent. A dosing error that gives you 5mg instead of 2.5mg (because you used the wrong concentration row on your chart) could produce significantly worse nausea than expected.
The titration schedule exists specifically to allow your body to adjust gradually. Each four-week period at a given dose lets your GI system adapt before increasing. If you accidentally take a higher dose due to reconstitution error, you skip that adaptation period, and side effects may be more severe. This is why charts matter. This is why printing them and posting them where you prepare your dose matters. It is not just about getting the number right. It is about making the treatment tolerable so you can stay on it long enough to see results.
For people experiencing side effects even with accurate dosing, our guide on tirzepatide and anxiety covers one of the less-discussed side effects. And for those wondering about fatigue, does tirzepatide make you tired addresses energy-related concerns.
Working with your provider
These charts are tools for accuracy, not replacements for medical supervision. Your prescribing provider determines your dose, your titration schedule, and any modifications based on your individual response. The reconstitution process and the charts that support it are the mechanical execution of their clinical decision.
Bring your chart to appointments. Show your provider which concentration you use and how you draw your doses. If anything looks wrong to them, they can correct it immediately. Some providers also appreciate seeing your vial labels with dates and concentrations, as it helps them assess compliance and troubleshoot if results are not matching expectations.
If you are considering tirzepatide and want to understand the full landscape of GLP-1 options, the semaglutide vs tirzepatide comparison provides a comprehensive overview. For men specifically, our article on men before and after tirzepatide shows real-world outcomes. And for understanding the broader category, the peptides for weight loss guide covers every available option.
SeekPeptides members get access to detailed protocols, reconstitution guides, dosing calculators, and a community of people navigating the same questions. Whether you are on your first vial or your twentieth, having reliable references and knowledgeable support makes the entire process smoother and safer.
Frequently asked questions
How much bacteriostatic water do I add to a 10mg vial of tirzepatide?
The most common recommendation is 1ml of bacteriostatic water, creating a 10mg/ml concentration. This gives clean unit numbers on insulin syringes: 25 units for 2.5mg, 50 units for 5mg, 75 units for 7.5mg. You can also add 0.5ml for a 20mg/ml concentration (smaller injection volumes) or 2ml for a 5mg/ml concentration (easier to measure small doses). See the 10mg vial dosage chart for complete details.
Can I use sterile water instead of bacteriostatic water?
Sterile water works for single-use vials but should not be used for multi-dose vials. Bacteriostatic water contains 0.9% benzyl alcohol, which prevents bacterial growth through multiple needle punctures. Without this preservative, bacteria can grow in the solution after the first puncture. Always use bacteriostatic water for compounded tirzepatide vials used over multiple weeks.
How long does reconstituted tirzepatide last?
When stored properly in the refrigerator at 36-46 degrees Fahrenheit (2-8 degrees Celsius), reconstituted tirzepatide with bacteriostatic water remains stable for up to 28 days. Some compounding pharmacy labels specify shorter beyond-use dates, so always follow your pharmacy label. Discard any remaining solution after the specified period. Learn more about proper storage in our tirzepatide refrigeration guide.
What happens if I accidentally freeze my tirzepatide?
Discard it. Freezing permanently denatures the peptide structure, even if the solution looks normal after thawing. The damaged molecules will not provide the intended therapeutic effect, and potency is compromised. Always store in the main compartment of your refrigerator, away from the freezer section. The back of the middle shelf typically provides the most stable temperature.
Why are my unit numbers different from what my pharmacy told me?
Unit numbers depend entirely on concentration. If your pharmacy reconstituted the vial at a different concentration than what a chart shows, the numbers will differ. For example, your pharmacy might provide tirzepatide at 40mg/ml, which is not a concentration you would typically create at home. Always use the concentration listed on YOUR vial label when referencing any chart. When in doubt, use the reconstitution calculator with your specific concentration.
Can I reconstitute tirzepatide at room temperature?
Yes. In fact, allowing the vial to reach room temperature before reconstitution can improve dissolution speed. Cold powder dissolves more slowly than room-temperature powder. However, once reconstituted, the solution must be refrigerated promptly. Do not leave the reconstituted vial at room temperature for extended periods.
How do I know if my reconstituted tirzepatide has gone bad?
Signs of degraded tirzepatide include cloudiness, discoloration (yellow or brown tint), visible particles or fibers floating in solution, unusual odor, or reduced effectiveness at your established dose. If you notice any of these, discard the vial and reconstitute a fresh one. Tracking your expected tirzepatide results timeline helps you spot effectiveness changes that might indicate a degraded product.
What if my vial contains more or less powder than expected?
Compounded tirzepatide may appear as different amounts of powder depending on the manufacturing process, fillers, and lyophilization method. The total milligrams of active tirzepatide is what matters, and that is determined by the compounding pharmacy quality control, not the volume of powder you can see. As long as the vial label states the correct amount and you reconstitute accordingly, the charts remain accurate.
External resources
In case I do not see you, good afternoon, good evening, and good night. May your reconstitutions stay precise, your concentrations stay accurate, and your results stay consistent.