Jan 20, 2026

You're losing peptide potency every single day. Not because your source is bad. Not because the compound is unstable. Because of how you're handling that vial sitting in your refrigerator right now.
The problem runs deeper than most researchers realize. A single mistake during reconstitution can degrade 30-40% of your peptide before you even draw your first dose. Improper storage temperatures accelerate breakdown exponentially. And those tiny rubber particles floating in your solution? They came from punching through the stopper with the wrong technique.
Most guides skip over these details. They tell you to add water and refrigerate. Done. But the gap between "functional" and "optimal" peptide handling represents the difference between mediocre results and the outcomes you actually want from your research.
This guide covers everything. Vial selection and sizing. Reconstitution protocols that preserve maximum potency. Storage methods backed by stability data. Quality control techniques to verify what you're actually working with. The equipment you need, the mistakes to avoid, and the troubleshooting steps when something goes wrong. Whether you're new to research peptides or looking to optimize your existing protocols, the information here will transform how you approach every vial that crosses your bench.
Understanding peptide vials and their contents
Before you ever pierce a rubber stopper, you need to understand what you're working with. The white powder sitting at the bottom of that vial represents months of synthesis, purification, and quality control. How you treat it from this point forward determines whether those amino acid chains stay intact or fall apart.
Research peptides arrive in lyophilized form for good reason. Freeze-drying removes water from the peptide solution, leaving behind a stable powder that can survive shipping and storage without the rapid degradation that plagues liquid formulations. This process, called lyophilization, preserves the three-dimensional structure that gives each peptide its biological activity.
The vial itself matters more than most researchers appreciate. Standard research vials hold 2-3 milliliters, with the 3mL borosilicate glass vial being the industry standard for peptide compounds. This isn't arbitrary. The size provides enough headspace for proper reconstitution while keeping the powder cake accessible at the bottom.
Inside that vial, the lyophilized peptide forms a characteristic "cake" or "plug" of material. A well-manufactured peptide cake appears white to off-white, fluffy, and uniform. Some peptides form loose powder instead of a solid cake. Both presentations are acceptable. What matters is consistency and the absence of discoloration.
Common peptide amounts and concentrations
Peptide vials come in standardized amounts that reflect typical research needs. You'll encounter vials containing 1mg, 2mg, 5mg, 10mg, or 15mg most frequently. Some compounds, particularly those used at higher doses, come in 25mg or even 50mg presentations.
Understanding these amounts matters for calculating your dosing protocols. A 5mg vial contains 5,000 micrograms (mcg) of peptide. If your research protocol calls for 250mcg doses, that single vial provides 20 doses before exhaustion. The math seems simple, but getting it wrong wastes money and compromises research validity.
SeekPeptides members access detailed protocols that match specific vial amounts to research goals. The concentration you create during reconstitution determines everything about your dosing accuracy. Too dilute means drawing larger volumes. Too concentrated means measuring tiny amounts where small errors create big variations.
For most applications, reconstituting to achieve concentrations between 1-5mg per milliliter of solution works well. This range balances accuracy with practical volume constraints. A 5mg peptide reconstituted with 2mL of bacteriostatic water yields a 2.5mg/mL (or 2,500mcg/mL) concentration. Drawing 0.1mL of this solution delivers exactly 250mcg of peptide.
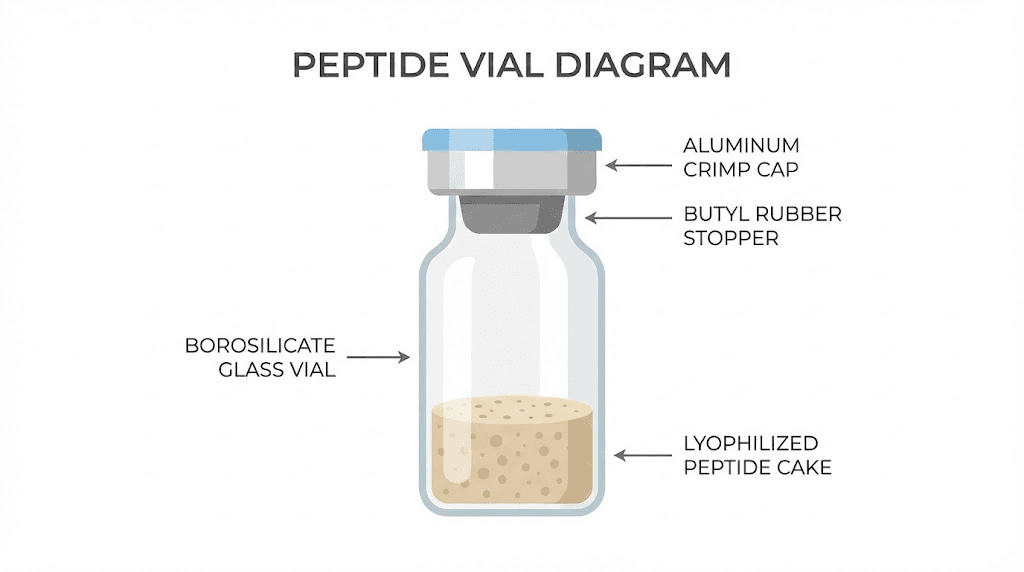
The rubber stopper and aluminum crimp
The rubber stopper sealing your peptide vial serves as the gateway for every reconstitution and withdrawal. Understanding this component prevents contamination and product loss.
Stoppers are made from butyl rubber or similar elastomeric materials designed to maintain seal integrity across multiple punctures. The target ring on top indicates where needles should pierce. Most stoppers tolerate approximately 10 punctures before seal degradation becomes concerning, though this varies with needle gauge and technique.
The aluminum crimp cap holds the stopper firmly against the glass vial. This seal prevents atmospheric exposure and maintains the partial vacuum created during lyophilization. Some vials arrive with positive pressure, others with negative pressure. You'll address this during reconstitution.
Coring represents the primary stopper-related risk. When a needle punches through rubber incorrectly, it can carve out a small fragment that falls into your solution. These particles contaminate the peptide and create injection safety concerns. Proper technique, which we'll cover shortly, minimizes this risk.
Essential equipment for peptide research
Gathering the right supplies before starting any peptide protocol saves time, prevents contamination, and ensures accurate results. Skipping items or substituting inappropriate alternatives compromises everything you're trying to accomplish.
The equipment list isn't long. But each item serves a specific purpose that cheaper or improvised alternatives cannot replicate. Investing in proper supplies costs far less than wasting peptide through poor handling.
Syringes and needles
You'll need two distinct syringe types for peptide work. The first, larger syringe handles reconstitution tasks. A 3mL Luer-Lock syringe with an 18-gauge or 23-gauge needle efficiently draws bacteriostatic water from its container. The Luer-Lock connection prevents accidental needle detachment during use.
The second syringe type measures and delivers peptide solutions. Insulin syringes with permanently attached needles work best here. These come in 0.3mL, 0.5mL, and 1mL sizes. The fine gauge needles, typically 29-31 gauge, cause minimal discomfort and reduce rubber stopper damage during withdrawal.
Choosing the right insulin syringe size matters for accuracy. If your typical draw falls between 6-12 units, a 0.3mL syringe provides better precision than a 1mL syringe. The markings spread across less total volume, making small measurements visually clearer.
Never reuse syringes or needles. Single-use means single-use. Each withdrawal from a peptide vial requires a fresh, sterile syringe. Each administration requires another fresh syringe.
And this isn't optional.
Contamination and infection risk make reuse unacceptable regardless of apparent convenience.
Bacteriostatic water versus sterile water
The choice between bacteriostatic water and sterile water determines how long your reconstituted peptide remains usable. This isn't a minor consideration.
Bacteriostatic water contains 0.9% benzyl alcohol, a preservative that inhibits bacterial growth. This allows multi-dose use over several weeks. The pH typically runs slightly acidic, around 5.7, which most peptides tolerate well. The benzyl alcohol concentration poses no toxicity concerns at the volumes involved in peptide research.
Sterile water lacks any preservative. Once opened, bacterial contamination risk becomes immediate and severe. Peptides reconstituted with sterile water should be used within 24 hours, even with refrigeration. For multi-dose vials, sterile water simply doesn't work.
The choice is clear for most research applications. Use bacteriostatic water. The extended stability and reduced contamination risk far outweigh the minimal cost difference. Purchase from reputable medical supply vendors only. Never use tap water, distilled water, or any non-pharmaceutical-grade solution.
Alcohol preparation pads
Individually wrapped 70% isopropyl alcohol pads serve multiple purposes during peptide handling. You'll use them to sterilize vial stoppers before each puncture, clean injection sites, and wipe down work surfaces.
Don't substitute household rubbing alcohol or reuse pads between different surfaces. The individual packaging maintains sterility until the moment of use. After wiping a surface, discard the pad immediately.
Some researchers use larger alcohol prep squares when cleaning broader work areas. Either format works, provided the alcohol concentration stays at 70%. Higher concentrations evaporate too quickly to provide adequate bacterial kill time.
Sharps container
Every used needle and syringe needs proper disposal. FDA-cleared sharps containers prevent accidental needle sticks and comply with waste disposal regulations. Never throw loose needles in regular trash.
Keep your sharps container within arm's reach of your preparation area. Immediately after each use, deposit the syringe directly into the container. Don't recap needles unless necessary, and never reach into a sharps container for any reason.
Clean workspace and optional equipment
A clean, well-lit workspace forms the foundation of proper peptide handling. You don't need a laboratory. A cleared countertop, wiped down with alcohol, suffices for most research applications.
A laminar flow hood provides the gold standard for sterile work but isn't required for typical peptide reconstitution. If available, use it. If not, work in a draft-free area away from potential contamination sources.
Optional equipment that improves your protocol includes nitrile gloves for handling vials, a small refrigerator dedicated to peptide storage, and a timer for tracking reconstitution soak periods. None of these are strictly necessary, but each adds a layer of protection.
The complete reconstitution protocol
Reconstitution transforms your lyophilized peptide from stable powder into usable solution. Do it wrong and you've just destroyed weeks of anticipated research. Do it right and your peptide maintains maximum potency through every dose.
The process takes about five minutes of active work. Rushing through it gains nothing and risks everything. Follow each step precisely.
Temperature equilibration
Before adding any liquid, let your peptide vial reach room temperature. This takes approximately 15 minutes after removal from freezer storage, slightly less from refrigeration.
Why does this matter? Adding room-temperature water to a freezing vial creates thermal shock. The rapid temperature change can cause protein precipitation, visible as cloudiness or particles in your solution. This represents peptide that's no longer bioavailable.
Similarly, your bacteriostatic water should be at room temperature. Both components at the same temperature minimizes stress on the peptide structure during dissolution.
Don't accelerate warming by placing vials in warm water or using heat. Let time do the work naturally.
Pressure equalization
The lyophilization process creates variable pressure inside sealed vials. Some contain a vacuum. Others hold positive pressure. Neither condition allows smooth reconstitution without first equalizing pressure with the environment.
Here's the technique. Clean the vial stopper with an alcohol swab and let it dry for a few seconds. Insert the needle of a syringe containing a small amount of air, about half the syringe volume, through the stopper. The syringe will either draw in additional air or push air out, depending on the internal pressure.
Once pressure equalizes, remove this syringe. Now you're ready to add your reconstitution solution without fighting against pressure differentials that cause solution to spray or resist entry.
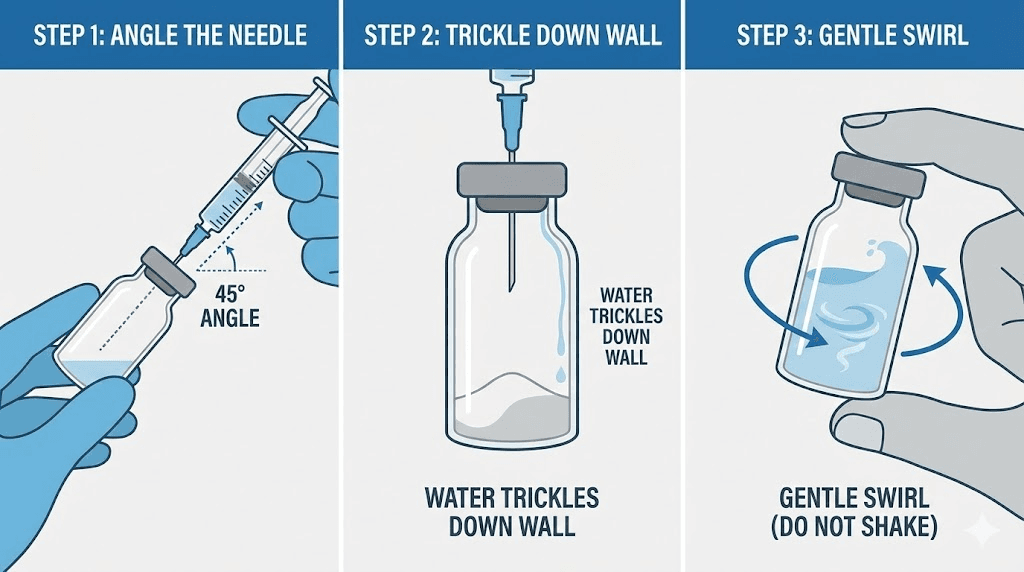
Adding bacteriostatic water
Calculate your target concentration before drawing any water. Using the peptide reconstitution calculator at SeekPeptides simplifies this math. Enter your peptide amount, desired concentration, and the calculator tells you exactly how much water to add.
Draw the calculated volume of bacteriostatic water into your reconstitution syringe. Clean the peptide vial stopper again with a fresh alcohol swab. Insert the needle at a 45-degree angle, with the bevel (the slanted opening) facing up, away from the stopper.
This angle matters. It reduces coring risk and directs the water stream appropriately. As the needle penetrates, slowly increase to 90 degrees just as the bevel clears the stopper.
Now, here's the critical part. Don't blast water directly onto the peptide cake. Angle the needle so water trickles down the inner glass wall of the vial. This gentle approach prevents physical disruption of the peptide structure.
Depress the plunger slowly. Very slowly. Let the water saturate the cake from the bottom up. Rushing this step creates foam, denatures peptide, and reduces potency.
Dissolution without agitation
After adding water, resist every urge to shake the vial. Shaking creates micro-bubbles and surface tension forces that literally tear apart amino acid sequences. This process, called denaturation, permanently destroys peptide activity.
Instead, gently swirl the vial. Think of the motion you'd use swirling wine in a glass. Slow, circular movements let the water and peptide interact without violent agitation. If the peptide doesn't fully dissolve immediately, set the vial aside.
Most peptides dissolve completely within a few minutes of gentle swirling. Some require up to 30 minutes. Very rarely, certain peptide sequences need hours to fully dissolve. Check periodically, swirl gently, and be patient.
The final solution should be clear and colorless. No particles. No cloudiness. No foam. If you see any of these, something went wrong. Cloudiness that persists after 12 hours indicates precipitation. Hair-like strands suggest contamination. Either scenario means discarding the vial.
Troubleshooting dissolution problems
Sometimes peptides resist dissolving despite proper technique. Several factors can cause this, and each has solutions.
Hydrophobic peptides, particularly those with many non-polar amino acids, may not dissolve well in plain water. For these sequences, briefly adding a small amount of dilute acetic acid or DMSO can help solubilize the peptide before diluting with water. Check manufacturer recommendations for specific compounds.
pH can affect solubility. Some peptides dissolve better at slightly acidic or basic pH. Again, specific guidance for your particular peptide takes precedence over general protocols.
If your peptide forms a gel-like mass instead of dissolving, the concentration may be too high. Adding more water reduces the concentration and often resolves the issue. This is why starting with a lower concentration target provides flexibility.
Persistent precipitation after troubleshooting attempts usually indicates damaged peptide. Exposure to heat, light, or moisture before reconstitution can cause irreversible aggregation. At that point, the vial should be discarded rather than forcing a compromised solution into research use.
Proper storage protocols
How you store peptides, both before and after reconstitution, determines how long they maintain potency. Get storage right and your compounds remain effective for months. Get it wrong and degradation begins within days.
Temperature control forms the foundation of peptide storage.
But temperature alone doesn't tell the whole story. Humidity, light exposure, and container integrity all influence long-term stability.
Lyophilized peptide storage
Unopened, lyophilized peptides maintain stability for extended periods under appropriate conditions. The absence of water virtually eliminates hydrolysis, the primary degradation pathway for dissolved peptides.
For long-term storage, keep lyophilized peptides at -20°C to -80°C. A standard freezer works fine for most applications. At these temperatures, properly sealed peptides remain stable for years. Some manufacturers guarantee 4+ years of shelf life under optimal freezer storage.
Short-term storage at refrigerator temperatures (2-8°C) works for periods up to 12-24 months. If you plan to use a peptide within that window, refrigeration provides convenient access without the freeze-thaw considerations that complicate freezer storage.
Room temperature storage is acceptable during shipping and brief handling periods. However, extended room temperature exposure accelerates degradation. Don't leave lyophilized peptides sitting on your desk for days.
Humidity and moisture protection
Lyophilized peptides are hygroscopic, meaning they absorb moisture from surrounding air. This property makes humidity control essential, even for dried material.
Store peptides in airtight containers when possible. Adding desiccant packs to storage containers provides extra protection against moisture infiltration. Some researchers use desiccator cabinets for particularly valuable or sensitive compounds.
When removing a vial from freezer storage, let it warm to room temperature inside a desiccator or sealed bag before opening. This prevents atmospheric moisture from condensing on the cold peptide, which can initiate degradation before you've even begun reconstitution.
Light protection
Many peptide sequences contain amino acids susceptible to photo-oxidation. Tryptophan and tyrosine residues are particularly vulnerable to UV and visible light damage.
Store peptides in amber vials or opaque containers when possible. If your peptides arrive in clear vials, store them inside light-blocking containers or wrapped in foil. Keep storage refrigerators and freezers away from direct sunlight or bright laboratory lighting.
Light damage is cumulative. Brief exposure during handling won't destroy your peptide, but consistent exposure over time degrades potency incrementally.
Reconstituted peptide storage
Once you've added water, the stability equation changes dramatically. Dissolved peptides face hydrolysis, oxidation, and bacterial contamination risks that don't exist in lyophilized form.
Store reconstituted peptides at refrigerator temperature (2-8°C) for short-term use. Most compounds maintain acceptable potency for 3-8 weeks under refrigeration, though this varies by specific peptide. Some sensitive sequences degrade faster.
For longer storage, reconstituted peptides can be frozen at -20°C. At freezing temperatures, solution-phase degradation slows substantially. Peptide solutions typically remain stable for 3-4 months frozen.
However, freezing introduces a new problem: freeze-thaw cycles. Each time a frozen peptide solution thaws and refreezes, ice crystal formation can damage the peptide structure. Aggregation and precipitation become increasingly likely with repeated cycling.
Aliquoting to avoid freeze-thaw damage
The solution to freeze-thaw problems is simple: aliquot your reconstituted peptide into single-use portions immediately after preparation.
Rather than drawing doses from one vial repeatedly over weeks, divide the solution into multiple small containers. Each aliquot contains only what you need for one session or one day's research. Freeze all aliquots, then thaw only what you need, when you need it.
This approach requires more containers and slightly more preparation time. But it protects your peptide from the degradation that accumulates with every freeze-thaw event. For expensive or difficult-to-source compounds, aliquoting isn't optional.
Some researchers use small microcentrifuge tubes for aliquots. Others prefer single-dose syringes, prefilled and frozen individually. Either method works. The key is never returning thawed solution to the freezer.

Quality control and purity verification
You can follow every protocol perfectly and still get poor results if your starting material is substandard. Quality control isn't something that only manufacturers worry about. Researchers need to understand how purity is measured and what those measurements mean.
Two analytical methods dominate peptide quality assessment: High-Performance Liquid Chromatography (HPLC) and Mass Spectrometry (MS). Together, they provide complementary information about what's actually in your vial.
Understanding HPLC purity
HPLC separates components in a peptide sample based on their chemical properties, primarily hydrophobicity. When a sample passes through the HPLC column, different compounds elute at different times, creating distinct peaks on a chromatogram.
The main peak represents your target peptide. Additional peaks indicate impurities, which might include synthesis by-products, truncated sequences, or degradation products. Purity is calculated as the percentage of total peak area belonging to the main peptide peak.
A purity of 98% means that 98% of the material detected corresponds to the target peptide. The remaining 2% represents other compounds. For research applications, purities above 95% generally suffice. Higher purity matters most for studies where even minor impurities could confound results.
However, HPLC has limitations. Compounds with similar properties may co-elute, meaning they exit the column together and appear as a single peak. The purity percentage represents relative abundance among detected compounds, not absolute molecular purity.
Mass spectrometry confirmation
Where HPLC quantifies purity, mass spectrometry confirms identity. MS measures the mass-to-charge ratio of ionized molecules, effectively weighing individual peptide molecules.
The observed molecular weight should match the theoretical weight calculated from the amino acid sequence. A match confirms that the peptide sequence is correct. Deviations indicate errors in synthesis, unexpected modifications, or degradation.
MS can detect subtle changes that HPLC might miss. Oxidized methionine residues, deamidation products, and sequence errors all produce characteristic mass shifts. This makes MS essential for comprehensive quality assessment.
Together, HPLC and MS answer the two fundamental questions: Is this pure? Is this actually what it claims to be?
Certificates of analysis
Reputable peptide suppliers provide Certificates of Analysis (COA) with their products. These documents summarize quality control testing results and should accompany every vial you purchase.
A complete COA includes the peptide sequence, molecular weight, lot number, purity by HPLC, mass spectrometry confirmation, and testing date. Some COAs include additional data like peptide content (quantifying how much actual peptide versus salts and residual moisture), appearance description, and solubility information.
Learn to read COAs critically. A purity of "95%" sounds good, but check the context. Does that represent crude purity before further purification, or final product purity? What column conditions did the HPLC use? Does the MS data actually match the expected molecular weight?
Missing or vague COAs represent red flags. Legitimate manufacturers test their products and document results. Suppliers who can't or won't provide analytical data should be avoided.
Third-party testing labs offer independent verification for researchers who want additional assurance beyond manufacturer-provided data. This adds cost but provides peace of mind for critical applications.
Visual inspection of peptide quality
While analytical testing provides definitive quality assessment, visual inspection catches obvious problems before you invest time in reconstitution.
Lyophilized peptides should appear white to off-white. Yellow, brown, or other discoloration suggests degradation or manufacturing issues. Some peptides naturally have slight coloration, so compare against the COA description for expected appearance.
The cake or powder should look uniform. Excessive moisture, visible clumping, or sticky appearance indicates improper storage or seal failure. These signs suggest the peptide has absorbed atmospheric moisture and may have degraded.
After reconstitution, clear and colorless solutions indicate success. Persistent cloudiness, visible particles, or unusual odors all suggest problems. Fresh peptides have minimal to no smell. A foul or unusual odor indicates bacterial contamination or severe degradation.
Sterile technique and contamination prevention
Every time you pierce a vial stopper, you create an opportunity for contamination. Bacteria, fungi, and other microorganisms can enter the solution and proliferate, particularly in the nutrient-rich environment that dissolved peptides provide.
Sterile technique isn't about achieving hospital-grade cleanliness. It's about minimizing contamination risk through consistent, careful practices. The goal is reducing exposure to potential contaminants at every step.
Workspace preparation
Before handling any peptide materials, prepare your workspace. Clear unnecessary items from the area. Wipe surfaces with 70% isopropyl alcohol and allow them to dry completely before placing equipment or supplies on them.
Work in a draft-free area. Moving air carries particles that can contaminate open vials. Turn off fans, close windows, and position yourself away from heating or cooling vents.
A laminar flow hood provides the ideal environment if available. These devices create a continuous stream of filtered air that sweeps particles away from your work area. For most research applications, however, a clean, still workspace suffices.
Personal protective equipment
At minimum, wash your hands thoroughly before handling peptide materials. Soap and water for 20 seconds, then dry completely. This simple step reduces contamination risk substantially.
Nitrile gloves add another layer of protection. They prevent direct skin contact with vials and solutions while reducing transfer of oils and microorganisms from your hands. Change gloves if you touch non-sterile surfaces.
A lab coat protects your clothing from potential spills and reduces the amount of environmental debris that enters your workspace from your person. Closed-toe shoes and long pants round out basic laboratory attire.
Aseptic handling practices
The cardinal rule of sterile technique: never touch sterile surfaces. Don't touch needle tips, syringe plungers, vial openings, or any surface that will contact your peptide solution.
Before each vial puncture, wipe the stopper with a fresh alcohol swab and let it dry for a few seconds. Alcohol needs contact time to kill bacteria. Immediately puncturing a wet stopper reduces sterilization effectiveness.
Use each needle only once. Drawing bacteriostatic water requires one needle. Adding water to the peptide vial requires another needle. Withdrawing solution requires yet another needle. Yes, this uses more supplies. No, there's no safe alternative.
Return reconstituted peptides to refrigerated storage immediately after use. Don't leave vials sitting at room temperature while you attend to other tasks. Bacterial growth accelerates dramatically at warm temperatures.
Recognizing contamination
Despite best efforts, contamination sometimes occurs. Early recognition prevents using compromised material.
Visual changes often appear first. Cloudiness developing in a previously clear solution suggests bacterial growth. Visible particulates, color changes, or floating material all indicate contamination.
Odor provides another warning sign. Fresh peptide solutions have minimal smell. Bacterial contamination produces characteristic off-odors as microorganisms metabolize the solution components.
If you suspect contamination, discard the vial. Don't try to salvage it. Don't filter it and hope for the best. The risks of using contaminated material far outweigh the cost of replacement.
Dosage calculations and measurement
Accurate dosing separates meaningful research from guesswork. Every calculation error, every measurement mistake, introduces variability that can obscure your results. Taking time to understand the math and practice the techniques pays dividends in data quality.
Basic concentration calculations
The fundamental relationship is straightforward: dividing peptide amount by solution volume gives concentration. A 5mg peptide in 2mL water yields 2.5mg/mL (or 2,500mcg/mL).
Working in micrograms simplifies most peptide math. Since 1mg equals 1,000mcg, that same 5mg peptide contains 5,000mcg total. At 2,500mcg/mL concentration, drawing 0.1mL delivers 250mcg of peptide.
The peptide calculator tools available through SeekPeptides handle these calculations automatically. Enter your vial amount, reconstitution volume, and desired dose. The calculator returns exactly how much solution to draw.
For peptide-specific calculations, dedicated tools exist for common compounds. The BPC-157 dosage calculator, TB-500 dosage calculator, and semaglutide dosage calculator account for compound-specific considerations that general calculators might miss.
Understanding syringe measurements
Insulin syringes measure in units, where 100 units equal 1mL. This standardization comes from insulin dosing conventions but applies to any solution in the syringe.
At 100 units per milliliter, 10 units equals 0.1mL, 25 units equals 0.25mL, and so on. Using our earlier example of 2,500mcg/mL concentration, drawing 10 units (0.1mL) delivers 250mcg of peptide.
Syringe accuracy depends on volume. Measuring 5 units on a 1mL syringe introduces more relative error than measuring 50 units. If your typical doses fall in the 5-15 unit range, switch to a 0.3mL syringe where those same volumes occupy more of the scale.
Air bubbles in the syringe barrel affect measured volume. Always tap bubbles to the top and expel them before recording your measurement. The peptide solution should fill the barrel completely without air gaps.
Choosing reconstitution volumes
The volume of water you add determines your concentration, which in turn determines the volume needed for each dose. Strategic choice of reconstitution volume makes subsequent dosing easier and more accurate.
Consider a 10mg vial with a target dose of 250mcg. Reconstituting with 1mL creates a 10,000mcg/mL concentration. A 250mcg dose would require drawing just 0.025mL, or 2.5 units. That's hard to measure accurately.
Instead, reconstituting with 2mL yields 5,000mcg/mL. Now 250mcg requires 0.05mL or 5 units. Better, but still tight. With 4mL, concentration drops to 2,500mcg/mL, and 250mcg requires 0.1mL or 10 units. Much easier to measure precisely.
Balance accuracy against practical constraints. Larger reconstitution volumes improve measurement precision but also mean drawing more solution per dose. Very large volumes can exceed what syringes comfortably hold.
Whole number reconstitution volumes simplify mental math. Adding exactly 1mL, 2mL, or 3mL makes subsequent calculations straightforward compared to odd volumes like 1.7mL or 2.3mL.
Compound-specific dosing considerations
Different peptides have different dosing requirements based on their mechanisms, half-lives, and research protocols. Generic calculators provide starting points, but compound-specific guidance optimizes outcomes.
Growth hormone releasing peptides like CJC-1295 and Ipamorelin often use microgram-per-kilogram dosing tied to body weight. The peptide stack calculator helps coordinate multiple compounds when combining peptides in research protocols.
Healing peptides like BPC-157 and TB-500 follow different conventions. Some protocols specify flat doses regardless of body weight. Others adjust based on injury severity or healing goals.
Weight loss compounds like semaglutide and retatrutide use titration protocols that start low and increase gradually. The peptide cost calculator helps project total costs across extended protocols.
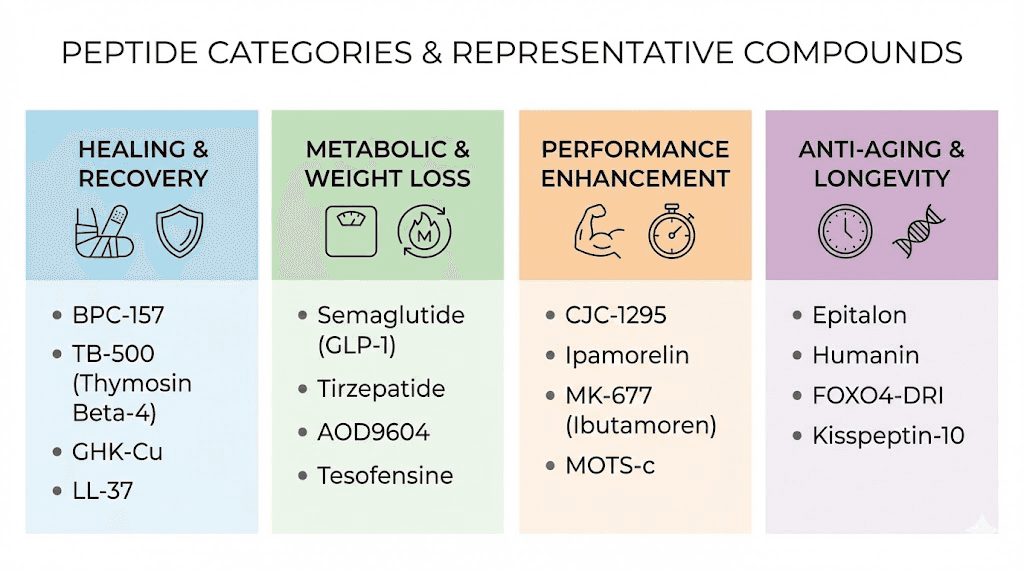
Working with specific peptide categories
Different peptide categories present unique handling considerations. What works perfectly for one compound might damage another. Understanding these differences optimizes your protocols for each specific material you work with.
Growth hormone secretagogues
Peptides in this category stimulate natural growth hormone release. They include compounds like Sermorelin, Ipamorelin, CJC-1295, and various combinations. These peptides generally handle reconstitution and storage well following standard protocols.
Most GH secretagogues dissolve readily in bacteriostatic water without special treatment. Their stability in solution ranges from good to excellent, with reconstituted material remaining viable for 4-8 weeks refrigerated.
Timing considerations matter for this category. Many GH releasing peptides work best at specific times relative to meals and sleep. Research protocols often specify fasted administration or nighttime dosing to align with natural hormone rhythms.
Healing and repair peptides
Body protection compound 157 and Thymosin Beta-4 derivatives fall into this category. These injury healing peptides support tissue repair, reduce inflammation, and accelerate recovery processes.
BPC-157 and TB-500 represent the most popular compounds here. Both reconstitute easily and maintain good stability in solution. The BPC-157 and TB-500 stacking guide provides detailed protocols for combining these compounds.
Some researchers choose oral BPC-157 formulations for gut health applications. Injectable forms require standard reconstitution, while oral preparations follow different handling guidelines.
Metabolic peptides
GLP-1 agonists and similar compounds target metabolic pathways related to appetite, blood sugar, and fat loss. Semaglutide, tirzepatide, and retatrutide dominate this category currently.
These peptides often require more careful handling than simpler sequences. Their larger molecular weights and complex structures can make them more susceptible to physical stress during reconstitution. Gentle swirling becomes especially important.
The comparison between semaglutide and tirzepatide helps researchers understand the differences between available options. Both require similar handling despite their distinct mechanisms.
Extended half-lives mean once-weekly dosing for many metabolic peptides, which simplifies protocol design but requires careful concentration planning to ensure accurate weekly doses.
Performance peptides
Compounds targeting muscle growth, athletic performance, and recovery fall into this broad category. IGF-1 variants, follistatin, and various peptide stacks all see use in performance research.
IGF-1 peptides like IGF-1 LR3 require acidic reconstitution for optimal stability. Pure bacteriostatic water may not fully dissolve these compounds. Adding a small amount of dilute acetic acid before diluting with water often improves results.
Storage temperatures matter more for this category. Some performance peptides degrade quickly at refrigerator temperatures and require freezer storage even after reconstitution.
Anti-aging and longevity peptides
Anti-aging peptides target cellular repair, DNA protection, and metabolic optimization. Compounds like Epitalon, SS-31, and MOTS-c exemplify this category.
Many anti-aging peptides contain oxidation-sensitive amino acids. Methionine and cysteine residues in these sequences require protection from light and oxygen. Amber vials and inert gas (nitrogen or argon) purging before storage extend stability.
GHK-Cu copper peptides represent a unique case. The copper ion bound to this peptide can interact with certain materials and requires specific handling considerations covered in dedicated protocols.
Cosmetic peptides
Peptides targeting skin tightening, hair growth, and other aesthetic outcomes often use different delivery methods than injectable research peptides.
Topical formulations require different preparation than injectable solutions. The peptide may need incorporation into creams, serums, or other vehicles that maintain stability while allowing skin penetration.
SNAP-8 and similar cosmetic peptides often come prepared in topical formulations rather than lyophilized powder. When working with raw material, special attention to pH and formulation compatibility becomes necessary.
Avoiding rubber stopper coring
Every needle puncture through a vial stopper creates risk.
Do it wrong and rubber fragments contaminate your solution. Do it repeatedly with poor technique and you'll eventually compromise the seal entirely.
Understanding coring physics helps you prevent it consistently.
The mechanics of coring
Coring occurs when a needle cuts through rubber rather than displacing it. The needle's bevel, that angled opening at the tip, acts like a tiny scalpel when inserted incorrectly. A perpendicular entry with the bevel facing down maximizes cutting action and coring risk.
Factors that increase coring likelihood include larger gauge needles, perpendicular insertion angles, dull or damaged needles, and repeated punctures in the same location.
The resulting rubber fragment can be microscopic or visible. Either way, it now floats in your peptide solution. Injecting rubber particles creates obvious safety concerns. Even particles that don't cause immediate problems compromise solution sterility.
The 45-90 degree technique
The most effective coring prevention technique involves angled insertion. Rather than pushing the needle straight through the stopper, you'll use a two-stage approach.
Start with the needle at a 45-60 degree angle relative to the stopper surface. Orient the bevel facing up, away from the rubber. The angled entry allows the needle to slide between rubber molecules rather than cutting through them.
Apply light pressure and begin advancing the needle. As it penetrates the stopper, gradually increase the angle toward 90 degrees. Complete the transition just as the bevel clears the inner surface of the stopper.
This technique dramatically reduces coring compared to perpendicular entry. Practice on a test vial if you're new to the method. The motion becomes natural after a few repetitions.
Needle selection for minimal coring
Smaller gauge needles core less than larger gauges. The trade-off is slower fluid transfer. Finding the balance point for your specific application optimizes both speed and safety.
For reconstitution where you need to add larger water volumes, an 18-23 gauge needle works efficiently. Use careful technique to minimize coring risk with these larger needles.
For solution withdrawal, insulin syringe needles (29-31 gauge) present minimal coring risk. Their small diameter simply doesn't cut rubber as effectively as larger needles.
Never reuse needles for this additional reason: dulled tips core more readily than sharp ones. Each puncture slightly damages the needle's cutting edge. Fresh needles for each vial access eliminates this cumulative risk.
Multi-dose vial considerations
Research peptide vials typically support multiple withdrawals. But "multiple" doesn't mean unlimited. Most rubber stoppers tolerate approximately 10 punctures before seal integrity becomes questionable.
Track your puncture count. Some researchers mark vials with a tally after each access. When approaching 10 punctures, plan to exhaust the remaining solution rather than storing a compromised vial long-term.
Puncture placement matters. Hitting the same spot repeatedly enlarges the hole and accelerates seal failure. The target ring on the stopper indicates the intended puncture zone. Within that zone, vary your needle placement across different accesses.
If you notice a puncture hole that doesn't reseal, appears enlarged, or leaks solution when the vial is inverted, the stopper has failed. Transfer remaining solution to a sterile container or use it immediately. Don't store peptide in a compromised vial.
Vial adapters as an alternative
For applications requiring many withdrawals from a single vial, vial adapters eliminate repeated stopper punctures. These devices attach to the vial once, creating a port for repeated syringe access without additional needle sticks through rubber.
Adapters are more common in clinical settings than research applications. Their cost makes sense for high-volume usage but may be excessive for typical peptide protocols that exhaust vials within a few weeks.
If coring has been a persistent problem in your work, vial adapters offer a definitive solution. The single initial puncture, made carefully with proper technique, eliminates all subsequent coring risk.
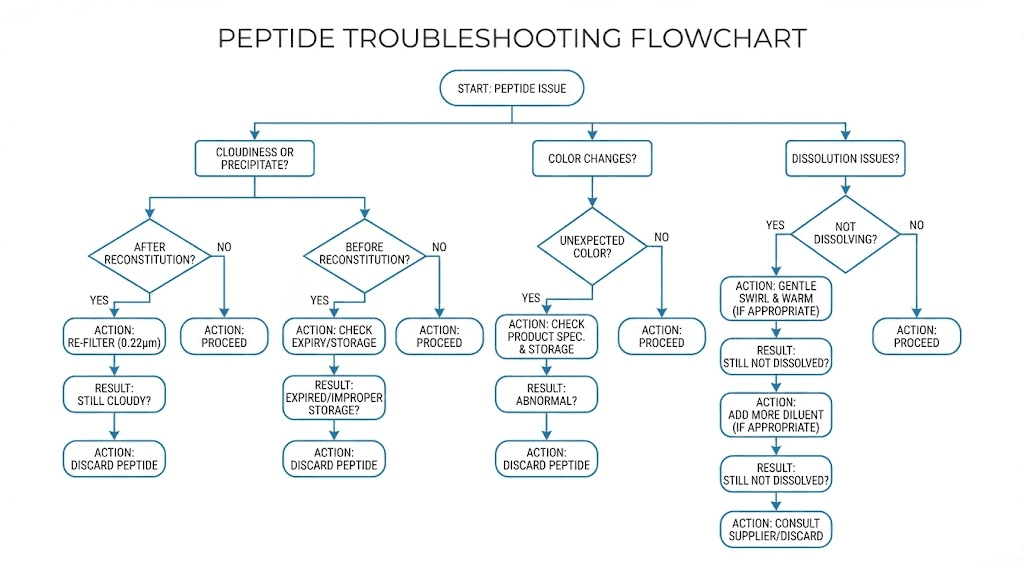
Troubleshooting common problems
Even with perfect protocols, problems occasionally arise. Recognizing issues quickly and understanding their causes helps you decide whether to troubleshoot or discard and start fresh.
Peptide won't dissolve
Some peptides resist dissolution despite proper technique. Before concluding the peptide is damaged, try these interventions.
First, give it more time. Some sequences require hours to fully dissolve. Set the vial aside, check periodically, and swirl gently at each check. Rushing forces the decision prematurely.
Second, consider solubility characteristics. Highly hydrophobic peptides may need help dissolving in water. A small amount of dilute acetic acid, added first, can break up these sequences before water dilution. Check manufacturer guidelines for compound-specific recommendations.
Third, verify temperature equilibration. Did you let the vial fully warm before adding water? Cold peptide and warm water interact poorly. Let both reach room temperature and try again.
If these interventions fail and the peptide remains undissolved after 24 hours with gentle swirling, the material may be damaged. Aggregated or degraded peptide often forms insoluble precipitates that won't respond to normal reconstitution.
Cloudy or particulate solution
Clear solutions can become cloudy through several mechanisms. Identifying the cause guides your response.
Immediate cloudiness after reconstitution suggests precipitation from thermal shock or pH incompatibility. If you rushed temperature equilibration, this is the likely cause. Unfortunately, precipitated peptide rarely redissolves successfully.
Cloudiness developing days after reconstitution indicates either bacterial growth or slow precipitation. Contaminated solutions may also develop unusual colors or odors. In either case, discard the vial.
Visible particles could be precipitated peptide, rubber fragments from coring, or external contamination. Regardless of source, particulate solutions shouldn't be used. The risk isn't worth the small amount of peptide you'd save.
Unexpected color changes
Peptide solutions should remain colorless throughout their useful life. Color changes signal degradation.
Yellowing indicates oxidation, often affecting tryptophan or tyrosine residues. This degradation is irreversible and reduces peptide potency. Light exposure accelerates oxidative color changes.
Brown or darker discoloration suggests more severe degradation or microbial contamination. These solutions should be discarded immediately.
Compare against expected appearance if documentation is available. Some peptides have slight natural coloration that's normal. Others should be perfectly clear. Know what your specific compound should look like.
Reduced apparent potency
Sometimes the peptide looks fine but doesn't produce expected effects. This apparent potency loss has several potential causes.
The peptide may have degraded invisibly. Not all degradation produces visual changes. A peptide that's lost 50% of its potency might appear identical to fresh material while delivering half the expected effect.
Calculation errors can produce similar apparent failures. If your math is wrong and you're actually dosing at half the intended level, results will disappoint regardless of peptide quality. Verify all calculations and measurements.
Source quality matters. Low-purity peptides contain less active material than labels suggest. If COA purity shows 85% and you calculated doses assuming 100% purity, actual delivered peptide is 15% less than intended.
Finally, peptide responses vary between individuals. What works dramatically for one researcher may produce subtle effects for another. Physiological variation isn't a peptide handling problem, but it can masquerade as one.
Injection site reactions
Redness, swelling, or irritation at injection sites can indicate several issues related to peptide handling.
Contaminated solutions cause injection site infections. Signs include increasing redness, warmth, and pain over time. This requires medical attention, not just protocol adjustment.
High concentrations can irritate tissues. If reconstitution produced a very concentrated solution, diluting further may reduce local reactions. Some peptides are inherently more irritating than others.
Improper injection technique contributes to reactions independent of peptide issues. Insufficient alcohol preparation, contaminated injection sites, or injecting too quickly can all cause problems. Review your administration technique alongside handling protocols.
Advanced considerations for experienced researchers
Once you've mastered basic peptide handling, several advanced techniques can further optimize your research outcomes. These aren't necessary for everyone, but dedicated researchers will find value here.
Inert gas purging
Oxidation degrades many peptides over time. Oxygen dissolved in solution and present in vial headspace drives these reactions. Replacing headspace air with inert gas slows oxidation substantially.
Nitrogen and argon both work well. After reconstitution and before sealing the vial for storage, gently flow inert gas into the headspace for several seconds. This displaces oxygen-containing air and creates a protective atmosphere.
Special equipment makes this easier but isn't strictly necessary. Small nitrogen or argon canisters with appropriate regulators and tubing allow controlled gas flow. Even canned air alternatives marketed for electronics cleaning can work if they contain nitrogen or argon rather than compressed air.
For oxidation-sensitive peptides containing methionine, cysteine, or tryptophan, inert gas purging noticeably extends solution stability.
pH adjustment and buffering
Most peptides tolerate the slightly acidic pH of bacteriostatic water without issues. Some sequences, however, benefit from specific pH conditions.
Acidic peptides may need slightly basic reconstitution medium to fully dissolve. Basic peptides may need the opposite. If a peptide consistently fails to dissolve in standard bacteriostatic water, pH adjustment could solve the problem.
Buffers maintain stable pH over time. Phosphate buffered saline (PBS) or similar buffer systems can replace or supplement bacteriostatic water for peptides requiring specific pH ranges. Match buffer choice to peptide requirements and intended storage duration.
This gets into chemistry territory quickly. Unless you understand pH, pKa values, and buffer chemistry, stick with standard bacteriostatic water and manufacturer recommendations. Incorrect pH adjustment damages peptides more often than it helps.
Carrier proteins and stabilizers
Some peptides benefit from added proteins that prevent surface adsorption and aggregation. Bovine serum albumin (BSA) at low concentrations protects certain peptides from sticking to glass vial walls and syringe surfaces.
This matters most for very dilute solutions where peptide loss to surfaces represents a significant percentage of total material. At higher concentrations, surface effects become proportionally less important.
Adding BSA or other carriers changes the solution composition and may introduce variables if research results depend on pure peptide solutions. Use carrier proteins when their stabilizing benefits outweigh any compositional concerns.
Long-term storage optimization
For researchers maintaining peptide libraries or working with materials that must last months to years, storage optimization becomes critical.
Lyophilized material lasts longest. Keep original vials sealed and frozen until needed. Reconstitute only what you'll use within the stability window rather than preparing large batches.
When long-term solution storage is necessary, multiple strategies help. Aliquot into single-use portions immediately. Store at the coldest practical temperature. Protect from light with amber vials or foil wrapping. Consider inert gas purging as discussed above.
Monitor stored materials periodically. Visual inspection catches obvious degradation. Maintaining records of appearance at storage and over time helps identify subtle changes.
Combination protocols and stacking
Many research protocols involve multiple peptides used together. Proper handling of peptide stacks requires understanding compatibility and practical considerations.
Some peptides can be mixed in the same syringe for administration. Others should remain separate due to stability concerns or incompatible optimal storage conditions. Research the specific combination you plan to use.
Timing matters for stacked protocols. Different peptides may have different optimal administration times relative to meals, sleep, or other factors. Coordinating these requirements can become complex.
SeekPeptides provides members with detailed stacking protocols that address compatibility, timing, and dosing considerations for popular combinations. This guidance helps researchers navigate the complexity of multi-peptide protocols.
Frequently asked questions
How long do reconstituted peptides last in the refrigerator?
Most reconstituted peptides maintain acceptable stability for 3-8 weeks at refrigerator temperatures (2-8°C) when prepared with bacteriostatic water. Specific compounds vary, with some lasting shorter or longer periods. Check manufacturer recommendations and inspect solutions regularly for signs of degradation including cloudiness, color changes, or unusual odors.
Can I freeze reconstituted peptides to extend their shelf life?
Yes, freezing reconstituted peptides at -20°C extends stability to 3-4 months for most compounds. However, freeze-thaw cycles damage peptides through ice crystal formation. Aliquot solutions into single-use portions before freezing and thaw only what you need. Never refreeze thawed peptide solution.
What's the difference between bacteriostatic water and sterile water for reconstitution?
Bacteriostatic water contains 0.9% benzyl alcohol preservative that inhibits bacterial growth, making it suitable for multi-dose vials over weeks of use. Sterile water lacks preservatives and becomes contaminated within 24 hours of opening. For peptides used across multiple doses over time, always use bacteriostatic water. Sterile water only makes sense for single-use applications.
How do I know if my peptide has gone bad?
Visual inspection reveals most degradation. Look for cloudiness, particulates, color changes (especially yellowing), or clumping in lyophilized material. Smell the solution, as bacterial contamination produces off-odors. Reduced apparent potency without visible changes suggests invisible degradation. When in doubt, discard and replace rather than risking compromised research.
Why won't my peptide dissolve completely?
Several factors can prevent complete dissolution. Temperature shock occurs when cold peptide contacts room-temperature water. Allow both to equilibrate before combining. Hydrophobic peptides may need acidic reconstitution first. Concentration may be too high for the peptide's solubility limit. If none of these apply, the peptide may be aggregated or damaged, preventing normal dissolution.
How do I calculate the right reconstitution volume?
Choose a volume that creates a concentration allowing convenient measurement of your target dose. For example, if you need 250mcg doses and have a 10mg vial, reconstituting with 2mL yields 5,000mcg/mL. Drawing 0.05mL (5 units) delivers 250mcg. Use the peptide reconstitution calculator for precise calculations.
Do peptides need to be refrigerated before reconstitution?
Yes, lyophilized peptides should be stored at freezer temperatures (-20°C to -80°C) for long-term stability. Refrigeration (2-8°C) works for shorter periods up to 12-24 months. Room temperature storage is acceptable during shipping and brief handling but shouldn't extend beyond a few days for optimal stability.
What gauge needle should I use for peptide vials?
For drawing bacteriostatic water and reconstituting, 18-23 gauge needles work efficiently. For withdrawing peptide solution, insulin syringe needles (29-31 gauge) minimize stopper damage and coring risk. Use the angled insertion technique regardless of needle size to reduce coring probability.
Can I mix different peptides in the same vial?
Some peptides can be combined safely, while others have stability or compatibility issues when mixed. Research your specific combination before mixing. Many researchers prefer keeping peptides in separate vials and combining only in the syringe immediately before use, which avoids any long-term compatibility concerns.
How many times can I puncture a peptide vial stopper?
Most rubber stoppers tolerate approximately 10 punctures before seal integrity becomes questionable. Use proper technique to minimize stopper damage with each access. Vary puncture location within the target ring. If a hole doesn't reseal or appears enlarged, transfer remaining solution or use immediately rather than storing further.
In case I don't see you, good afternoon, good evening, and good night.